When you use a VPN, you can be confident that spies and advertising aren’t snooping around your traffic, and that it won’t be intercepted by ne’er-do-wells, even if they’re on the same network as you. While VPN providers give apps to make it easier to set up their products, that isn’t the only way you may use it. In this guide, we will show you two different ways on how to set up and connect to a VPN on Windows 11 PC or laptop. But first, let’s have some basic information abou VPN.
Table of Contents
What do we mean by VPN?
A VPN, or Virtual Private Network, allows you to connect to another network securely via the Internet. VPNs can be used to access region-restricted websites, protect your browsing activities on public Wi-Fi from prying eyes, and much more.
VPNs are quite popular these days, but not for the reasons they were designed. Originally, they were merely a method to securely link corporate networks over the internet or to allow you to access a business network from home.
VPNs basically forward all of your network traffic to the network, which is where the benefits, such as distant access to local network resources and circumventing Internet restrictions, stem from. VPN functionality is built into the majority of OS systems.
Why do I need a VPN on my Windows 11 computer?
A VPN, in its most basic form, links your PC, smartphone, or tablet to another computer (called a server) somewhere on the internet, allowing you to access the internet via that computer’s internet connection. So, if that server is in a different nation, it will look as if you are from that country, and you may be able to access things that you would not normally be able to.
You can use a VPN to:
- Bypass geographic limitations on websites or audio and video streaming.
- View streaming media such as Netflix and Hulu.
- Protect yourself from eavesdropping on shady Wi-Fi networks.
- Hide your actual location to get at least some privacy online.
- While torrenting, protect yourself from being logged.
Many individuals nowadays use a VPN to torrent or to bypass geographic limitations in order to access content from a foreign region. They are still extremely handy for safeguarding oneself when working in a coffee shop, but that is far from their sole application.
Method 1. Set up a VPN on Windows 11 PC via Settings
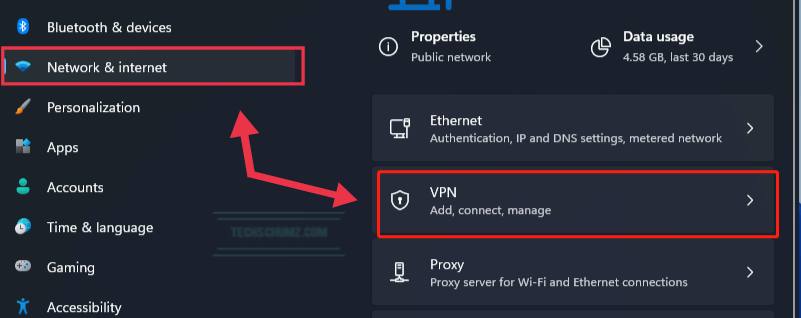
Step 1: To create a VPN using Windows 11 build in VPN, open the Settings app by using the “Windows + I” shortcut keys.

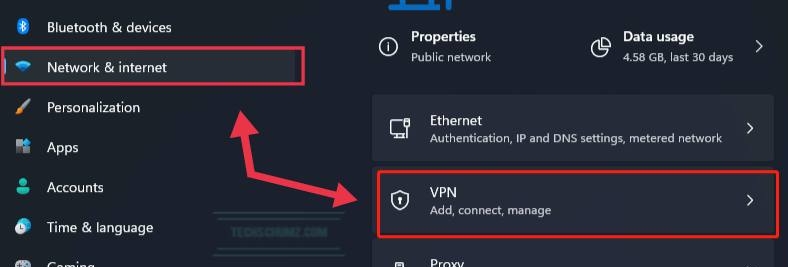
Step 2. Next, click the “Network and Internet” option on the left pane and On the right side, select “VPN”.
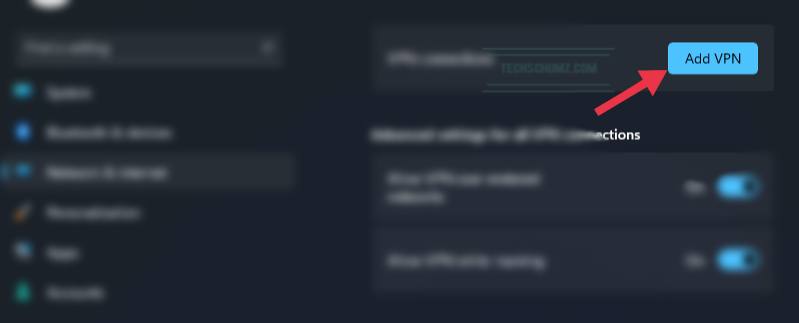
Step 3. Now, click on the “Add VPN” button.
Step 4: Now, you will see a VPN connection setting pop up. Here there are few parameters to set:
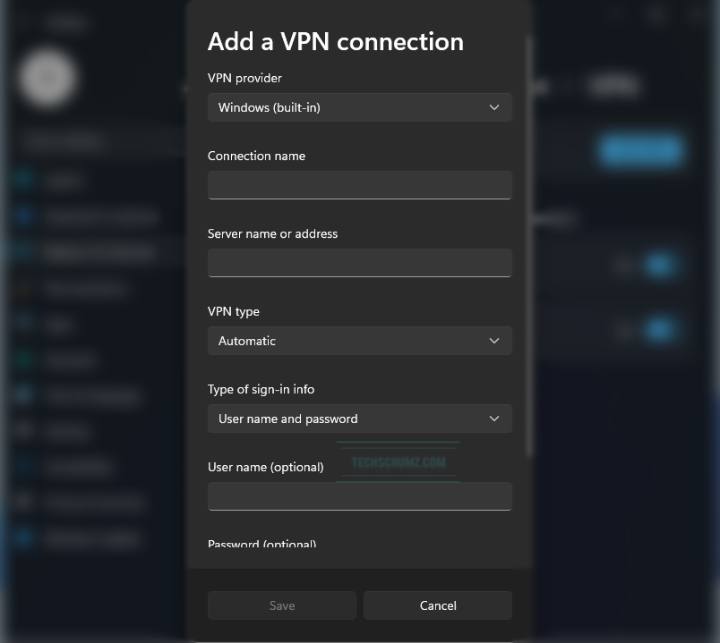
- VPN Provider: Default Windows (Built-in)
- Connection name: This is the name that will be used to identify the VPN; you may give it whatever name you like.
- Server name or address: This is given by the VPN company, and they may have many locations; input any of the service provider’s server locations.
- VPN Type: Automatic
- Type of Sign-in info: If it is a free connection with no user name or password, leave the remaining boxes blank. Use it in the fields below if it has a user name and password. There is also the option of using a smart card.
Step 5: Once you’ve added the VPN, it’ll be shown under VPN connections. To begin browsing in VPN mode, click the “Connect” button to connect to the created VPN.

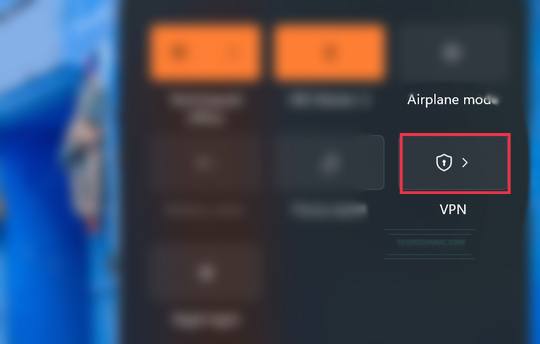
Step 6: You can also connect to a VPN on Windows 11 using the taskbar’s Quick Settings panel after you set up the VPN.
Method 2. Connect to a VPN on Windows 11 Via a Third-Party App
This is by far the simplest approach to set up a VPN on Windows 11. There are several VPN applications available on the market that you can use. However, we use NordVPN software for Windows since it provides excellent software for Windows PCs at an incredibly low cost. Follow the below steps to set it up and start using VPN:
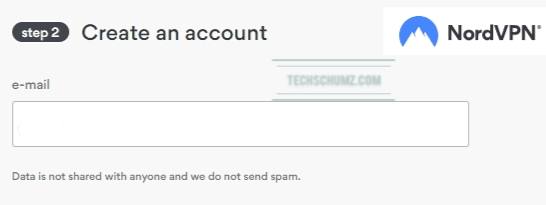
Step 1. Subscribe to the VPN and create an account in NordVPN
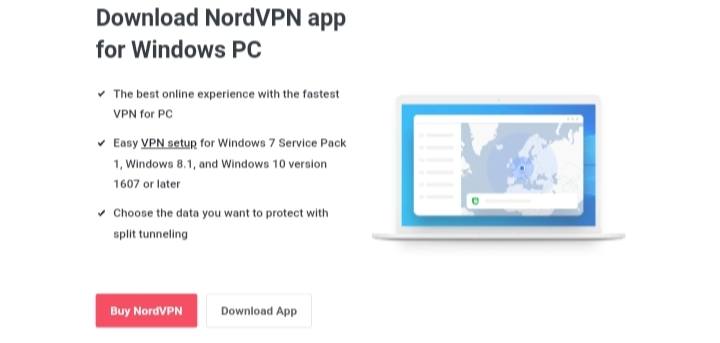
Step 2. Download the NordVPN software for Windows 11 from its official website.
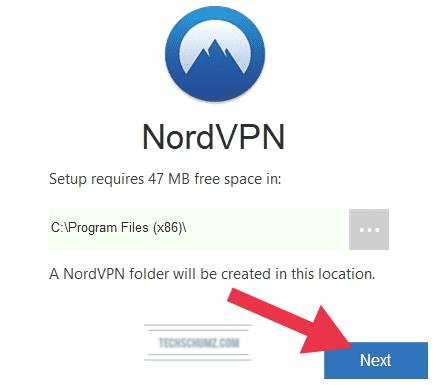
Step 3. Go to your Downloads folder and double-click the VPN .exe installation file to install the VPN on your machine.
Step 4. Agree to install any required components. (What you need to install will depend on your VPN provider but could include things like TAP drivers, for example.)
Step 5. Double click the icon on your desktop and log in using the credentials you created when subscribing.

Step 6. Once logged in, you are ready to start using the VPN.
How to disconnect and remove a VPN from Windows 11
If you no longer wish to use a VPN, or if you just want to delete a server from the list, you can disconnect or remove it entirely. There is a VPN button in the Windows 11 action center (the little speech bubble in the bottom-right corner of your screen) for quick on and off, but we’ll walk you through the whole process, which includes entirely removing a VPN from your system.
Step 1. To disconnect or remove a VPN, open the Settings app.
Step 2. Next, navigate to Network and Internet option on the left side, and on the right side, you can see the VPN option.
Step 3. Click a VPN connection you want to disconnect or remove, and click Disconnect.
Step 4. Click Remove, click remove again to confirm.

That’s all! The VPN you set up should now be uninstalled. You can always use the first set of steps to add a VPN again.
It’s worth noting that even if you manually configure a VPN on Windows 11, you can still use a different client without difficulty. You can always disconnect the manual connection, although it isn’t strictly required.
How to change protocols on a manual VPN setup
You cannot change the protocol of your VPN if it was set up manually. Instead, you must create a new manual connection (as described above) using the configuration information provided by your VPN provider (for the particular protocol that you want to change to). To accomplish this, contact your VPN provider and request the connection settings information you require, then proceed with the steps outlined above to establish a VPN connection to a server that uses a different protocol.
If you set up your VPN using the official Windows app, you can change the protocol by following the below steps:
- Use the VPN client for Windows to connect to the VPN.
- Click Settings.
- Select Encryption Options or Protocol Settings. This may be referred to differently in your VPN software, but it should be something similar.
- We recommend you to use OpenVPN UDP, OpenVPN TCP, IKEv2 or L2TP/IPsec because they are the most secure protocols available in 2021.
Final Words
Setting up a VPN server could be useful for connecting to your home network while on the road, playing LAN games with others, or securing your web browsing while using a public Wi-Fi connection. Here, you learned two easy ways to set up and connect to a VPN on Windows 11 PC or laptop, and also how to remove the added VPN from your computer. We hope you find this article useful, and if you encounter any question, please let us know.
Read also: