Windows is full of temporary files that help the operating system complete its work. Sometimes these file caches can get corrupted or become very large, affecting the performance of the computer.
If you are running low on storage space or notice any unusual behaviour on Windows 11, the first thing you can do is clear the cache. In this guide, I will show you how you can clear the cache on Windows 11 PC or laptop. Before going to the steps, first let’s have some information related to cache, its pros and cons.
Read also: How to Defrag Windows 11 Hard Drives
Table of Contents
What is a Cache in Windows 11?
A cache is a reserved storage location used to collect temporary data to help websites, browsers, and applications load faster. Be it a computer, laptop or mobile phone, web browser or application, you will find all kinds of caches.
Caching helps to retrieve data quickly, which in turn helps the device run faster. It acts as a repository, allowing you to easily access data locally without having to re-download it every time you visit a website or open an application.
Advantages of Caches
- Improved Performance: When storing local copies of website files, your browser only needs to download the information the first time you visit and may upload local files on subsequent visits.
- Saving more data: To help improve performance, the application caches recent and frequently used data. As mentioned above, this not only makes everything run faster but in some cases it can also make the application work “offline”.
- Storing data for later use: Downloading files only once is very efficient. If a copy of the file is cached, the application does not need to waste time, battery power, and other resources for the second download. Instead, the application only needs to download new or changed files.
Disadvantages of Caches
- It can Take up a lot of storage space: In principle, a cache is a small repository of files used by an app. But some caches can grow exceedingly large and limit the free space on your device.
- It can cause the app to behave badly: If there is a problem with the cache file, it may cause the application to display incorrect data, crash, or even crash.
- It can prevent apps from loading the latest version of a web page or other data: In theory, the application should only use the cache to display files that have not changed since the last access. However, this does not always work and sometimes the only way to see the latest version of the website or other information is to clear the cache, so the application is forced to download everything again.
Should You Clear the Cache on your Windows 11 Computer?
Given the cache’s downsides, it makes sense to clear the cache as part of regular maintenance on your Windows 11 PC. In addition to corrupted files, if the cache becomes too large or if your computer starts to run out of storage space, these issues can also affect the performance of your computer.
The advantages of clearing the cache include freeing up old storage space on your computer and deleting any files that may cause bad behaviour.
Unfortunately, clearing the cache also clears files designed to improve your computer’s efficiency. For example, clearing your browser’s cache generally means that you have to log into all of your favourite websites again, and you will lose any special customization or personalization settings there, including the shopping cart or the contents of the shopping cart.
However, if you’re having trouble with your Windows Computer, clearing the cache is worth it.
Different Ways to Clear the Cache on Windows 11
Clearing the cache in Windows is a good start to troubleshooting your system, improving system performance, and freeing up disk space. Here’s how to clear the cache on Windows 11.
1. Delete Unnecessary Files Cache on Windows 11 via Disk Cleanup
Disk Cleanup is a built-in utility for scanning cache files and other temporary system files that can be deleted.
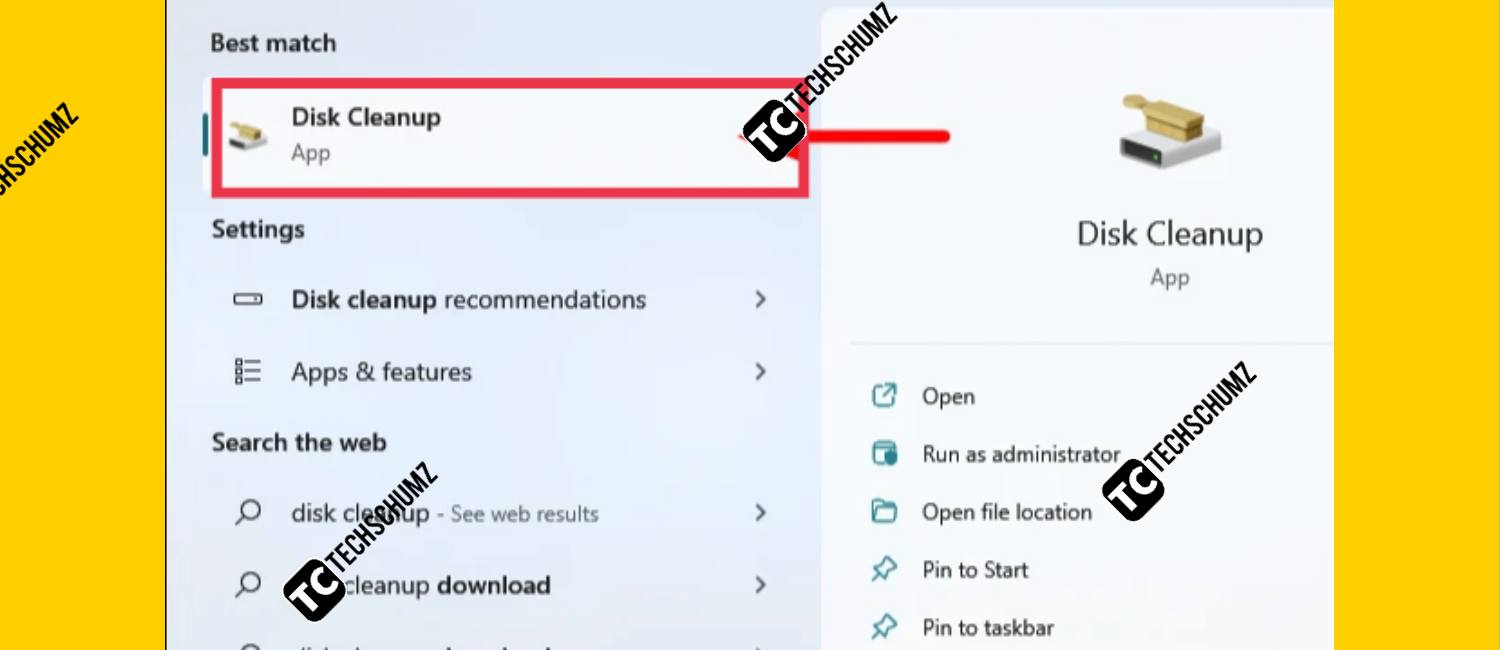
Step 1. To clear the system cache with Disk Cleanup, search for the app in the Search menu, and click on it to open it.
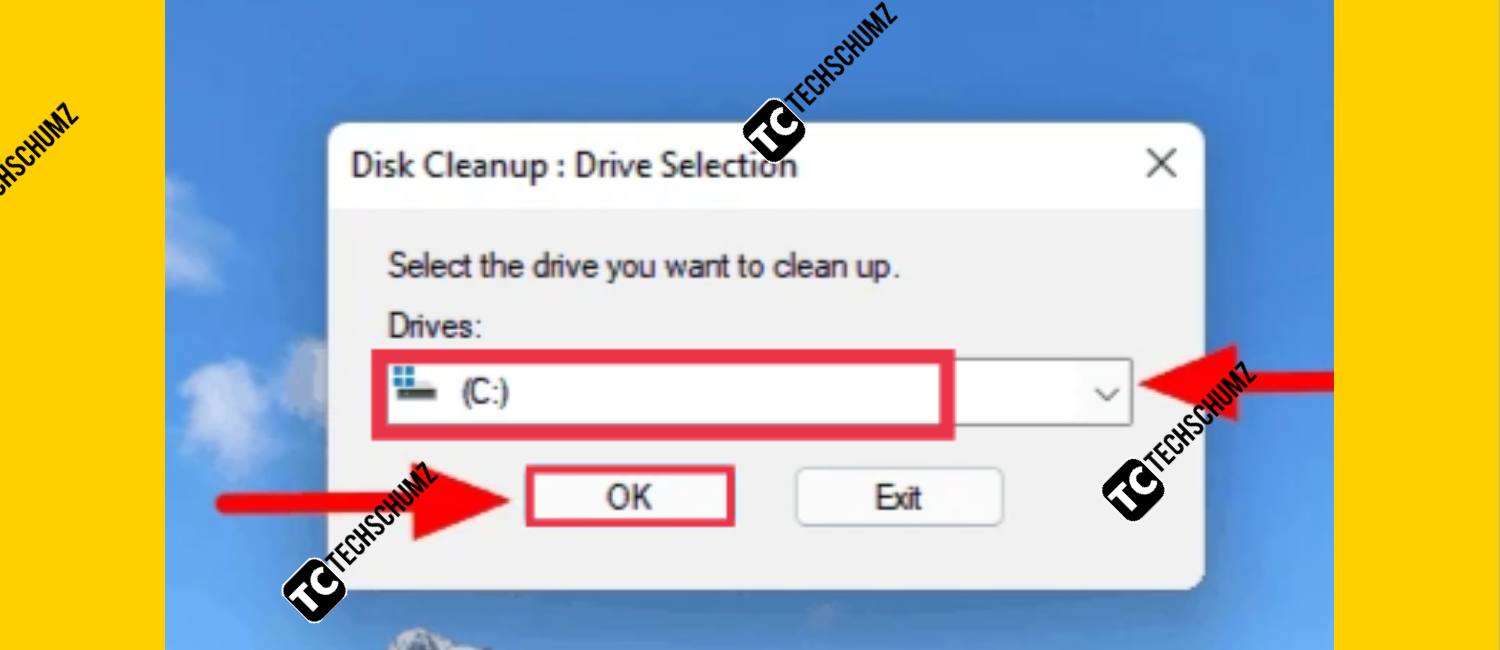
Step 2. Click on the drop-down menu, select the drive and then click on ‘OK’ at the bottom.
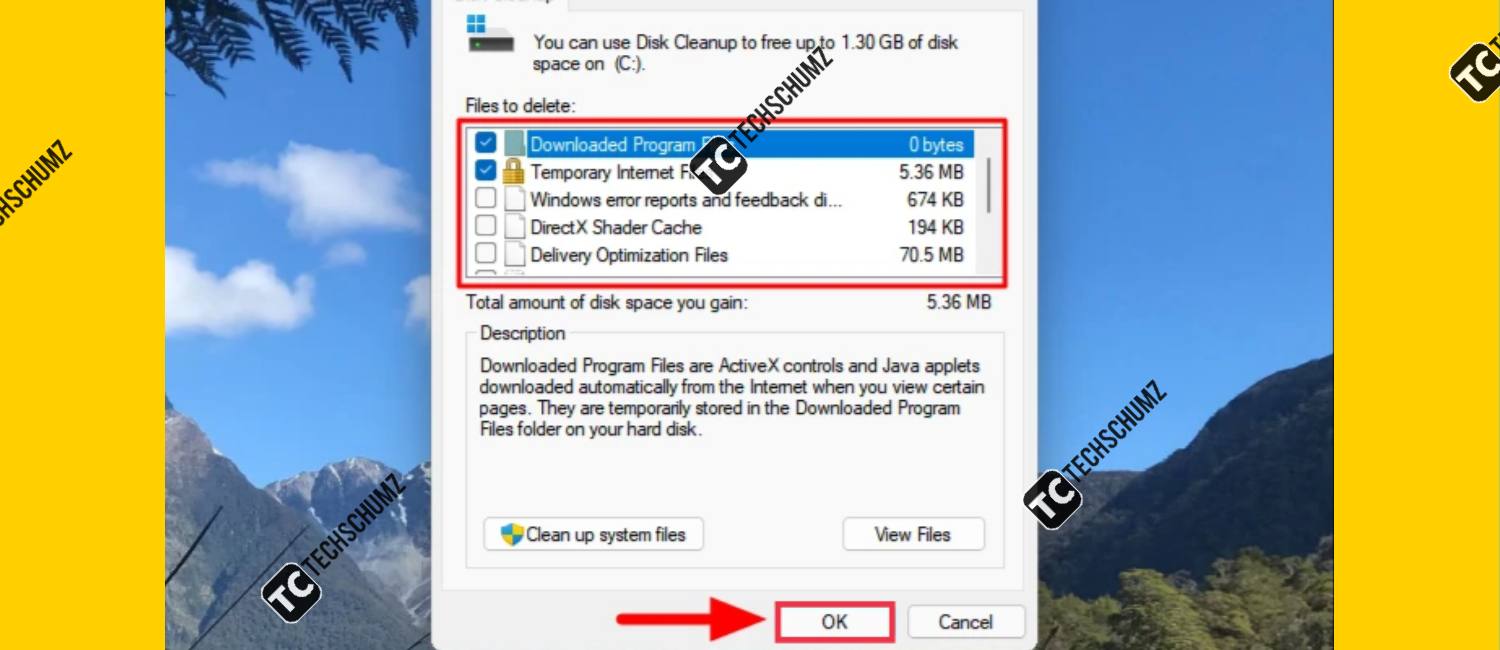
Step 3. Select the files that you want to delete and click on ‘OK’. Choose the appropriate response in case a confirmation box appears.
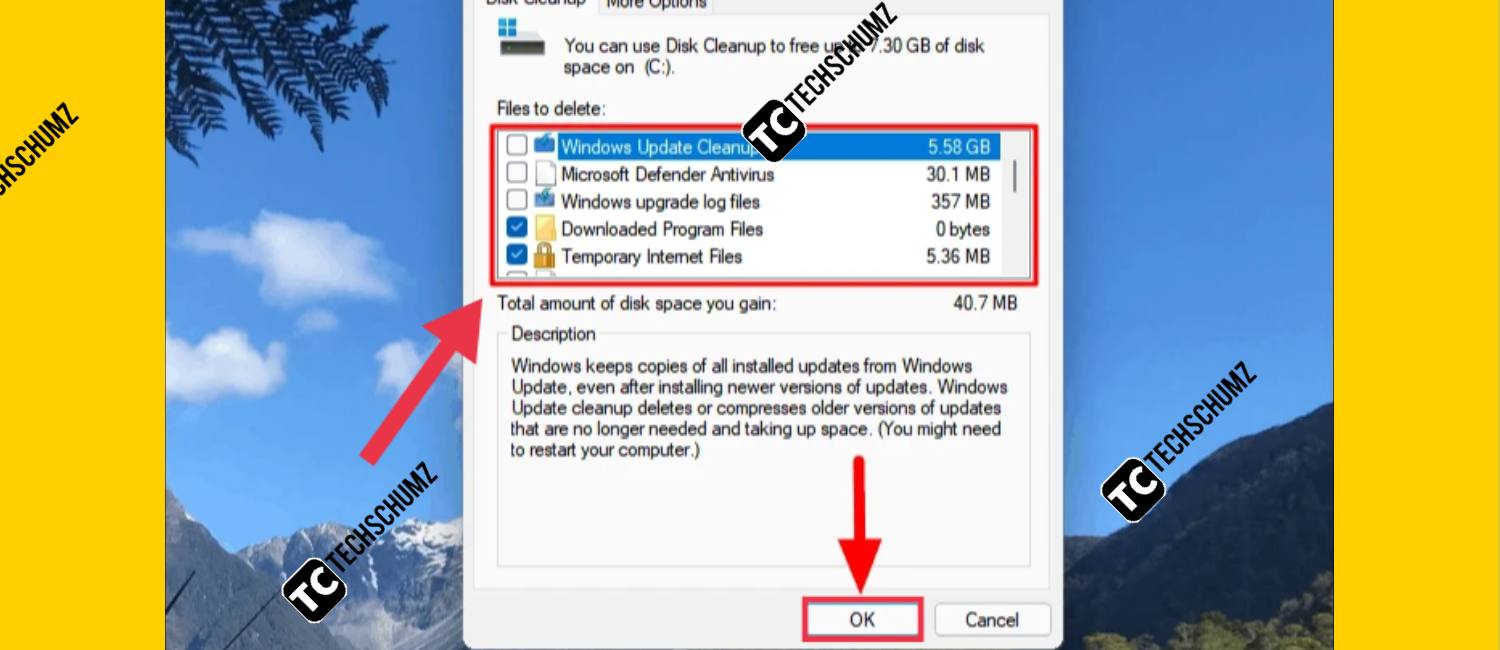
Step 4. To clear the system files, click on the ‘Clean up system files’ option, select the drive in which the system files are stored.
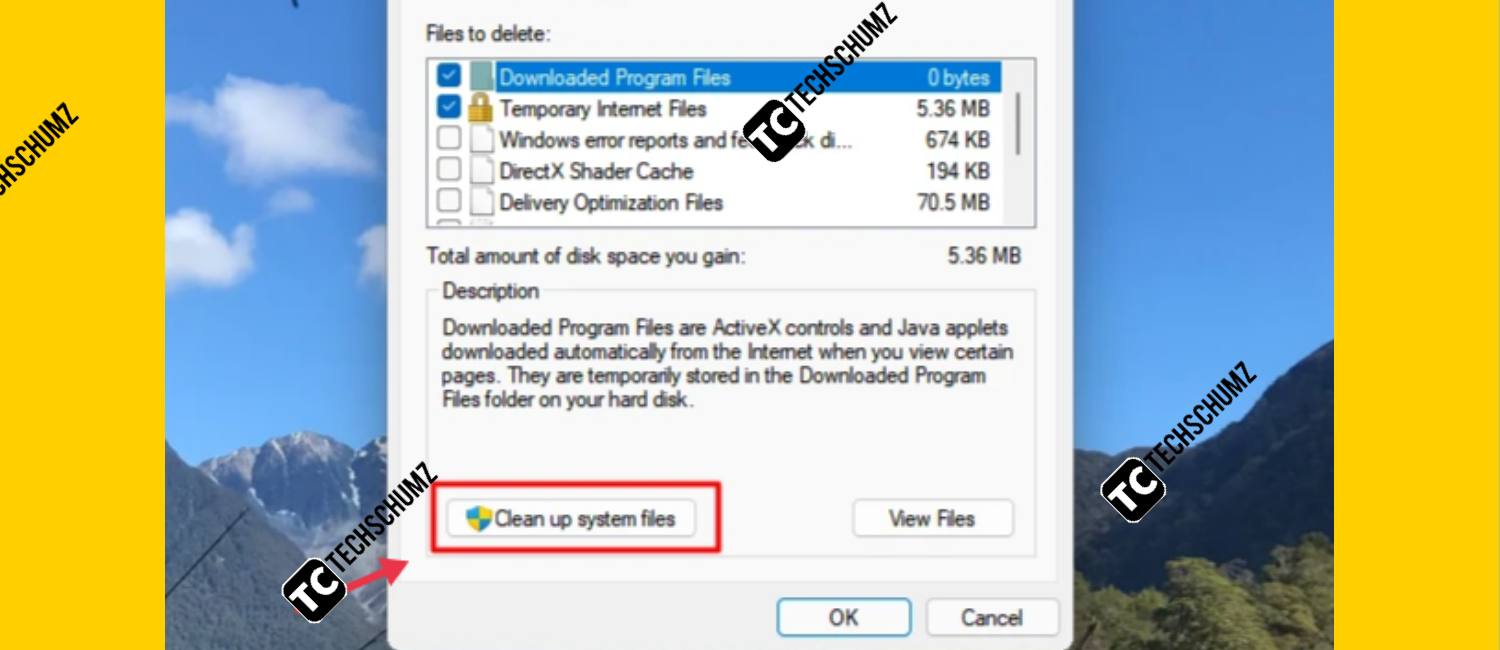
Step 5. Select the files that you want to delete and click on ‘OK’. Choose the appropriate response in case a confirmation box pops up.
2. Clear the Temporary Files via Settings
These files are created by the application while various tasks are running. Ideally, they should be automatically deleted after the task runs. However, this is not the case in most cases, and you must delete them manually.
There are certain other temporary files that are scattered throughout the system but can easily be cleared from the Settings.
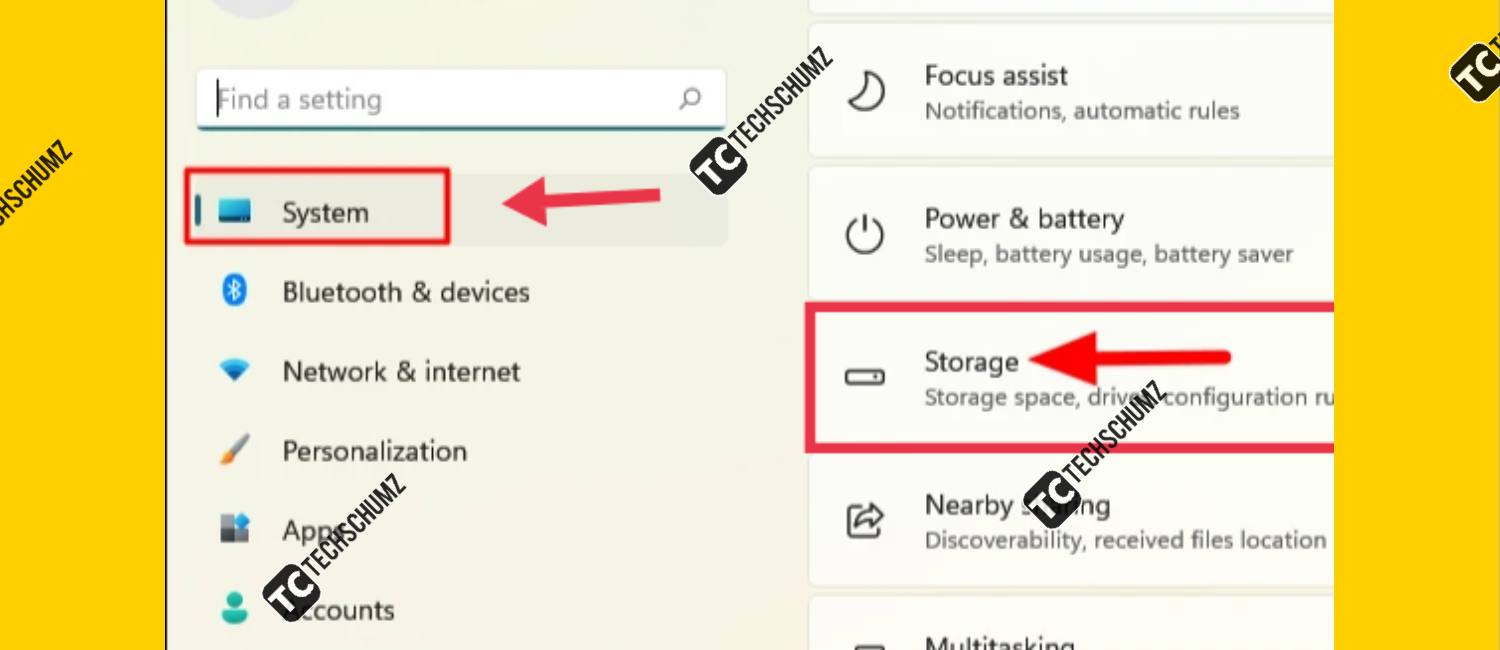
Step 1. To clear system cache via Settings, use Windows + I shortcut to open the Settings app.
Step 2. In the ‘System’ tab of Settings, scroll down on the right and select ‘Storage’.
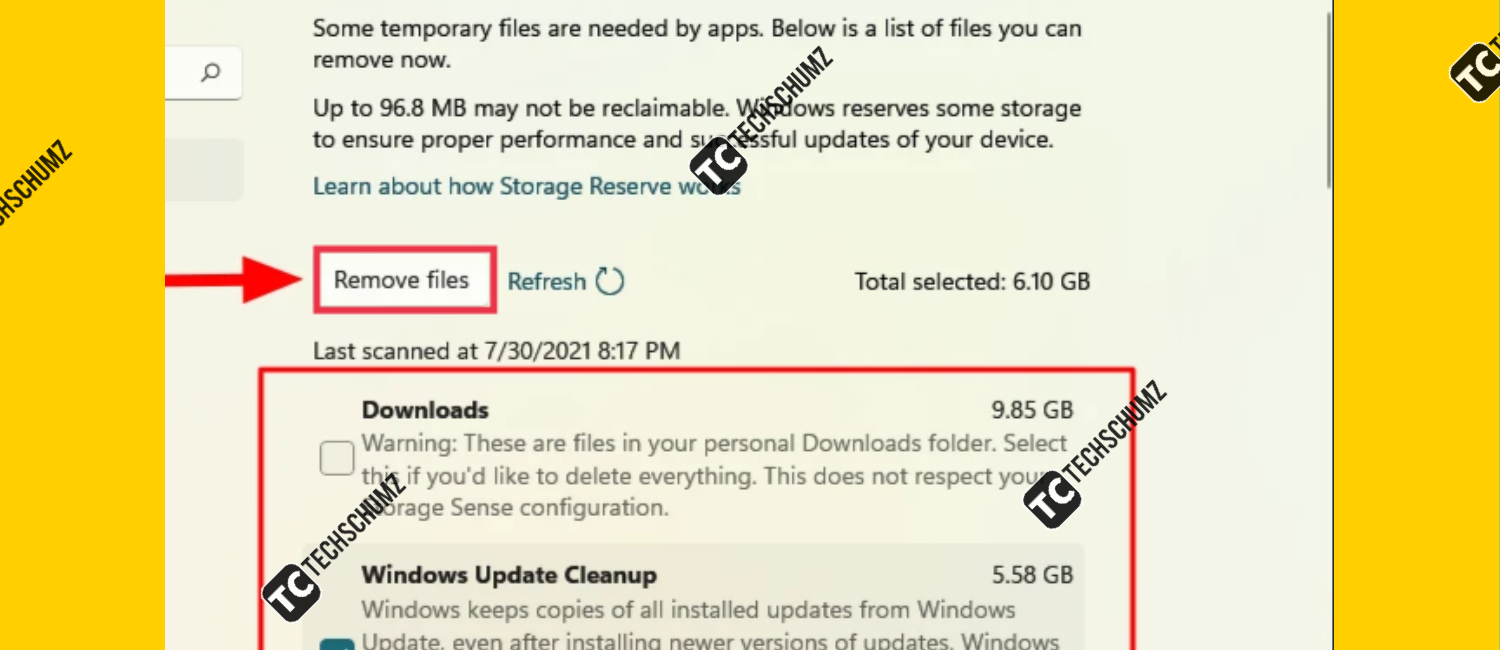
Step 3. Wait for Windows to scan and assess the temporary cache files stored on your system. Now, click on the ‘Temporary files’ option at the top.
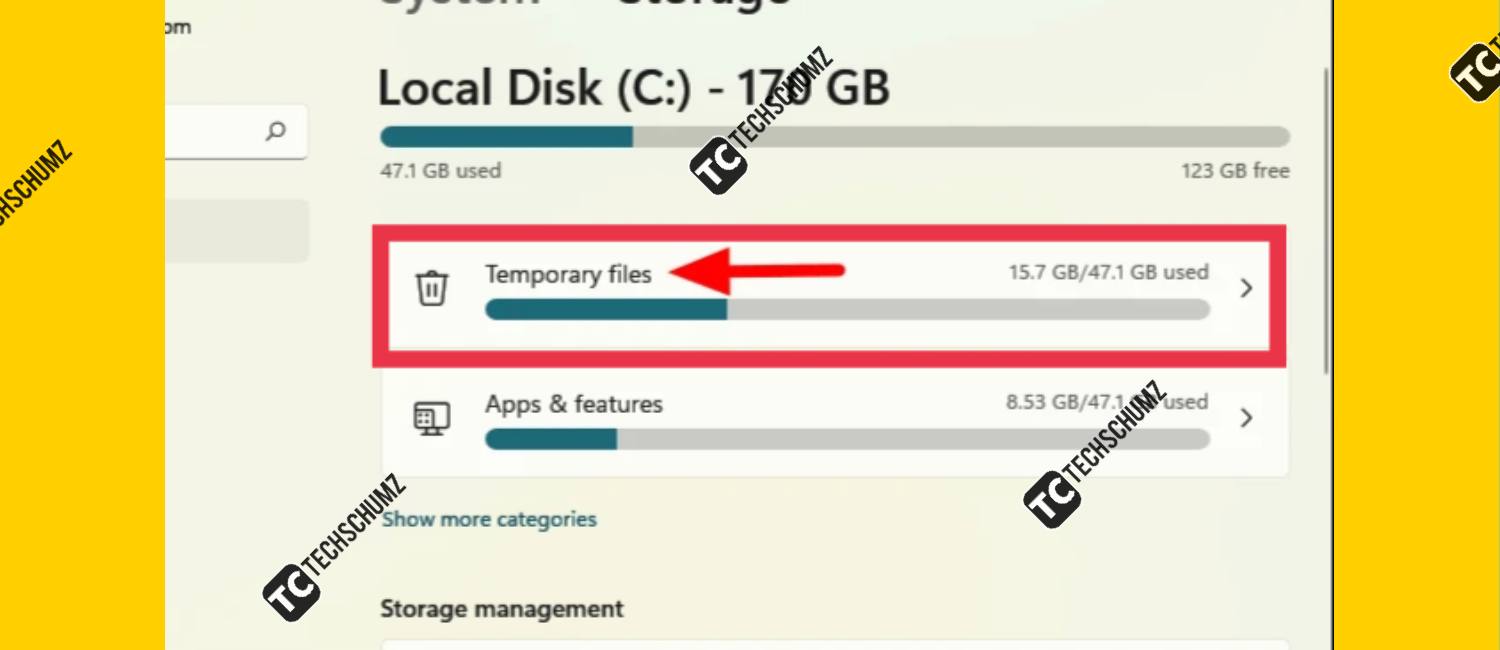
Step 4. The various cache files will now be listed. Scroll down and select the files that you want to delete and click on the ‘Remove files’ option.
Step 5. Finally, click on ‘Continue’ in the confirmation box that appears to complete the process.
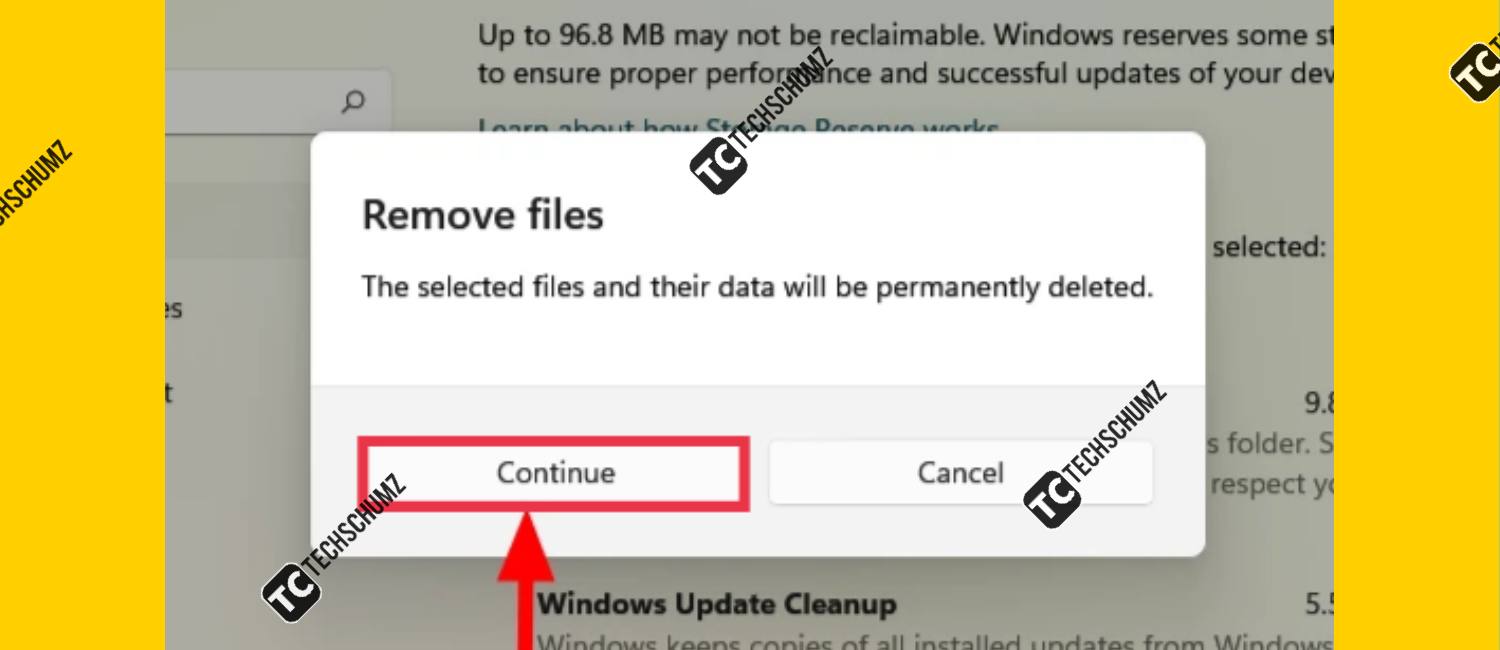
The selected files will now be deleted.
3. Clear your DNS Cache on Windows 11
The DNS (Domain Name System) server stores the domain names of the websites visited in the past to quickly load them on subsequent visits. Over time, this server may fill up and the entries may corrupt, thus leading to errors in loading websites. Here’s how you can clear the DNS cache.
- Open the Command Prompt by searching for it in Start Menu.
- In Command Prompt, type the following command and press Enter to execute it to delete the DNS cache.
ipconfig /flushdns
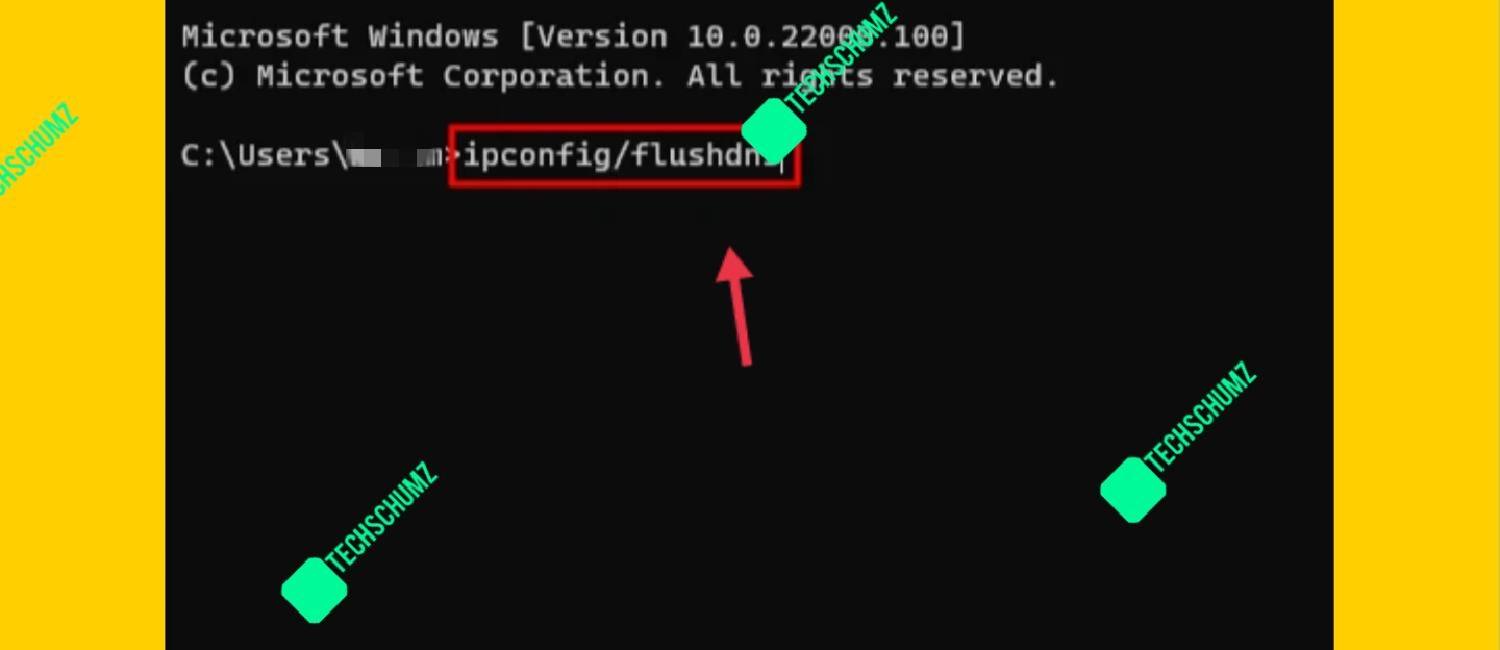
The DNS cache will now be cleared. To read more about DNS cache on Windows 11, click here.
4. Clear Windows 11 Store Cache
When you access the Microsoft Store and download apps, it creates cache files. You can easily delete these files through a simple command. Let’s see how you do that.
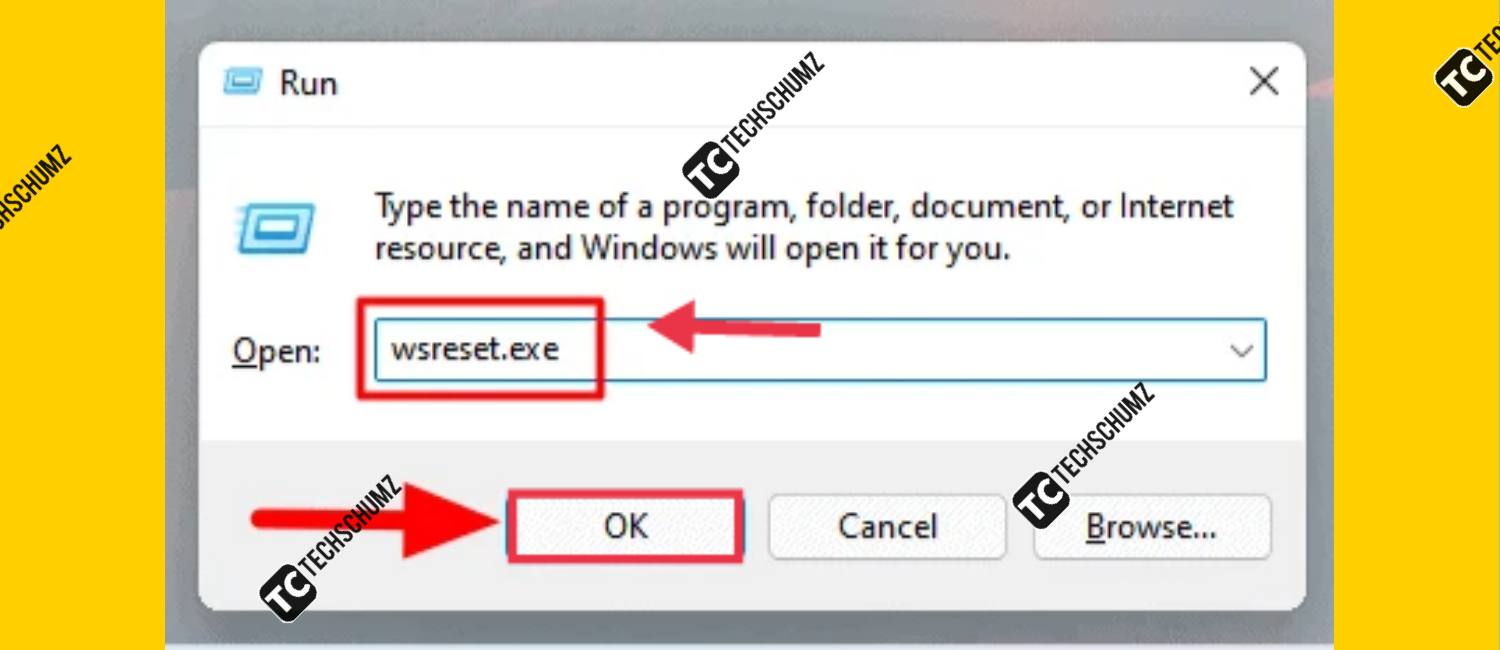
- To delete the Microsoft Store cache, press WINDOWS + R to launch the Run command.
- Enter ‘wsreset.exe’ in the text field, and hit the ENTER button.
This will open a black window with no text which will disappear once the cache is cleared, and the Microsoft Store app will launch.
5. Clear your Location Cache on Windows 11
You can also clear the location history stored on the system.
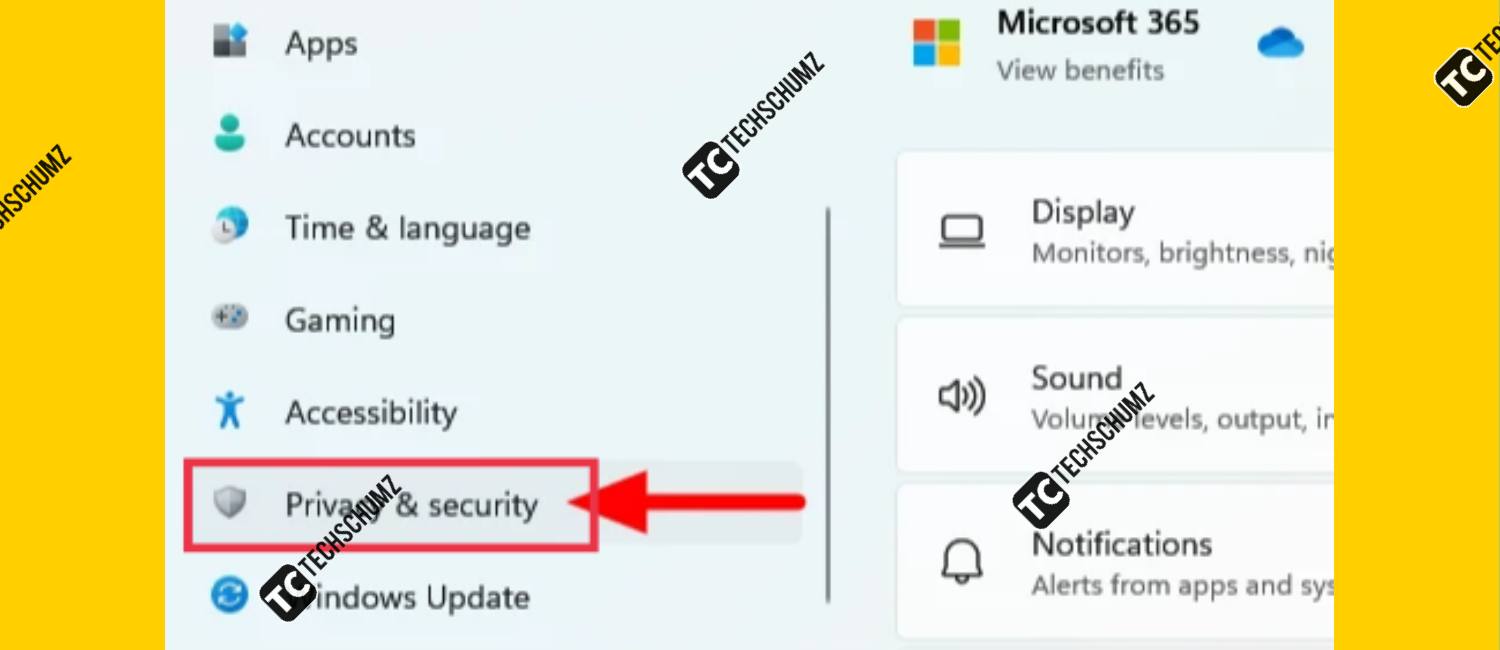
Step 1. To clean the location cache, launch the ‘Settings’ app by using Windows + I shortcut key and select ‘Privacy & security’ from the navigation pane on the left.
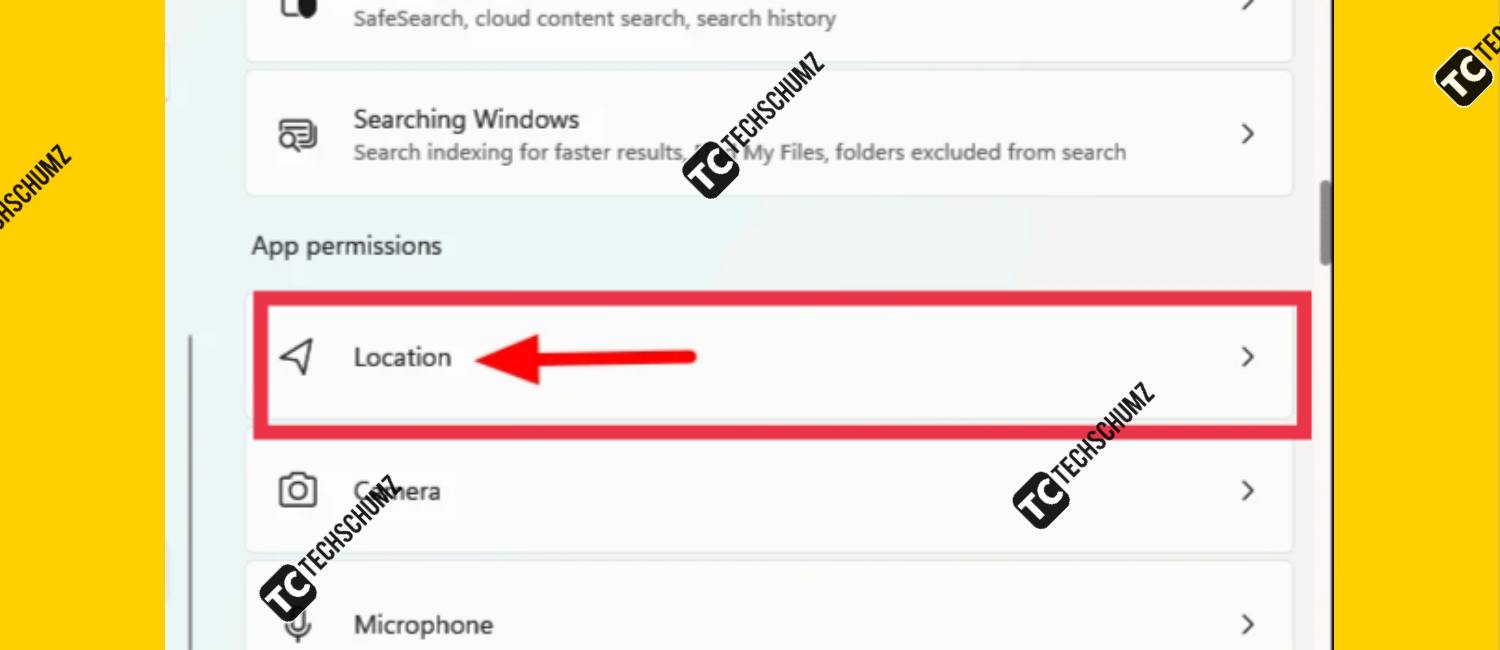
Step 2. Now, select the ‘Location’ option under ‘Apps permissions’ on the right.
Step 3. Next, locate ‘Location History’ and click on ‘Clear’ next to it.
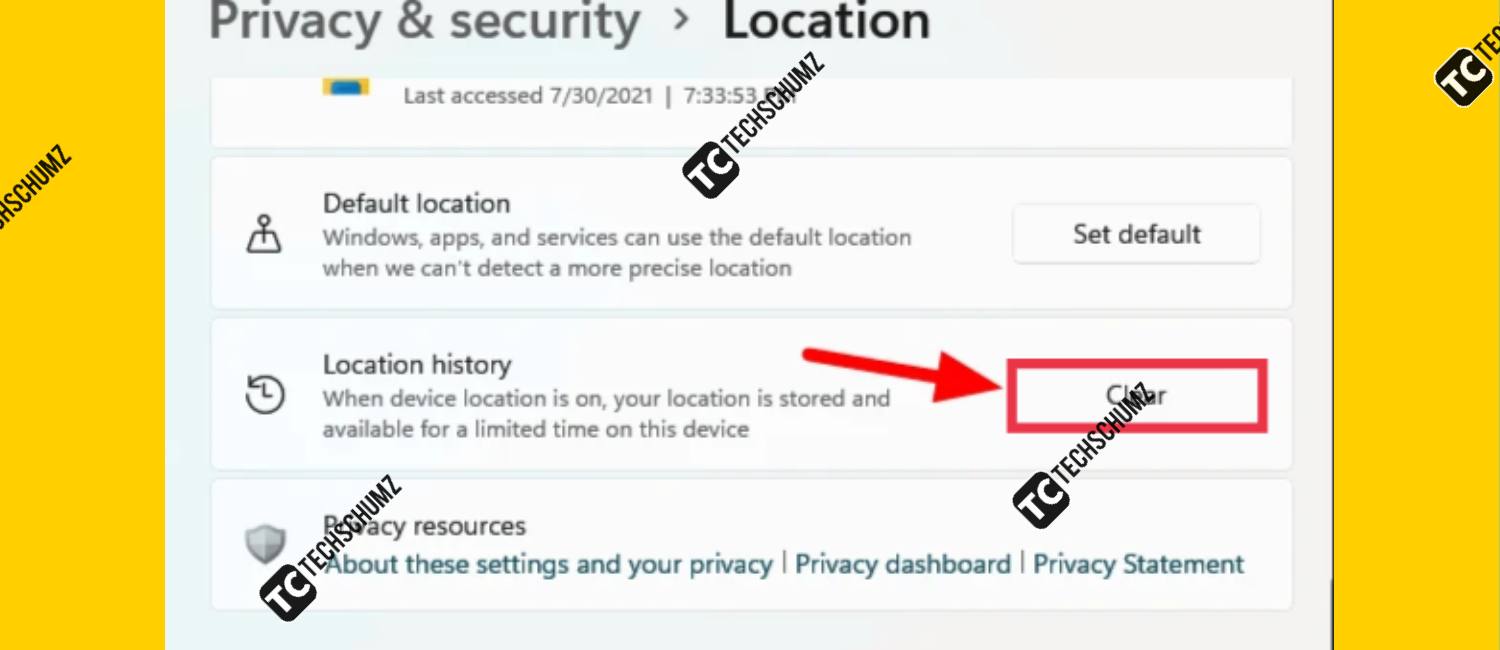
The location activity stored on the system will be deleted.
Final Words
The above methods are the most effective when you want to clear the cache on Windows 11 and would free up considerable storage space. Also, these methods come in handy in case you are encountering an error resulting from a corrupt cache file, and Clearing the cache is a good start to troubleshooting your system and improving system performance.
Thanks man for this guide!