Although during the development process, Microsoft did not enforce the security requirements for installing Windows 11, due to the lack of Trusted Platform Module (TPM) and secure boot, you may not be able to install the operating system on the VMware Workstation virtual machine in the end. So in this guide, I will show you how to create a Windows 11 virtual machine on VMware with TPM and secure boot Support. After following the steps, it will allow you to install Windows 11 on VMware with TPM and secure boot.
Table of Contents
What is a TPM Chip?
A Trusted Platform Module (TPM) is a small chip on the computer motherboard that can perform security-related activities at the hardware level. It is essentially a tamper-proof cryptographic processor capable of performing tasks such as creating encryption keys and providing a combination of hardware and software-based authentication.
If you plan to install Windows 11 on VMware Workstation, the application includes TPM and secure boot options. Since this is virtualization, you do not need to have the components on your computer.
What’s the Difference Between TPM 1.2 and TPM 2.0?
“The TPM 1.2 standard only allows the use of RSA and SHA1 hashing algorithms,” Microsoft said. “TPM 2.0 provides more encryption agility by being more adaptable in encryption algorithms,” the document continues. TPM 2.0 provides improved algorithms that can improve drive signing and key generation performance. “
Simply put, TPM 2.0 technology is newer than TPM 1.2, which has been in use since 2011. Cryptography is stronger, more secure, and can better support new algorithms. And, like most technical disciplines, the latest is better. Click here to know more about TPM.
Enable TPM and Secure Boot on VM to install Windows 11
To enable TPM and Secure Boot on VMware, follow the below steps:
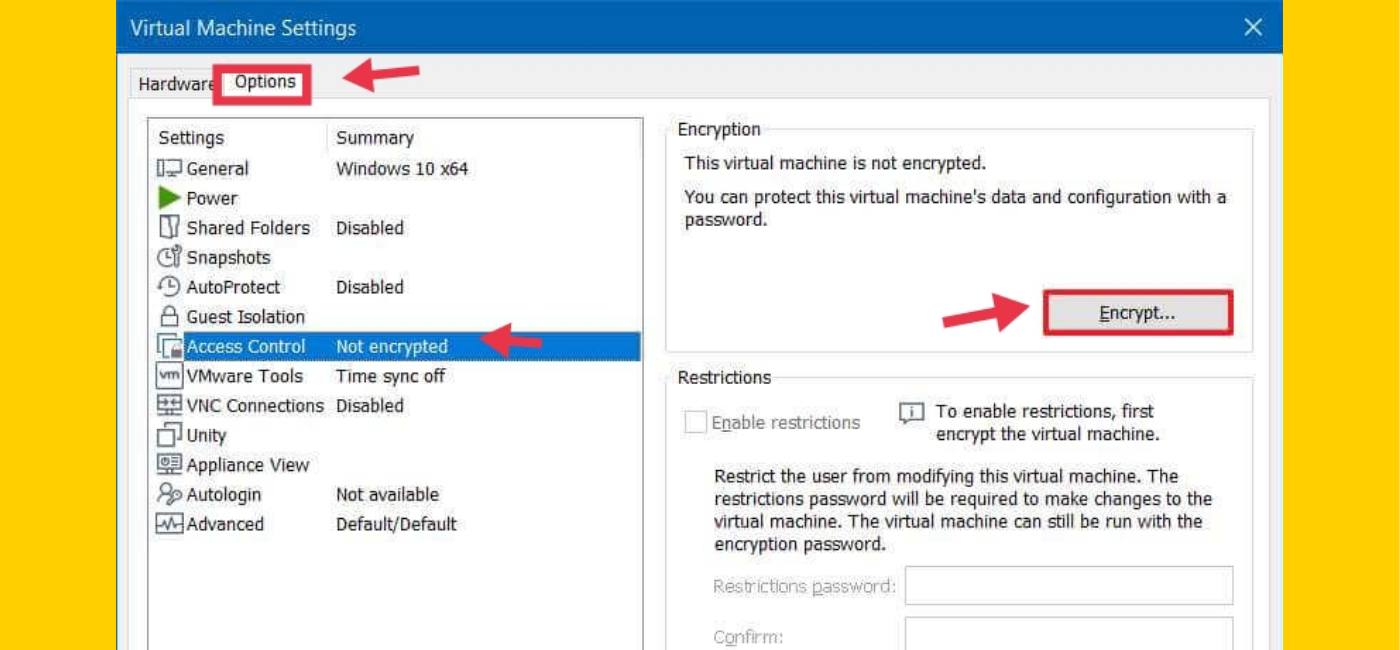
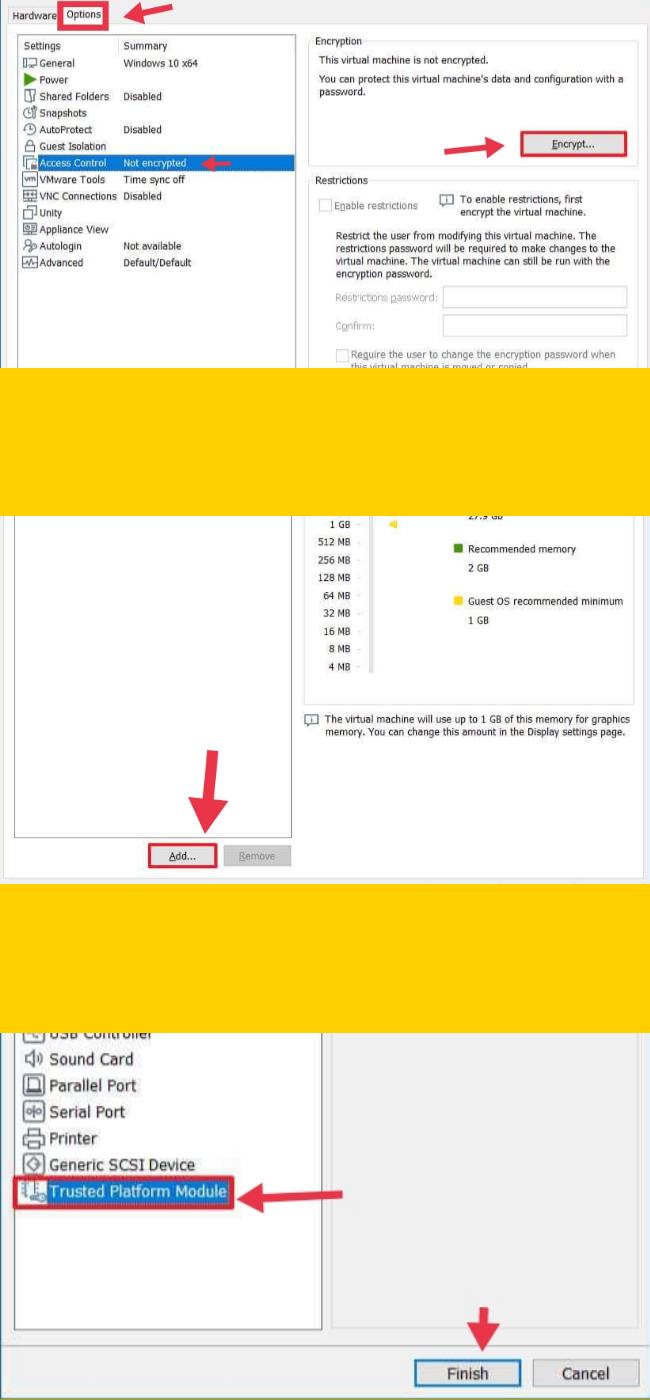
Step 1. Encrypt the Virtual Machine
- First, launch VMware Workstation, and tap on the virtual machine.
- Next, tap on the VM menu and click on the Settings option.
- Then, go to the Options tab, and tap the Access Control option and under the “Encryption” section, select the Encrypt button.
- Now, select an encryption password, and tap on the Encrypt button.
Step 2. Enable Secure Boot for the Virtual Machine
- After Virtual Machine encryption, the next thing you should do is tap on the Advanced option.
- Under the “Firmware type” section, tap on the UEFI option and check the Enable secure boot option (if applicable).
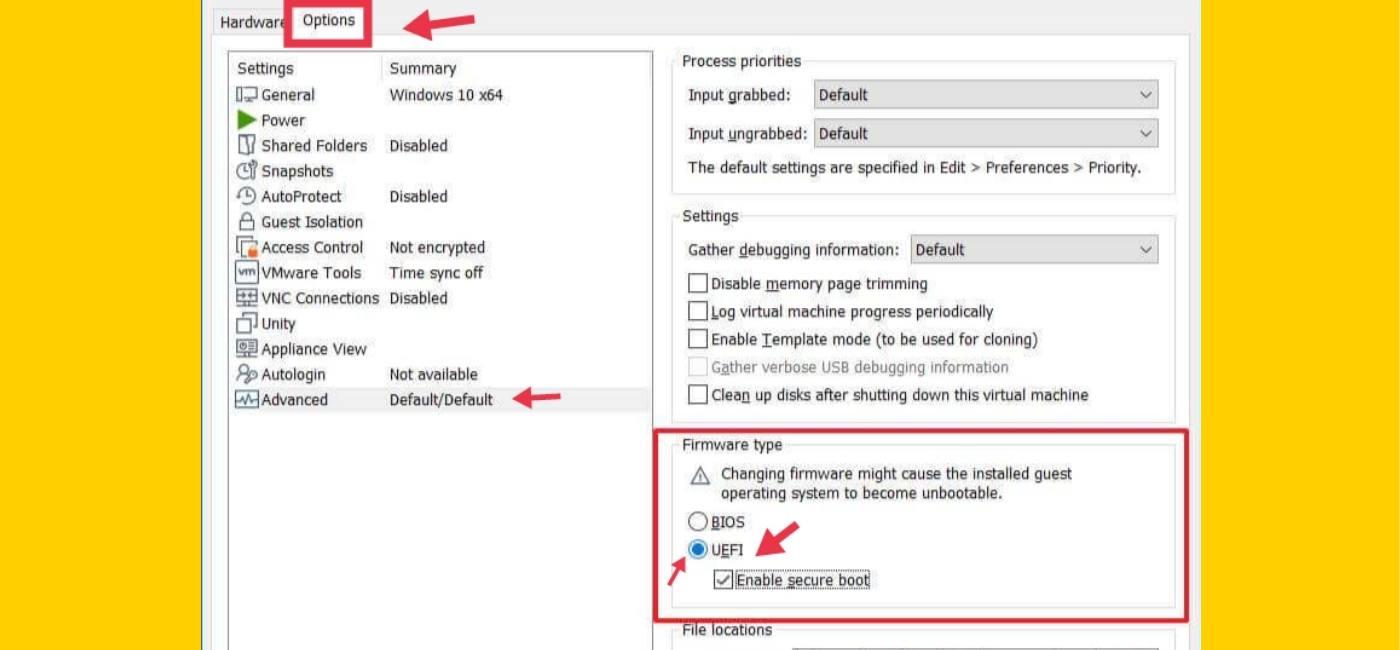
Note: Changing the firmware type may cause problems. If you don’t have the VM already with UEFI, it is best you should create a new virtual machine instead.
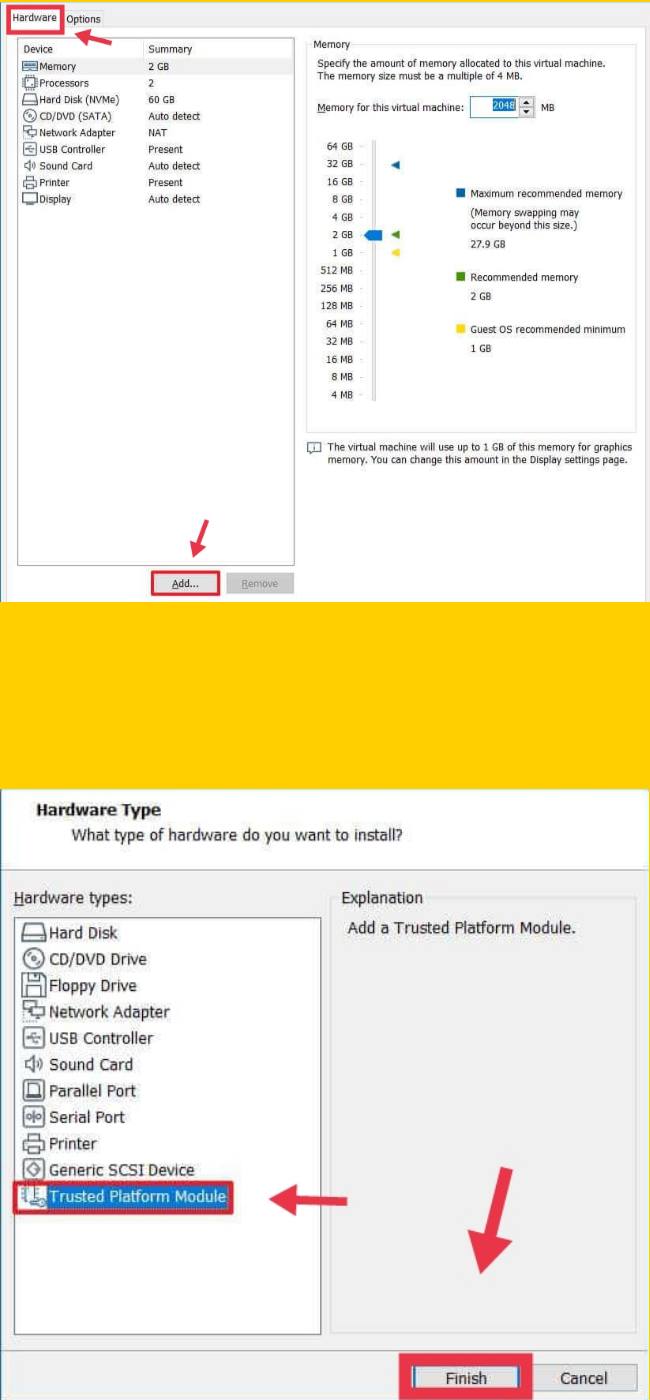
Step 3. Add TPM to Install Windows 11
- After enabling the secure boot option, tap on the Hardware tab.
- Next, click on the Add button, and select the Trusted Platform Module option to install Windows 11.
- Tap on the Finish button, and click the OK button.
After completing the above steps to enable TPM and Secure Boot on VM to install Windows 11, your computer should now contain the necessary security components to pass the requirements check to install Windows 11.
Create a Windows 11 Virtual Machine on VMware with TPM and Secure Boot support
If you want to install Windows 11 on VMware With TPM and Secure Boot, first you need to create a virtual machine with support for TPM and Secure Boot for Windows 11, for that you can follow the below steps:
Step 1. Select a Guest Operating System and Name it
- First, launch VMware Workstation. If you don’t have VMware installed on your PC, you can download it from here.
- Next, tap the File menu and select the New virtual machine option.
- Then tap the Next button, and select the latest virtual machine hardware compatibility option.
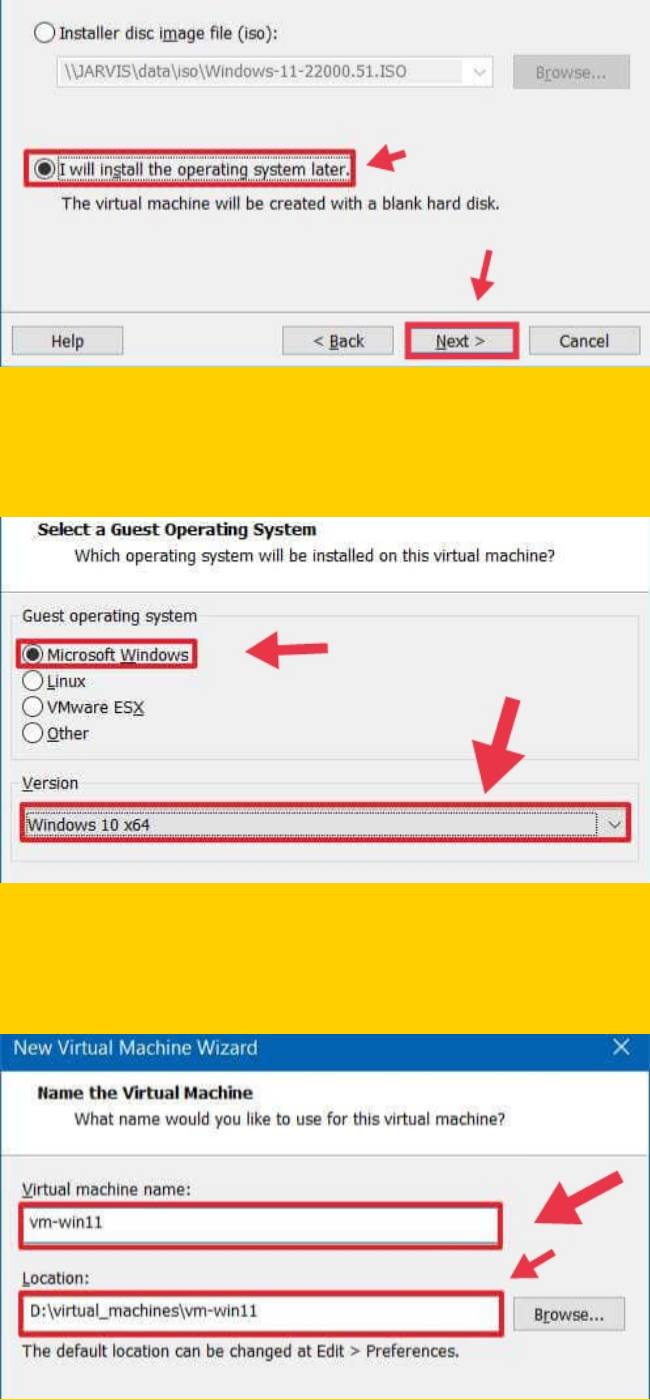
- Click the Next button, and select the I will install the operating system later option.
- Click again the Next button, and under the “Guest operating system” section, select the Microsoft Windows option.
- Now, under the “Version” section, select the Windows 10 x64 option. (If available, select the Windows 11 option.)
- Tap the Next button, select a name for the Windows 11 VM, and then specify the location to store the virtual machine.
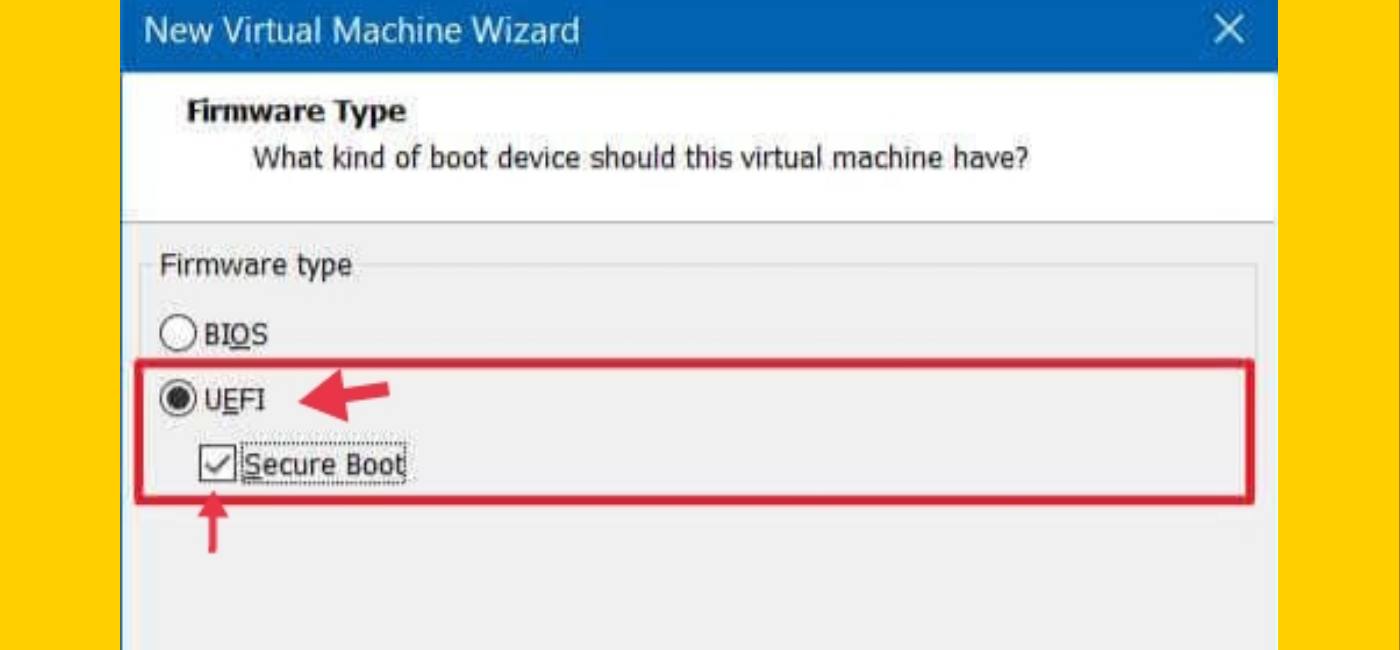
Step 2. Enable Secure Boot for the Windows 11 VM
- After naming and specifying a location for your Virtual Machine, tap on the Next button.
- Under the “Firmware type” section, select the UEFI option.
- Now, just check the Secure Boot option.
Step 3. Specify Processor Cores and RAM for Windows 11 VM
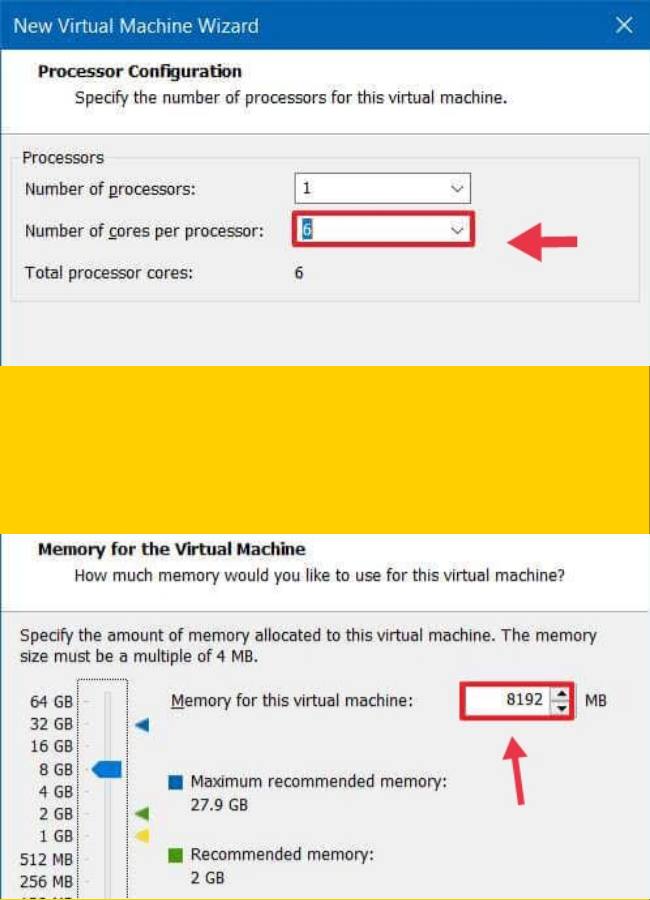
- After enabling the Secure Boot option, tap on the Next button.
- Now, Select the number of processor cores (two or more).
- Next, tap the Next button, and on the next window, specify the amount of RAM (4GB or higher).
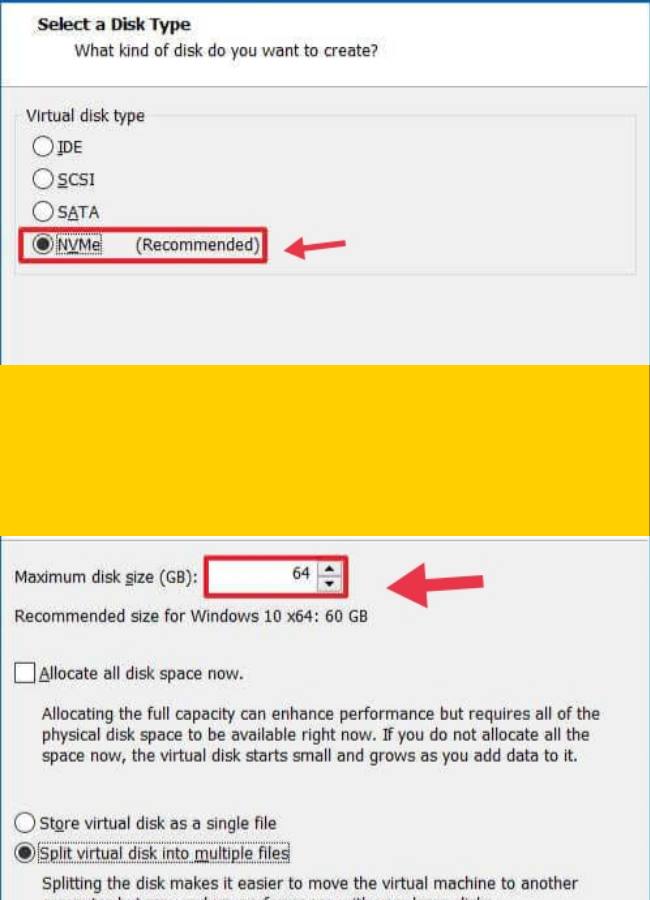
Step 4. Specify a Disk Type and Disk Capacity for Windows 11 VM
- After specifying Processors and RAM for the virtual machine, tap on the Next button.
- Next, select the preferred network connection, and tap on the Next button.
- Then use the default I/O controller types option, and click the Next button.
- Now, choose the virtual disk type option. (NVMe is usually recommended, if available.)
- Select the Create a new virtual disk option, and click the Next button.
- Now, specify the disk size in gigabytes (64GB or higher).
Step 5. Go Default with the Rest of the Settings
- After specifying the disk capacity, use the default settings for the rest of the settings unless you want to use different options.
- Tap on the Next button.
- Tap on the Next button again.
- Tap on the Finish button.
Step 6. Encrypt the Windows 11 VM and Add TPM
- After you create a Virtual Machine for Windows 11, open the VMware
- Select the virtual machine, and Click the VM menu and then select the Settings option.
- Next, Go to the Options tab, and tap on the Access Control option.
- Then, under the “Encryption” section, tap on the Encrypt button, and create an encryption password. Click the Encrypt button.
- Next, go to the Hardware tab: Tap the Add button, and select the Trusted Platform Module option.
- Click the Finish button.
Final Words
This is how to create a Windows 11 virtual machine on VMware with TPM and Secure Boot support. After you completed the above steps, you can install Windows 11 on VMware with TPM and Secure Boot by below steps:
- Launch VMware Software
- Go to the Windows 11 VM window, and tap on Power on this virtual machine.
- And after that just follow the instructions.
The installation process of Windows 11 is simple and it’s similar to Windows 10. Just follow the instructions and go through basic settings. Enjoy Windows 11 on VMware!
Read also: