The ZIP file format reduces file size by compressing files, saves disk space and reduces network transmission time. It also allows you to merge multiple files into one file that is easy to share with others. In this guide, we will show you different methods to zip and unzip files or folders on Windows 11. But let’s know more about zip files.
Table of Contents
What Are Zip Files?
Think about how folders work in Windows 11. You put the content in a folder to organize your files, and then you can transfer the folder to any location on your computer, and the files in it will follow. Zip files work similarly, except that the contents of “folders” (zip files) are compressed to reduce storage usage.
What if you have a folder of 20 files and need to email it to someone? Well, you can’t email a folder to someone, so you have to email all 20 individual files. This is where zip files come in handy because you can “compress” these 20 files into one zip file and send it via email. In addition to the convenience of putting all these files in a zip file, they will also be compressed to reduce storage space and facilitate transmission over the Internet.
For most people, this is where the zip file definition ends. You may not realize that you can not only use zip files to compress and combine files, but you can do more as well.
How to zip or compress files on Windows 11
Below you will learn 2 ways to zip or compress your files or folders on your Windows 11 computer.
1. Zip Files on Windows 11 Using Right-click Context Menu
In this method, you don’t need any third-party apps to zip files. This option is native to Windows 11. Here’s how it can be done:
- To zip or compress a file, right-click on the file or folder which you want to zip
- Next, click on the Compress to ZIP file option.
- Now, Windows 11 will compress or zip your file or folder, and a new ZIP file will appear in the same location as the file you are working on.
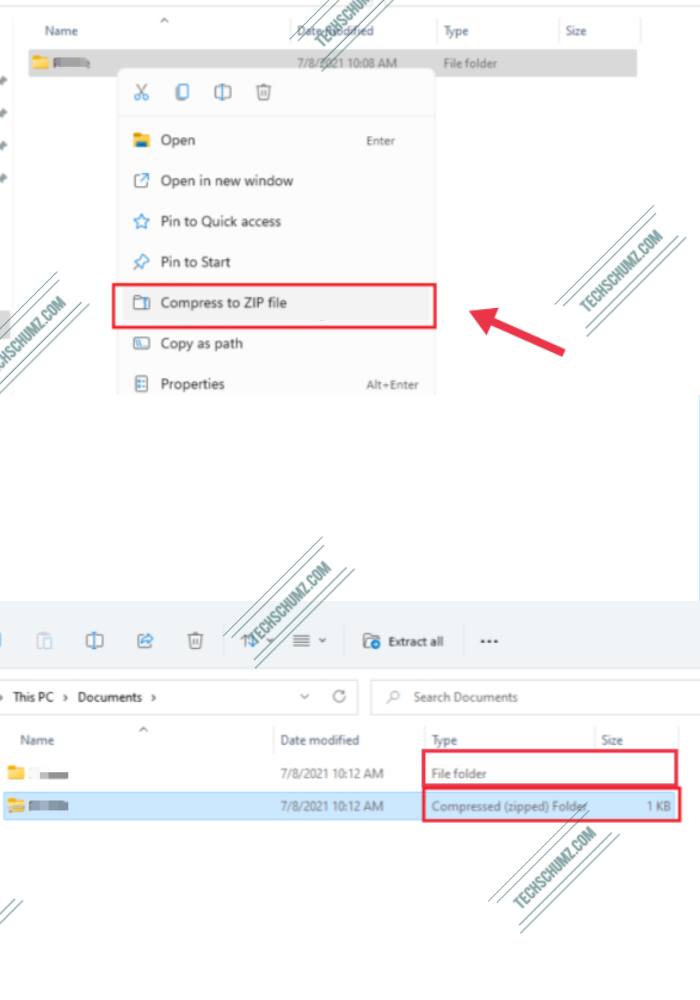
The ZIP file icon looks like a standard zippered Windows folder. It also allows you to name the ZIP file whatever you want. Type the name and press Enter on the keyboard.
Note: You cannot zip or compress an empty folder.
2. Zip or Compress Files on Windows 11 via 7 Zip
In this method, we use a third-party app, named 7 Zip, to compress or zip files on Windows 11. Here is how you can do it:
- First, download 7 Zip on your Windows 11 PC, to do that click here.
- After it’s downloaded, find the installer file on your PC and simply install 7 Zip on your PC.
- Next, select one or multiple files you want to archive, then right-click on the selection and select ‘Show more options‘.
- Then, go over the options, and select either ‘Add to filename.zip’ or ‘Add to filename.7z’ for quick compression.
- The Windows will create a new compressed file in the same location your file is.
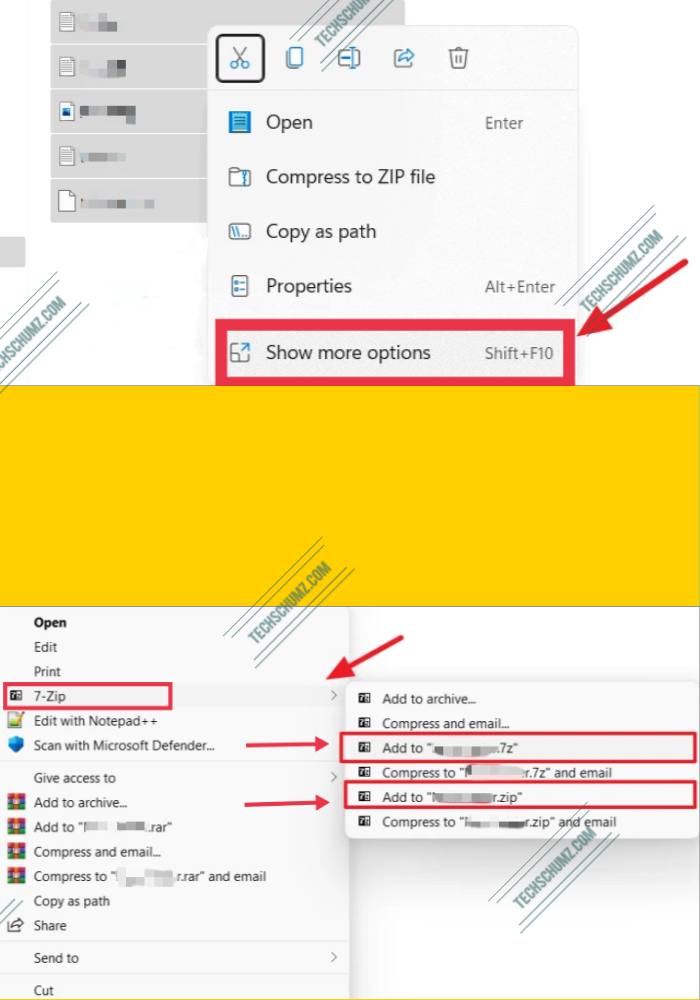
Since the “zip” and “7z” formats are the most popular and efficient file types, these formats are available as default file formats in the context menu. But 7Zip can archive files in four different formats, including zip, tar, wim and 7z.
- To zip or compress a file or folder into a different file format, right-click on the file and tap on ‘Show more options.’
- Then, go to the options and click on the ‘Add to archive’ option.
- Now, to choose a different format, select a file type from the ‘Archive format’ drop-down.
- After you can for other settings as well, if you want so.
- Once you’re done configuring the settings, click ‘OK’ to start the compression.
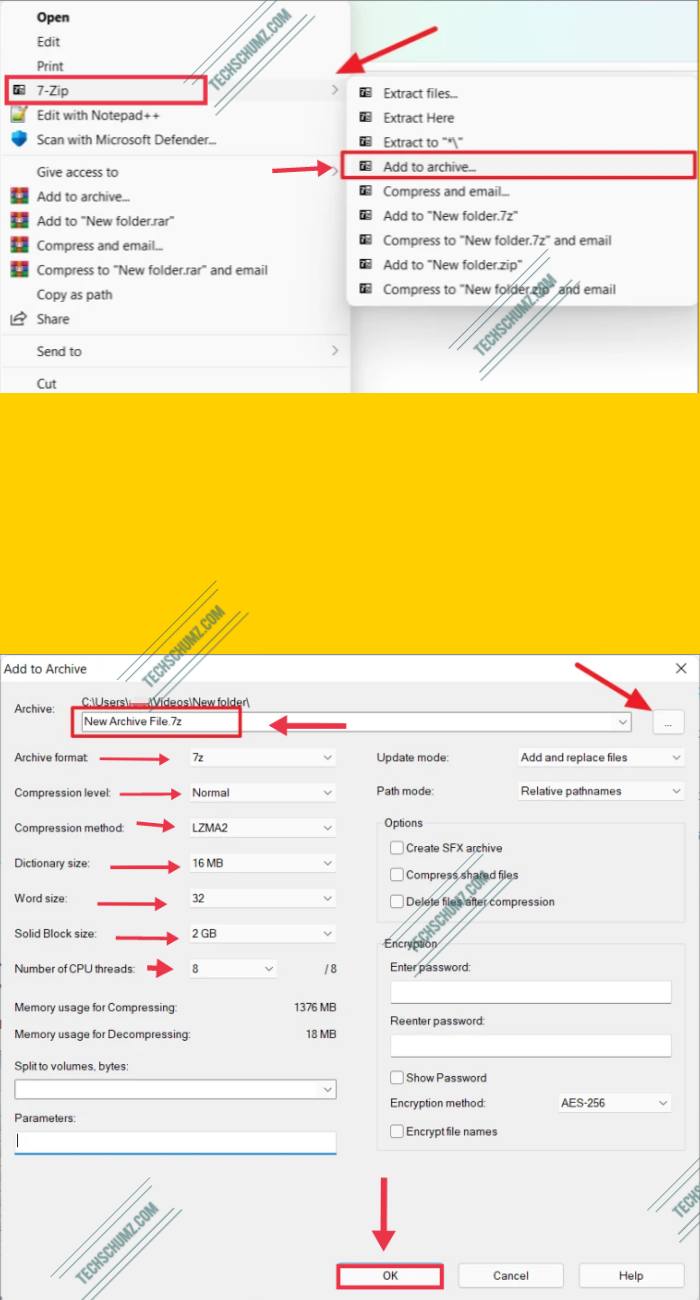
This will create a new compressed file in the file format of your choice. The time to compress files varies from a few seconds to a few hours, depending on the number of files, folders, size, and computer performance.
How to Unzip or Extract Files on Windows 11
We have shown you how you can zip files and folders natively or by using 7 Zip on Windows 11 computer. And here you will learn two different methods to unzip or extract files and folders on Windows 11.
1. Unzip Files and Folders on Windows 11 via Right-click Context Menu
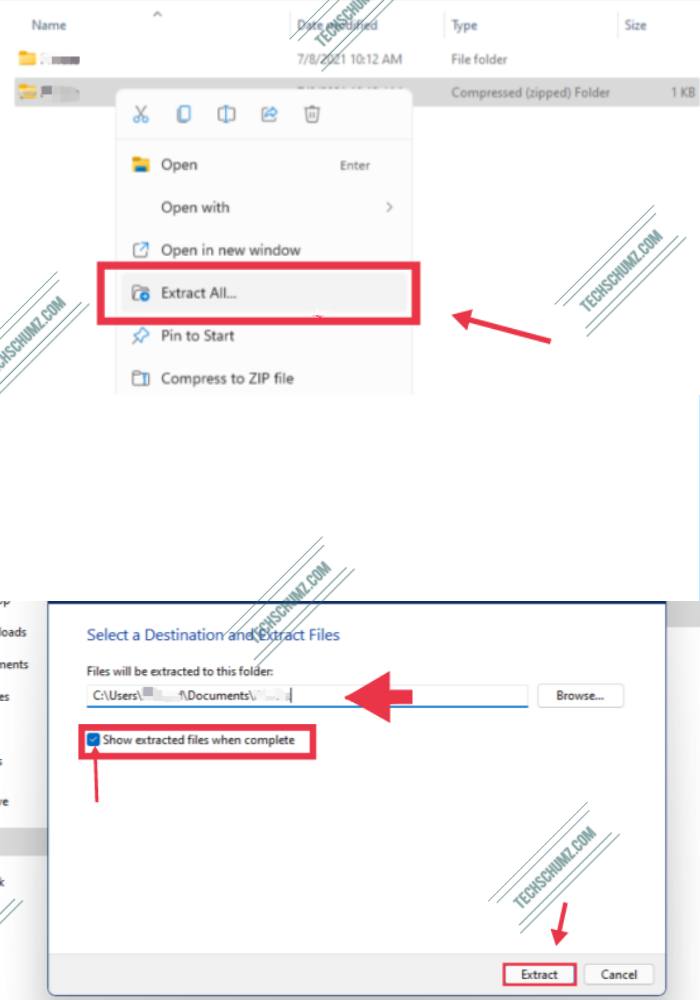
- To get started, first find and right-click on the .zip file you want to extract, and then select ‘Extract all’.
- Now click on ‘Browse’ and select a location where you wish to extract your files.
- Then, check the box for ‘Show extracted files when completed’ if you want Windows to open the folder with the extracted files automatically after.
- After you are done, click on ‘Extract’ to unzip the selected file.
- And that’s it! The Windows will now automatically extract the selected file to the location you selected.
2. Unzip or Extract Files on Windows 11 using the 7 Zip app
Extracting files is easier than compressing files with 7 Zip. To do it, follow the below steps:
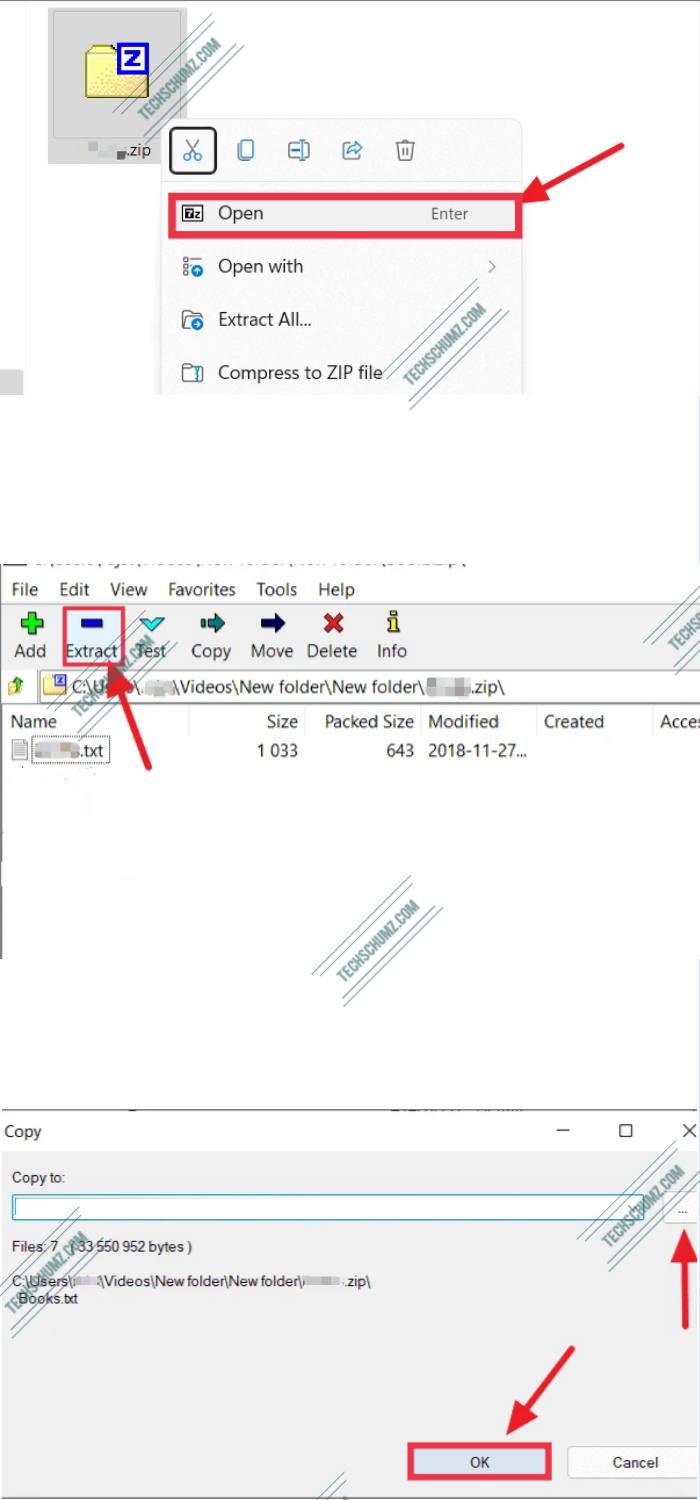
- First, find the archive file and right-click on it and select the ‘Open’ option.
- In the 7 Zip window, click on the ‘Extract‘ button.
- Now, in the window that opens, select a location for your extracted file.
- Then, click on the ‘OK’ button to start extracting or unzipping the file.
- That’s it! Now, the file will be extracted inside the selected location.
Conclusion
That’s it! This guide is all about how to zip and unzip files or folders on Windows 11 PC or laptop. You can reduce file size and save disk space by compressing files, and you can also reduce network transmission time. It also allows you to combine multiple files into one file that is easy to share with others. Now, if you have any questions, you can ask us in the comments section below. Good Luck!
Read also:
