Microsoft has put in a lot of effort to make Windows 11 perform quickly with an SSD. If you just copy the operating system (OS) to the SSD without using SSD optimization in Windows 11, you may not receive the greatest performance that an SSD has to offer. Windows 11, on the other hand, includes a slew of functions that help SSDs perform to their maximum capacity, although they aren’t always enabled by default. In this guide, you will find eight different ways that will help you increase SSD performance on a Windows 11 PC or laptop.
Table of Contents
1. Enable Fast Startup for SSD Performance
Fast Startup was primarily designed to make the boot process faster for individuals who use SSDs. It’s a handy option accessible in your system’s Power Options, and you can speed up your SSD on Windows 11 by enabling Windows Fast Startup.
Note: It’s worth noting that fast startup may also generate a variety of concerns. If you dual-boot, for example, you may be unable to access your Windows disk because it is locked. In this case, enabling Fast Startup isn’t helpful.
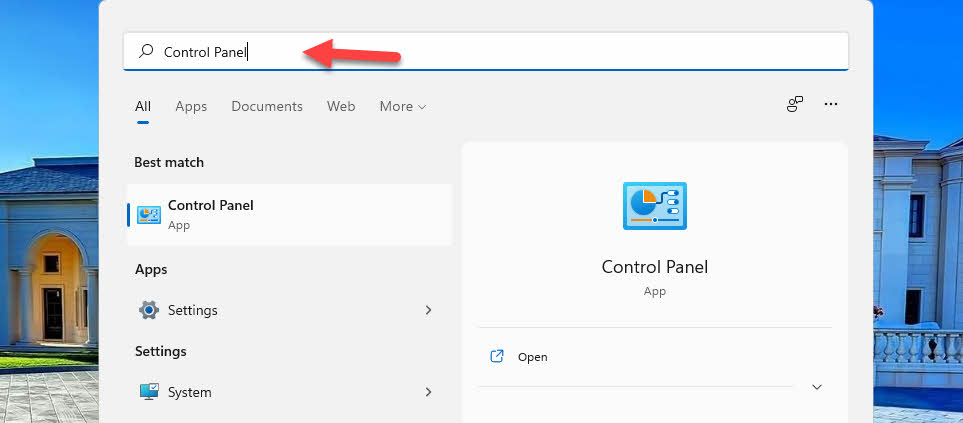
- Open the Control Panel by searching for it in the Start Menu.
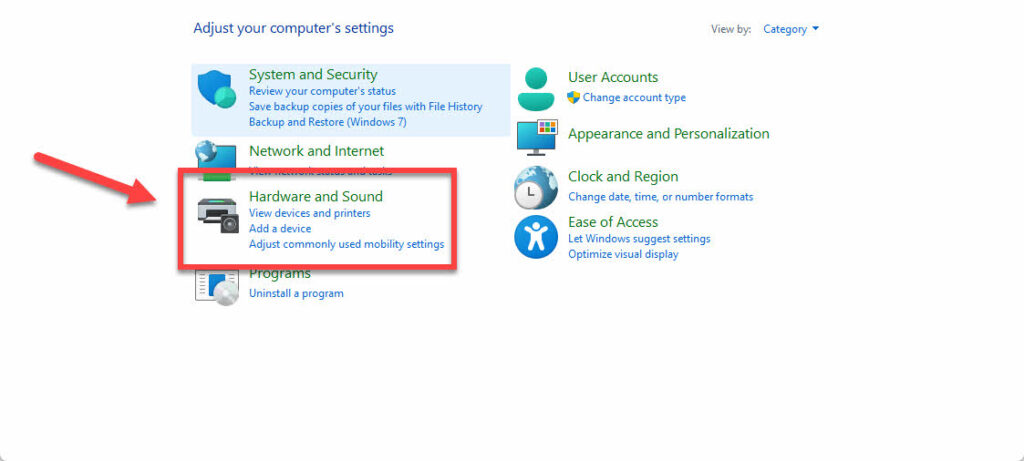
- In the Control Panel window, select “Hardware and Sound“.
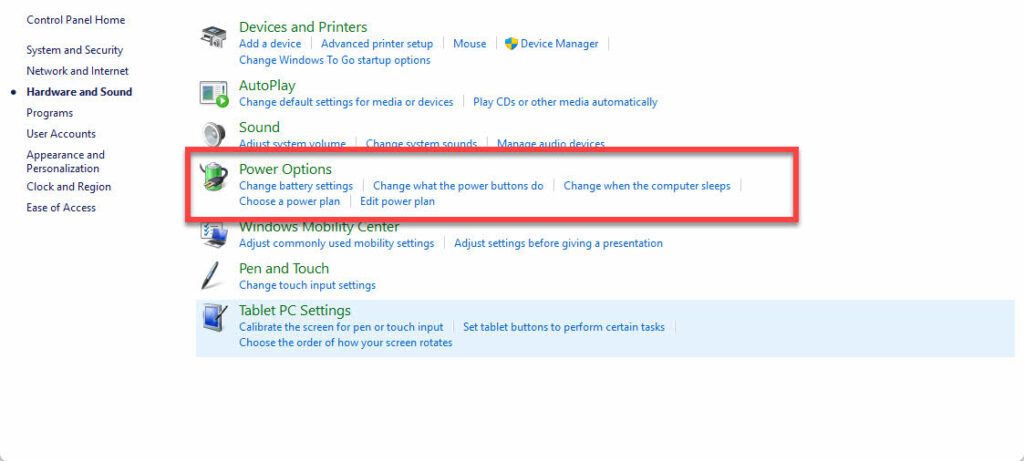
- Click on “Power Options“.
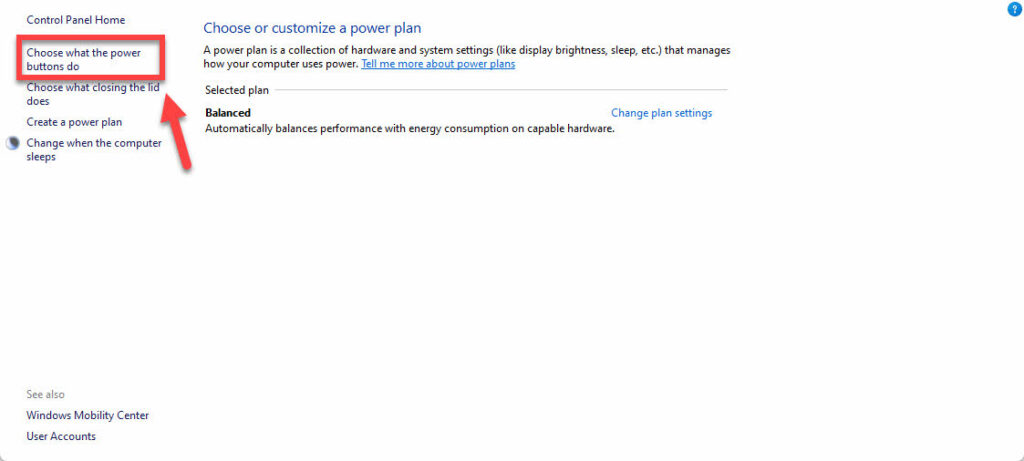
- From the left menu, click on “Choose what the power button does“.
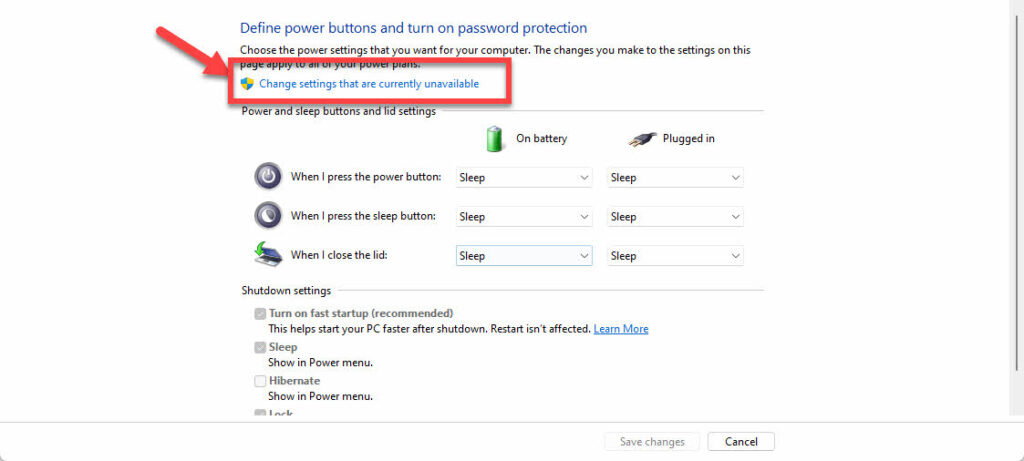
- Click on the “Change settings that are currently unavailable” link.
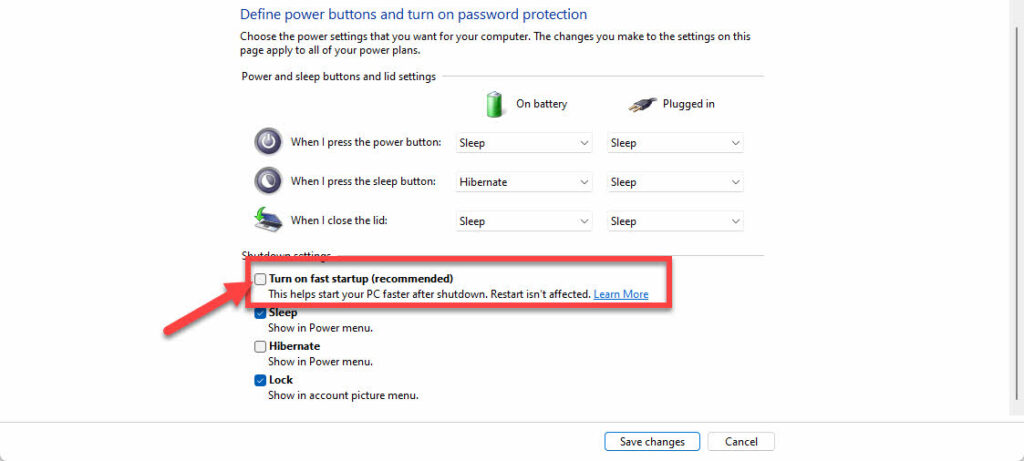
- Now, under Shutdown settings, enable “Turn on fast startup” by checking the box in front of it, and click on “Save changes“.
That’s it!
2. Disable Unnecessary Startup Programs
Windows has overburdened user computers with a slew of apps that, although frequently really helpful, have no need to be launched as part of the operating system’s startup process. Startup programs, in addition to the necessities required for a system to operate, are launched when a computer is turned on. Too many of these slow down your SSD and have a negative impact on performance. As a result, by disabling unnecessary startup apps, you can improve SSD performance on your Windows 11 computer. If you don’t know how, follow the below steps:
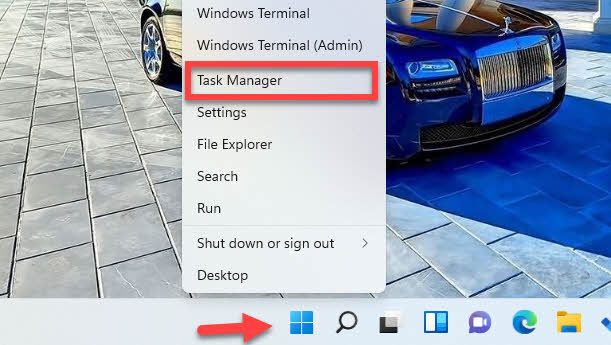
- Right-click on the Start Menu button and select “Task Manager“.
- Click on “Startup“.
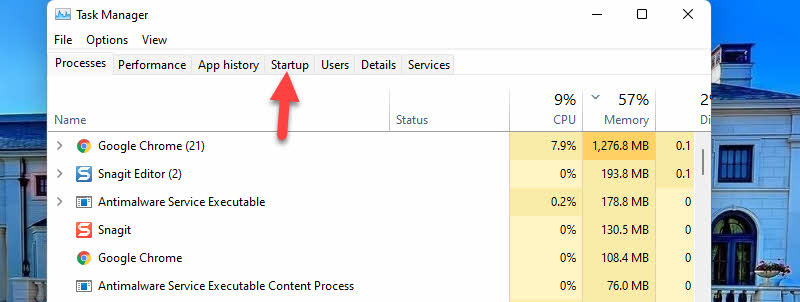
- Now, you can see lists of apps that start automatically when you turn on your PC.
- Simply right-click on the app that’s unnecessary and select “Disable“.

That’s it! You can get some SSD improvement after disabling unnecessary startup apps.
3. Fix a Slow SSD on Windows 11 Using Windows Update
Since the introduction of Windows 11, there have been several reports of people experiencing concerns with the poor performance of NVMe SSDs. Microsoft released the Windows 11 KB5007262 update to address this problem. Many consumers have reported that the Windows update patch has helped them with SSD speed concerns. The KB5007262 update was released around the end of 2021, so you may or may not already have it installed on your PC. You can install it if you haven’t already by following the below steps:
Note: Always make sure to update your Windows 11 PC to experience better security and performance.
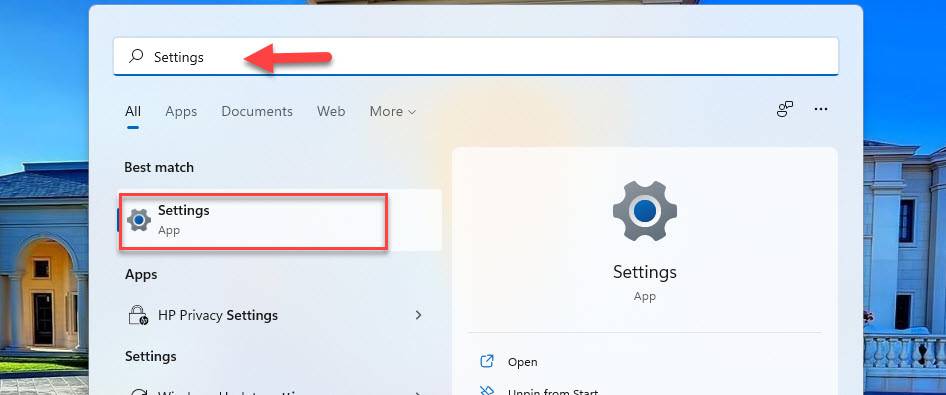
- Open the Settings app by searching for it in the Start Menu.
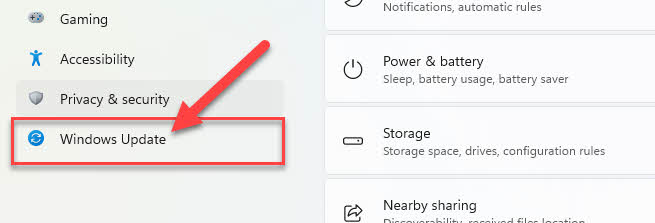
- From the left pane, tap on “Windows Update“.
- Click “Check for Updates,” and after the updates are listed, check to see whether the KB5007262 update is there. If an update is available, Windows 11 will install it automatically, and you should be set to go.
- When the installation is finished, click “Restart now” to let the changes take effect.

If you did not automatically get the KB5007262 update, you can manually download it from the Microsoft Update Catalog. Make sure you get the x64 version of the update. Once the update has been downloaded, install it and restart your computer as required. This should improve your SSD performance.
4. Enable AHCI
The Advanced Host Controller Interface (AHCI) is critical for guaranteeing that Windows will support all of the capabilities that come with operating an SSD on your computer, particularly the TRIM function, which enables Windows to assist the SSD with its normal garbage collection. To increase SSD performance on a Windows 11 PC or laptop, set the SATA controller mode to AHCI.
To change your SATA mode from IDE to AHCI, follow the below steps:
- Open the Settings app by searching for it in the Start Menu.
- Now, select “Windows Update” from the left pane and click on the “Advanced options” button on the right.
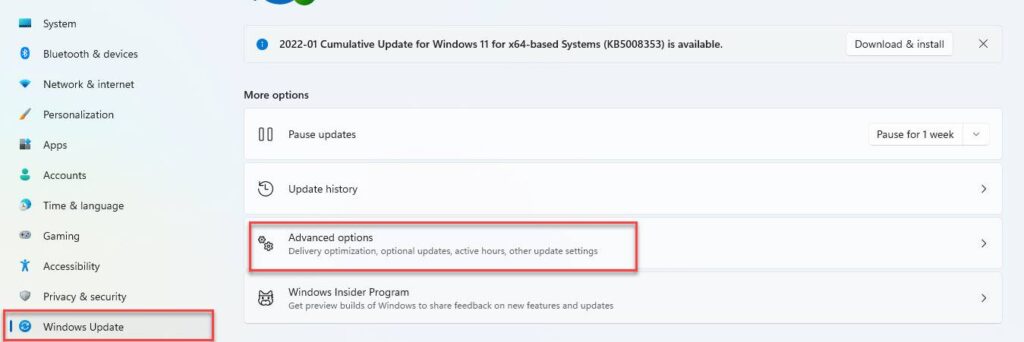
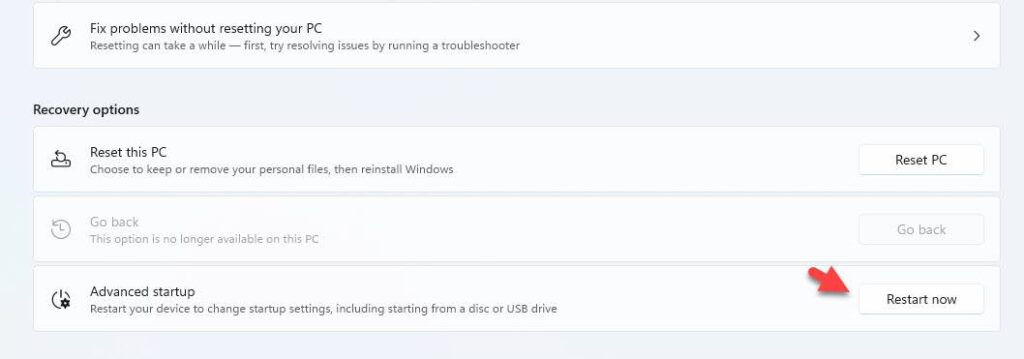
- Click on “Recovery” and click on “Restart now” beside “Advanced startup.”
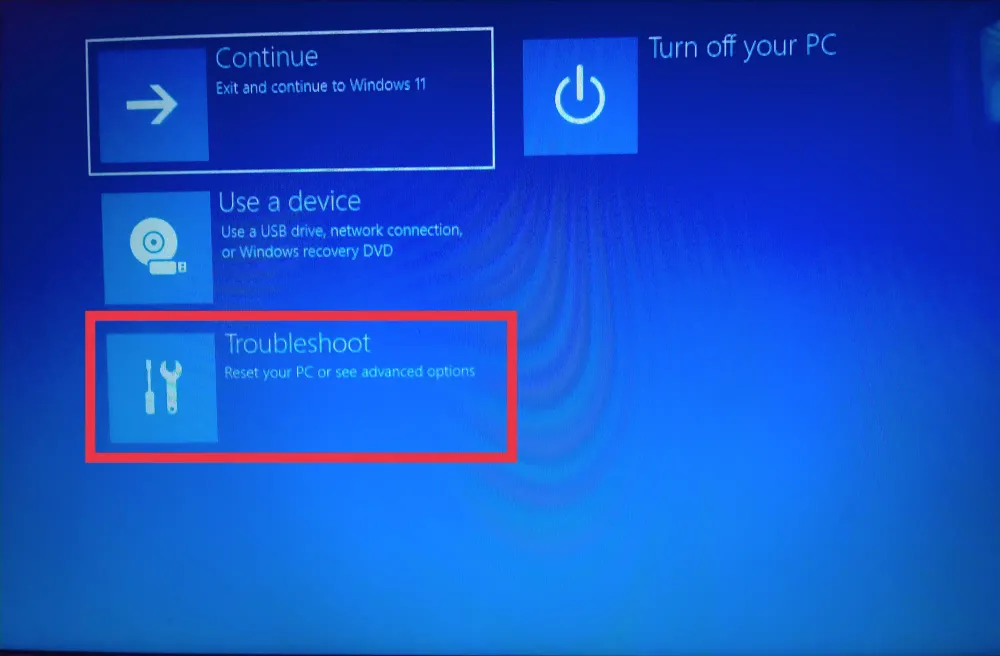
- Windows will now restart and boot into the recovery environment. From there, select “Troubleshoot.”
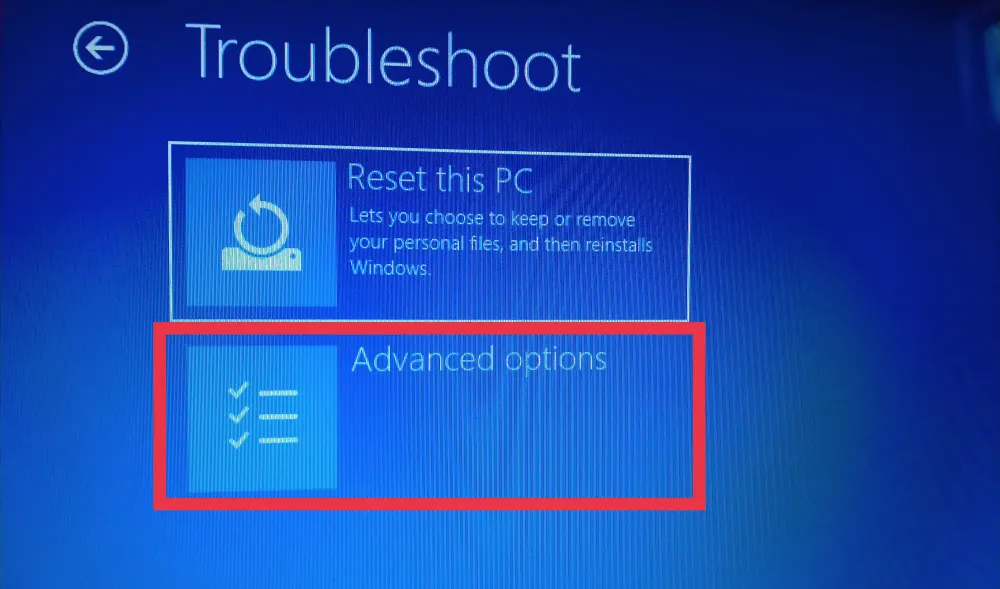
- Select “Advanced options“.
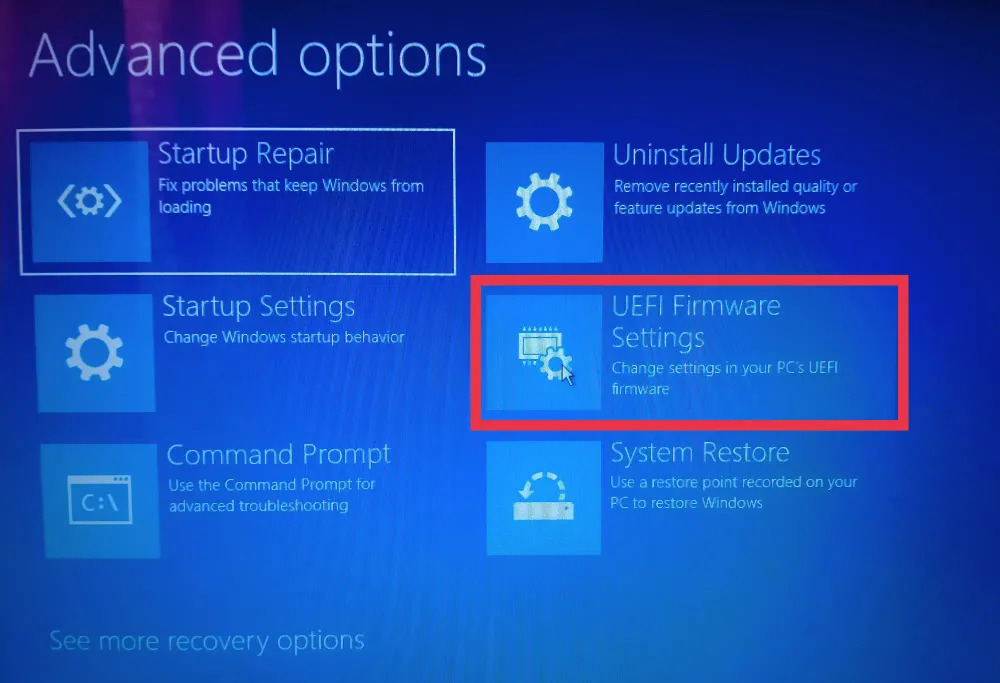
- Click on “UEFI Firmware Settings.“
- Click on “Restart”.
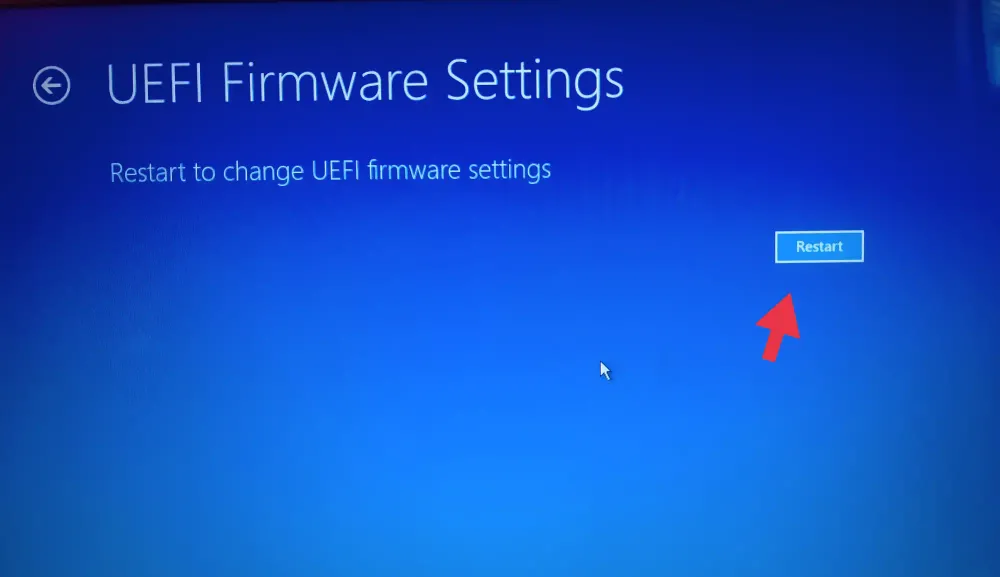
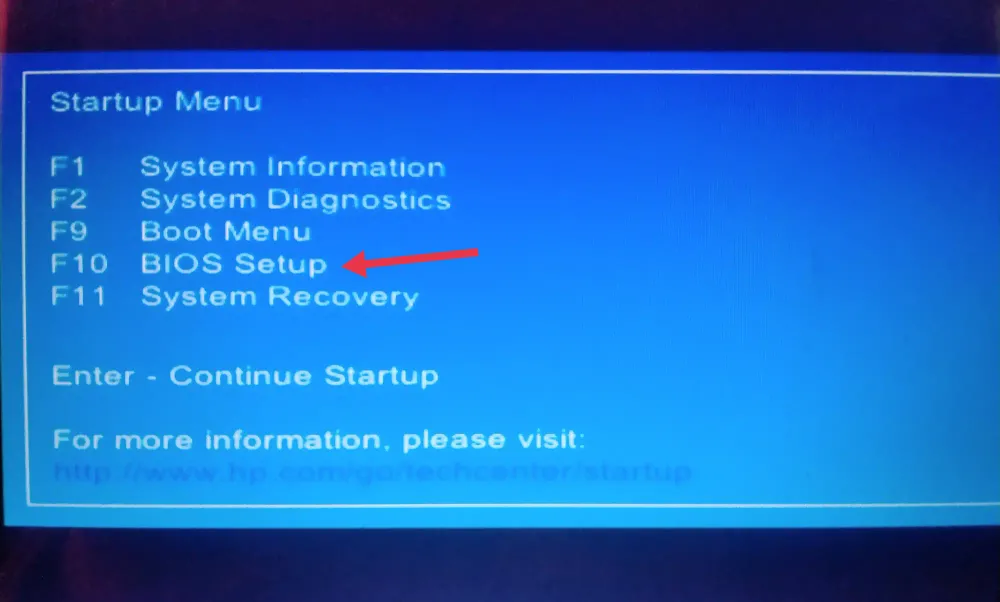
- Your PC will now restart and automatically boot into the BIOS menu. Although, in newer devices, it will show you Startup Menu, and from there, you need to select “BIOS Setup” with its corresponding key.
- Navigate to the Advanced menu to change from IDE or RAID to AHCI. Please keep in mind that each computer has a different BIOS interface, so you may have to do some digging to find it.
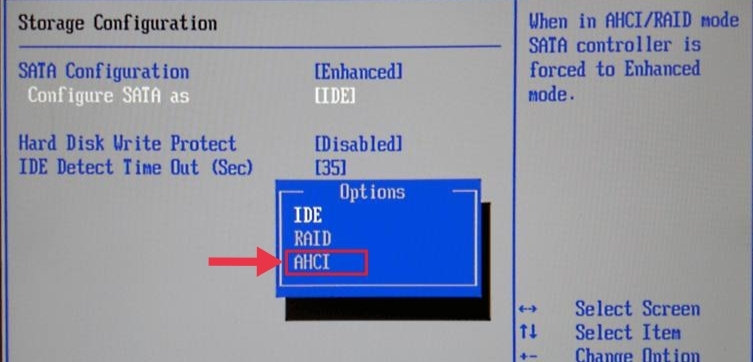
- When you are all set! Save changes and exit.
To see whether there has been any improvement, you need to check it out. I saw a little boost in sequential speed. It isn’t much, but any improvement is better than none. Other than that, there aren’t many differences between IDE and AHCI. The apps will continue to work normally, and startup time may be somewhat reduced.
5. Fix a Slow SSD on Windows 11 by Updating the SSD Firmware
It’s important to keep your SSD’s firmware up to date if you want it to perform optimally. Unfortunately, they are not automated; the process is irreversible and rather more complicated than, say, a software update. Each SSD manufacturer has its own way of upgrading SSD firmware, so you’ll need to go to the official websites of your SSD manufacturers and follow their instructions from there.
6. Enable TRIM
Enabling TRIM will speed up your SSD performance on Windows 11, and it is useful for extending the life of your SSD. It should be enabled by default in Windows 11, but it’s worth double-checking that it is.
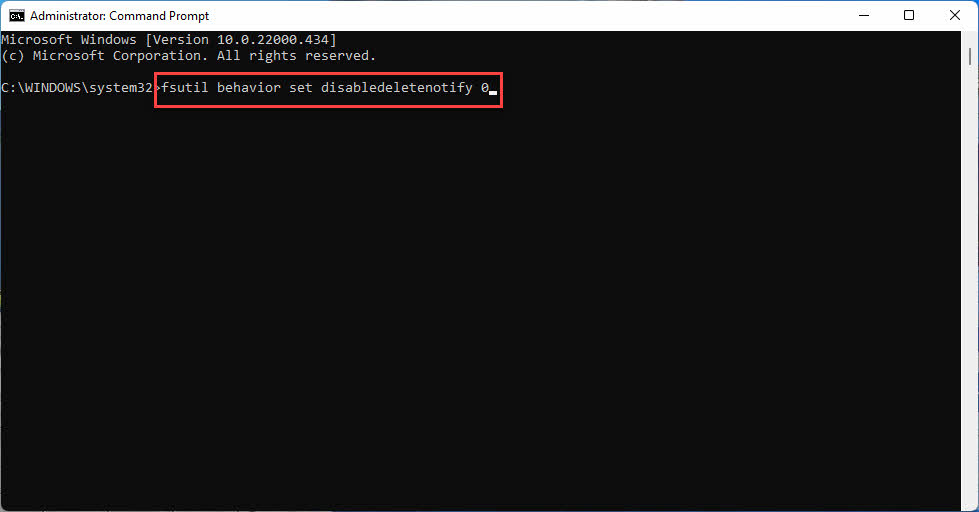
- To make sure TRIM is enabled, open the Command Prompt by searching for it in the Start Menu.
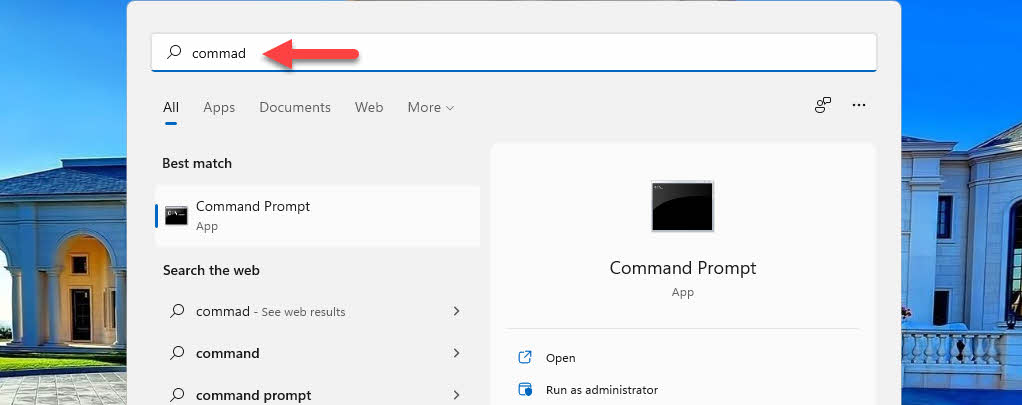
- Now, type the below command line and hit the Enter button on your keyboard.
fsutil behavior set disabledeletenotify 0
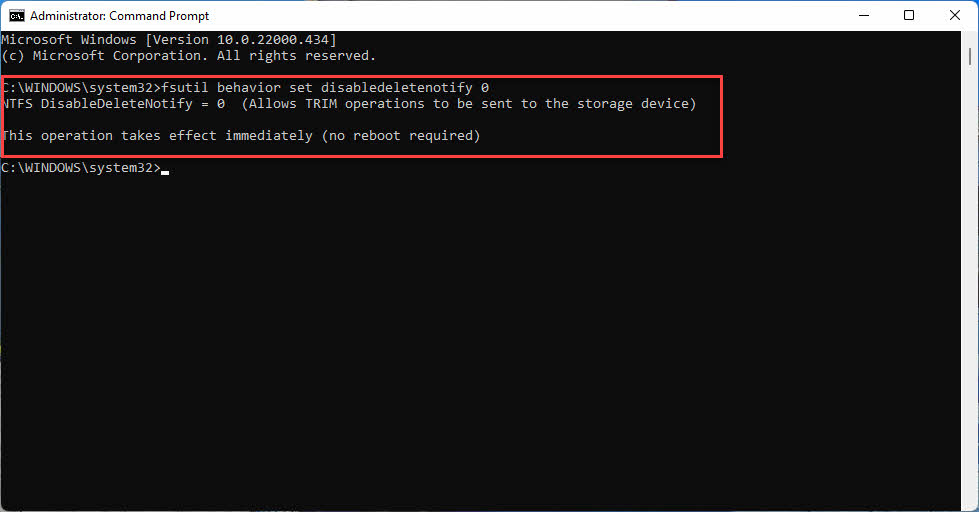
- Now, what you want to see next is a notification saying “Disabled,” which means that TRIM is enabled.
7. Enable System Restore
In the early days of SSDs, when they were significantly less durable and prone to failure than they are today, many people suggested turning off System Restore to improve the drive’s performance and longevity. However, these days, System Restore is a pretty useful feature that we recommend keeping an eye on. You can enable System Restore by following the below steps.
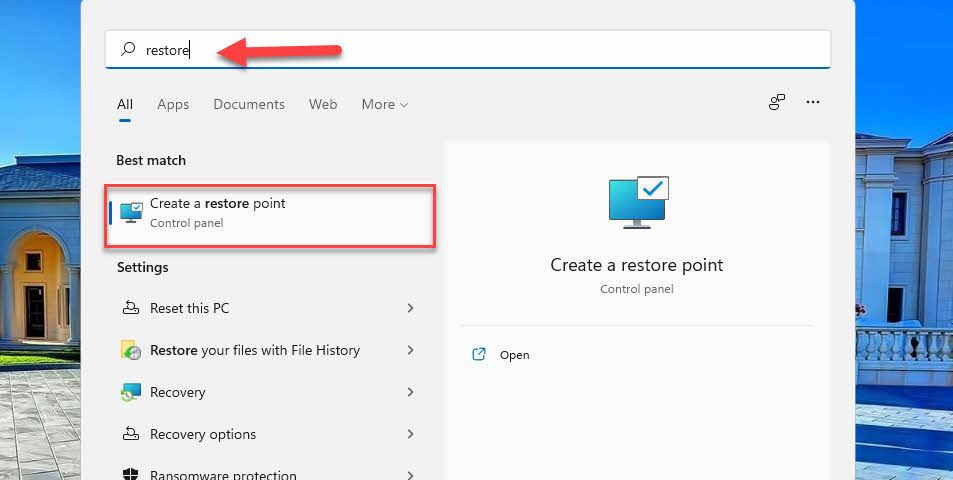
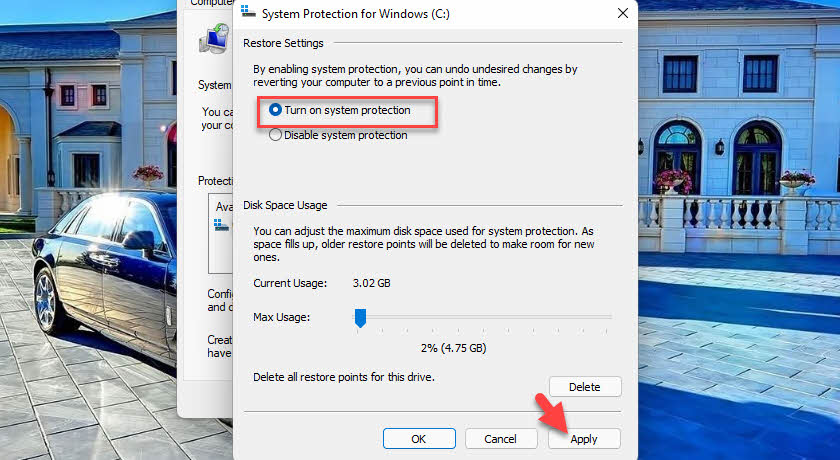
- To get started, search for “restore” in the Start Menu, and then click on “Create a restore point.”
- Next, click on “Configure” under the Protection Settings.
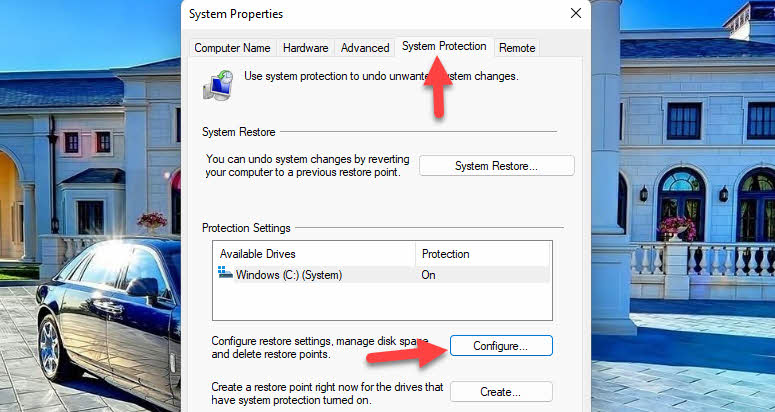
- Now, under Restore Settings, select “Turn on system protection” and press “Apply“.
8. Enable the Best Performance Power Mode
When your SSD constantly turns on and off, you’ll notice a little latency anytime you use your computer after it’s been inactive for a long time. The Best Performance power mode will increase SSD performance on a Windows 11 PC; we recommend using it so that none of your components are downclocked to lower speeds in order to reduce power consumption.
- To switch your power options, open the Settings app by searching for it in Start.

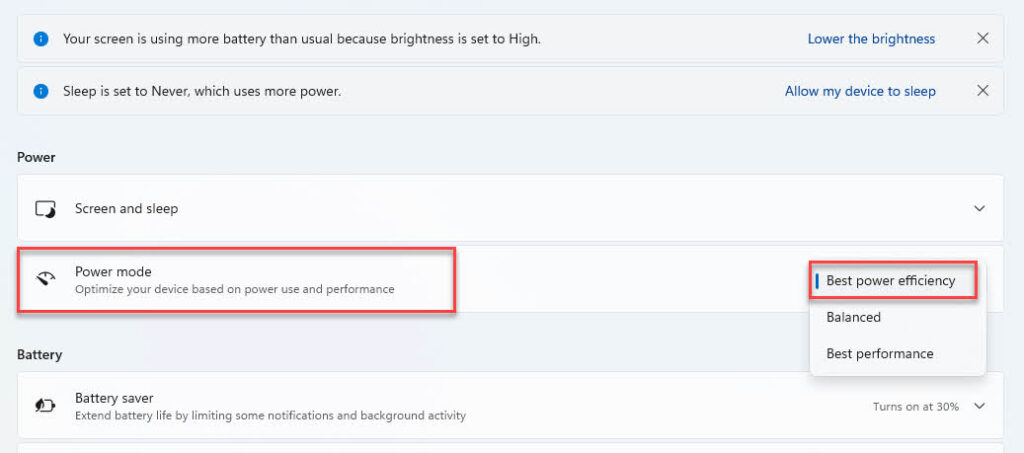
- On the System settings page, click “Power & battery“.

- Now under the Power section, find “Power mode“, and from the drop-down menu in front of it, select “Best performance“.
FAQs
Q. Is a solid-state drive (SSD) a better option for my Windows 11 PC?
SSDs are popular because of their speed; they outperform HDDs since they employ electrical circuitry and have no physical moving components. This results in speedier startup times and fewer delays while accessing apps or performing intensive processing operations. Well, If you want performance, then an SSD is a must.
Q. Is a solid-state drive (SSD) good for gaming in Windows 11?
No, an SSD will not provide you with a better framerate in your favorite games, but it will give players a competitive advantage over non-SSD hard drives in certain situations. Generally speaking, games installed on an SSD boot up far faster than games installed on a none-SSD hard drive.
Q. Does the size of an SSD impact my Windows 11 performance?
No, the size of an SSD has no effect on performance. The quantity of data that has to be looked through for searches may affect speed, and remember that SSD will be faster than non-SSD. When comparing two identical devices of the same size, SSD will always perform better.
Q. When an SSD is full, does it get slower?
Unfortunately, yes! As you fill up your SSD, they slow down. Filling your SSD to near-capacity can significantly reduce its writing performance. The reason for this is due to the way SSDs and NAND Flash storage operate.
Q. Does Windows 11 automatically defrag SSD?
No, it doesn’t! We suggest you do not try to defrag any solid-state drive. Defragmenting an SSD can shorten its lifespan. Defragmenting is not required due to the effective operation of SSD technology.
Conclusion
That’s it! These are eight ways that we think will help you increase SSD performance on your Windows 11 computer. We showed you how to do it step-by-step, and all you need to do is follow the steps. Lastly, if you have any other way in mind, please share it in the comments section below. And also, tell us which of the above methods was effective in your case.
Read also:
