Windows 11 allows you to increase the size of the mouse cursor and change its color. Do you want a black mouse cursor? You can choose that! Want a huge red cursor that’s easier to see? You can also choose that. In this guide, we will show you two quick methods to change the mouse pointer color on Windows 11 for better visibility.
Table of Contents
Why You Should Change Your Mouse Cursor Color?
Windows 11 comes with a standard mouse cursor size and color, it is white. The default white is not usually useful for people with poor eyesight. With the use of wide screens and higher resolutions, it can be difficult to find the mouse pointer in a larger screen area or even on dual monitors. Fortunately, Windows allows you to change the color of the mouse pointer to increase contrast.
Changing the color of the mouse pointer may not only be suitable for people with poor eyesight or light sensitivity, but also for people who match the color of the desktop theme or background or who just want to have fun. Whatever the reasons are, Windows 11 allows users to change and customize the color of the mouse pointer.
Two Ways to Change the Color of your Mouse on Windows 11
When the new Windows 11 is released generally for everyone, it comes with many new features and improvements. These features and enhancements are very useful for some people while adding some learning challenges for others. Some things and settings have changed a lot, and people need to learn new ways to use and manage Windows 11.
After all the new features added in Windows 11, the mouse pointer settings in Windows 11 did not change significantly. To start changing the mouse color in Windows 11, you can follow one of the below methods:
Method 1. Change the Mouse Pointer Color on Windows 11 via Settings app
One way to change the color of your mouse is using the Settings app. To do that, follow the below steps:
Step 1. To get started, open Windows 11 Settings app by using the ‘Windows + I’ shortcut keys or simply search for it in Start.

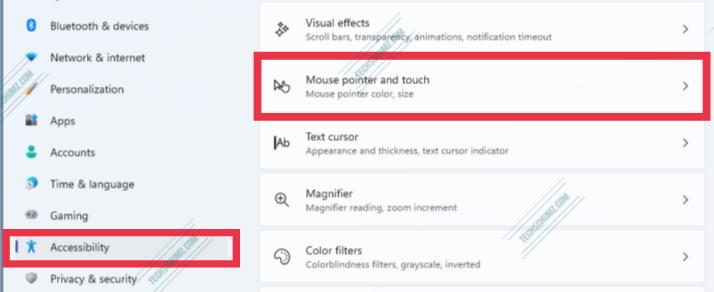
Step 2. After the Settings window opens, click on ‘Accessibility’ on the left pane, then select ‘Mouse pointer and touch’ on the right pane of your screen.

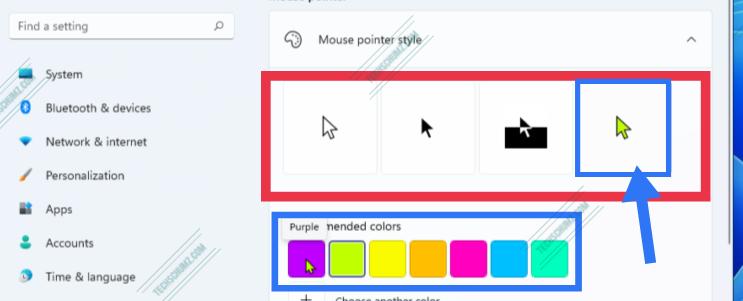
Step 3. Next, choose a custom color from the selection provider. Then choose a color for the pointer that is most suitable for your situation.

Step 4. The changes you make here will be applied automatically in real-time. Just exit the settings panel when you’re done.
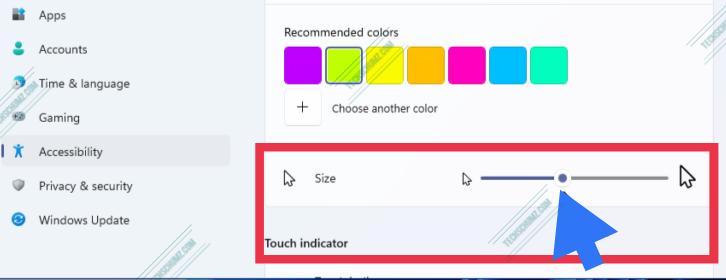
Note: Not only can you change the color of the pointer, if the pointer is too small to be seen on the screen, you can also increase the size of the pointer. Adding color and increasing size will go a long way for people with poor eyesight.

Method 2. Change the Color of Your Mouse on Windows 11 via Control Panel
The other way to choose a color for your mouse pointer on Windows 11 is by going through Control Panel. To do that, follow the below steps:
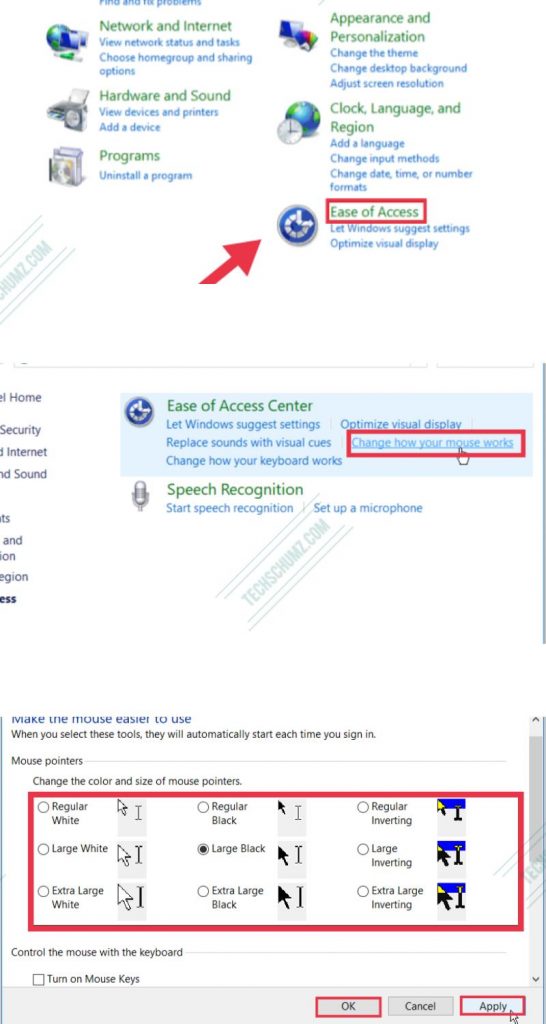
- Open Control Panel by searching for it in the Start.
- Next, find and click on Ease of Access option.
- Then, click on the ‘Change how your mouse works’ link under Ease of Access Center.
- Now, you can change the size and color of the mouse pointer by selecting any of the options that appear. After making your selection, click ‘Apply‘ and then ‘OK‘ to save your changes.

That’s it! That’s how the mouse pointer color can be changed using Control Panel.
Conclusion
This post showed you two quick ways on how to change the mouse pointer color on Windows 11 PC/laptop. You can use any of the above methods, whichever you find convenient. However, the Settings app have more customisation options for your mouse cursor. Finally, If you face any problems or have any questions, please let us know in the comments section below. Good Luck!
Read also:
