
Compared with Apple’s and other companies’ AirPods counterparts, the Galaxy Buds earbuds are one of the best true wireless earbuds. However, you may be using iMac, MacBook Pro, and MacBook Air and want to use and connect Galaxy Buds as your daily controller. So, in this guide, you will learn how to pair and Connect Galaxy Buds to your MacBook and Mac (MacBook Pro, MacBook Air, and iMac).
Read also: How to Connect Galaxy Buds Live to your iPhone and iPad
Table of Contents
Samsung Galaxy Buds
Like Jaybird Vista, the Galaxy Buds are made entirely of plastic. The edgeless design of the earbuds gives people a whimsical feeling, and the round triangular touchpad provides enough space to enter commands without frequent errors. The lack of onboard storage is a significant difference between the Galaxy Buds and the Gear IconX.
Samsung provides a dual microphone array that can reduce background noise and convey your voice by switching between the two microphones. Unfortunately, earbuds cannot work outdoors in strong winds, but they can block the noise of the crowd in the coffee shop.
How to charge it?
The charging box is a simple oval plastic piece with a hamburger-style opening. There is only enough internal space to adapt to the entry required to charge the handset. While the USB-C charging entry is on the back, the external LED flag warns from the battery level against red, green or yellow. If you lose the cable or don’t want to use it, you can place it on top of the Samsung Galaxy S10 model. First, make sure that the Wireless PowerShare function is turned on to the notification tray.
The charging case is a simple, oblong plastic piece with a hamburger-style opening. It has only enough interior space to accommodate the requisite inlets for charging the earbuds. A single LED indicator on the outside glows red, green, or yellow to alert listeners of the battery level, while a USB-C charging input is located on the rear. If you lose the cable or don’t want to use it, you can put it on top of your Samsung Galaxy S10 model. Just make sure the Wireless PowerShare feature is turned on in the notification tray first.
Who are Samsung Galaxy Buds made for?
Galaxy Buds are especially suitable for Samsung Galaxy S10 buyers because they are a giveaway for those who pre-ordered the Galaxy S10 and Galaxy S10. This does not rule out the possibility that any Android or iPhone user can use the headset. When used in conjunction with the iPhone, these true wireless earphones meet the requirements of the AAC Bluetooth codec, thereby reducing significant latency.
Pair & connect Galaxy Buds to your MacBook and Mac (MacBook Pro, MacBook Air & iMac)
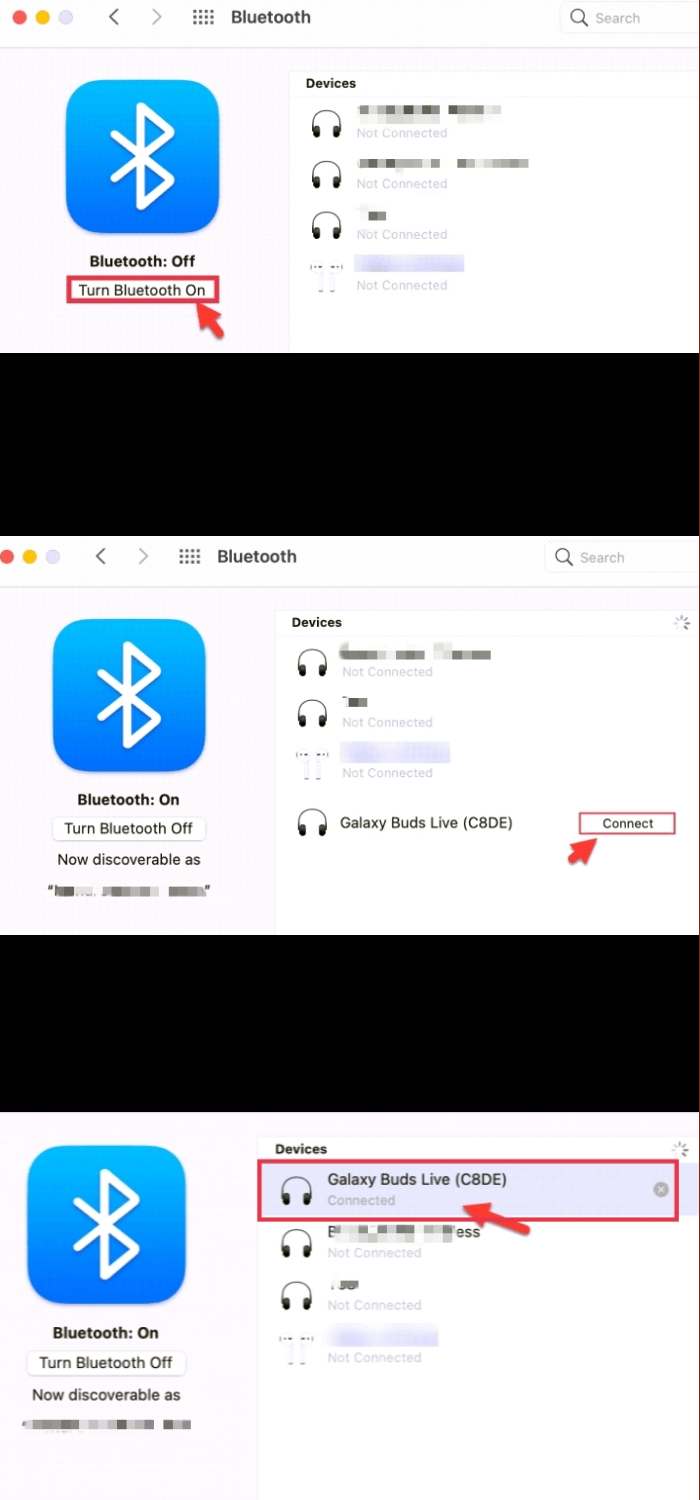
So, let’s go straight to step-by-step instruction, here’s how you can connect the Galaxy Buds (Galaxy Buds+, Galaxy Buds Pro & Galaxy Buds Live) to a MacBook or Mac:
- Open the “System Preferences”.
- Next, tap on “Bluetooth”.
- Now, click on “Turn Bluetooth On”.
- Now, to start pairing Galaxy Buds, open the “Galaxy Buds+” case.
- When the Galaxy Buds appear on the list of nearby devices, tap on “Connect”.
- Finally, you’ve connected your Galaxy Buds to your Mac or MacBook successfully.
In case you want to unpair or disconnect the Galaxy Buds from your Mac or MacBook, go to the System Preferences > Bluetooth and tap on the “x” or right-click and click on Disconnect next to the listing for the earbuds.

Final Words
That’s it. This is how you can pair and connect Galaxy Buds to your MacBook and Mac. Now go and play your favorite movie on your MacBook or Mac, connect your galaxy buds, and enjoy the movie. Good Luck!
Read more: