
Technology often provides much conveniences, such as turning on a computer from miles away without pressing the power button. Wake on LAN has been around for a while. In this article, I will show you how to enable wake on LAN on Windows 11 PC or laptop. Also, you will learn what is Wake on LAN and how to wake up your computer remotely on Windows 11 via this feature.
Table of Contents
What is Wake on LAN?
Wake on LAN (sometimes abbreviated as WOL) is an industry standard protocol for remotely waking up your Windows 11 computer from a very low power mode. The definition of “low power mode” has changed over time, but we can understand it because the computer is in the “off” state and can consume power. The agreement also allows to complement the functions of Wake-on-Wireless-LAN.
This is useful if you plan to access your Windows 11 PC or laptop remotely for whatever reason – it allows you to retain access to files and programs while keeping your PC in a low-power state to save energy (and money, of course). For convenience, anyone who uses programs such as VNC or TeamViewer or keeps file servers or game server programs available should enable this option.
What are the requirements?
Your computer might not have all the requirements for this feature that will include the following.
- Must have an Ethernet connection.
- A peer-to-peer network between two or more computers.
- The computer must be in either Sleep or Hibernation mode for this to work.
2 Ways Enable Wake on LAN on Windows 11
Most of the settings of Windows 11 have a centralized location. From enabling blue light filters to changing the drive letter and creating a new user, everything can be done through your system Settings panel. You can also enable Wake on LAN via Settings, and also you can use Disk Manager to enable it. You will learn about both ways below.
Method 1. Enable Wake on LAN on Windows 11 via Settings
Step 1. To enable Wake on LAN using Settings, you need to open the Settings app by using the Windows + I shortcut keys.

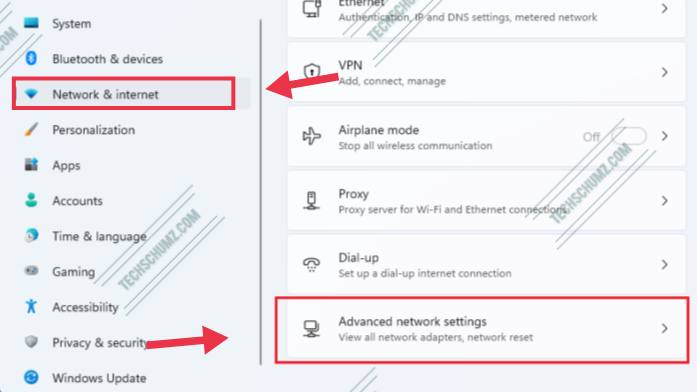
Step 2. After the Settings window opens, click ‘Network & internet‘ on the left pane, and select ‘Advanced network settings‘ on the right pane of your screen.
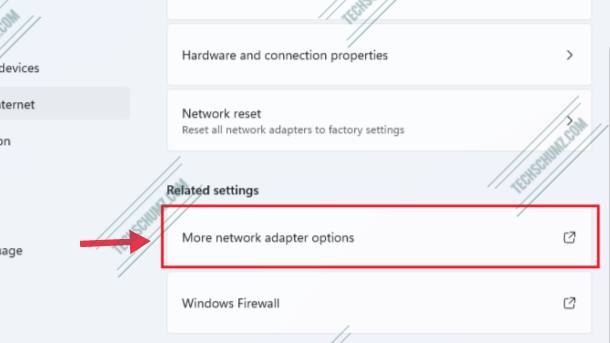
Step 3. Click on ‘More network adapter options’ under the Related settings section.
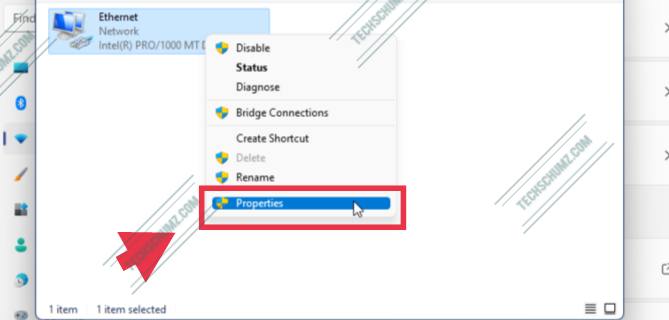
Step 4. Now, the network adapter settings window opens, right-click on the computer network adapter and click ‘Properties‘.
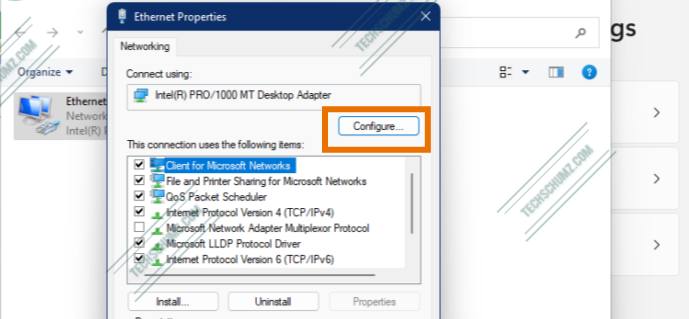
Step 5. On the new opened window, click the ‘Configure‘ button.
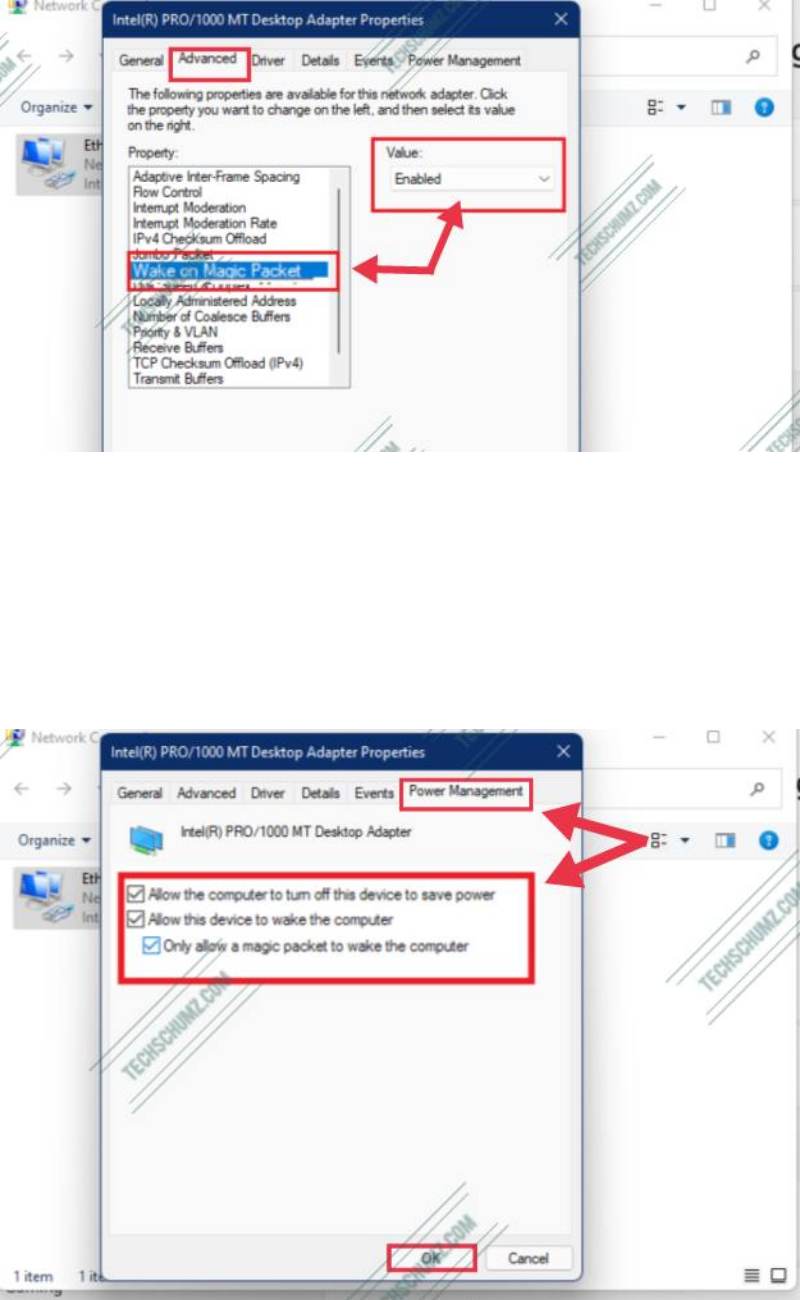
Step 6. Now, go to the ‘Advanced‘ tab, find and click ‘Wake on Magic Packet‘ from the list, then change its value to ‘Enabled‘.

Step 7. Now, click on the Power Management tab, then check the boxes to ‘Allow this device to wake the computer‘. Also, you may check the box to ‘Only allow a magic packet to wake the computer‘. Lastly, click OK.
After you complete the steps, the computer will be ready to be started remotely with a magic packet over the network using a third-party tool.
Method 2. Enable Wake on LAN on Windows 11 via Disk Manager
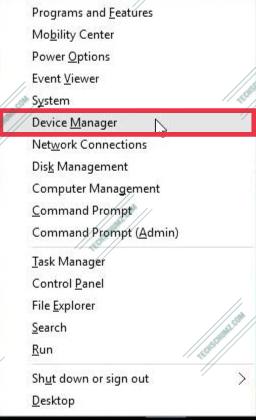
Step 1. To enable Wake on LAN using Disk Manager, press ‘Windows + X‘ , and select ‘Device Manager’ from the menu.
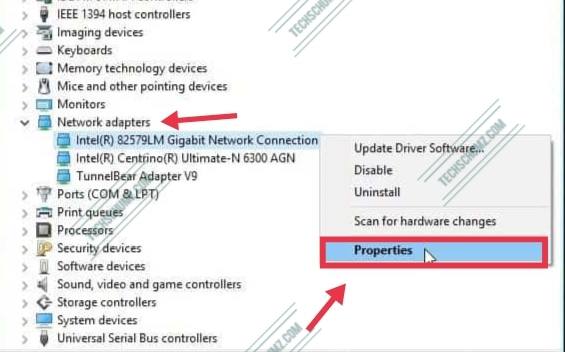
Step 2. Now, expand ‘Network adapters, select your Ethernet adapter, right-click it and then click ‘Properties‘.
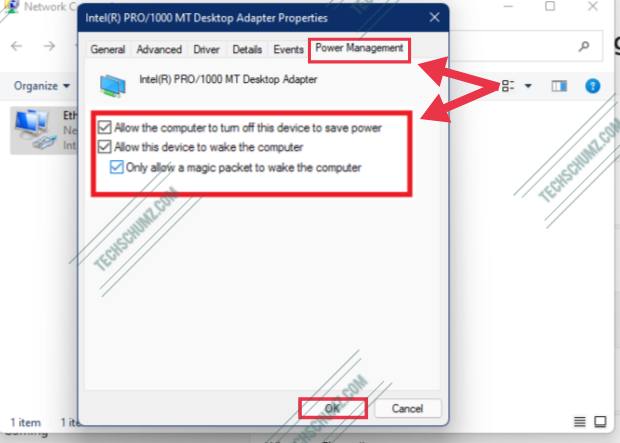
Step 3. Then select the Power Management tab and check off all three boxes shown below.

Step 4. Next, select the Advanced tab, scroll down in the Property box and select Wake on Magic Packet and ensure that it is enabled in the Value list box then click OK.

How To Wake Up Your Computer Remotely On Windows 11
Now that you have enabled and configured the Wake On LAN function, let’s know how you can remotely wake up a Windows 11 PC. Follow the steps below to remotely wake up a Windows 11 PC.
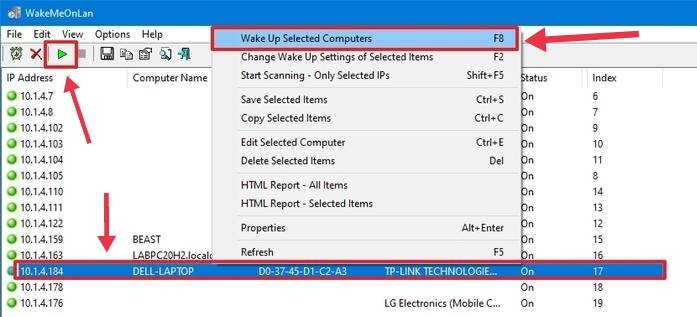
For this guide, we will use the ‘WakeMeOnLan’ tool from NirSoft to wake a PC or laptop remotely:
- First, download the NirSoft app and install it on your Windows 11 PC.

- After you install it, run the app, and tap on the Play button to view all the devices in the network.
- Next, right-click on the preferred computer, and select the ‘Wake Up Selected Computers‘ option.
- Finally, tap on the ‘Yes‘ button, and that’s it. Now the app will send the magic packet to the wake-up your Windows 11 computer.
How to Disable Wake on LAN on Windows 11
If you change your mind and want to disable the Wake on LAN feature in Windows 11, simply reverse the steps above to do it.
- Open the Settings app and click on the Network & internet.
- Click on Advanced adapter options.
- Select the network adapter, right-click on it and select Properties.
- Now, go to the Advanced tab, and select Wake on Magic Packet and select Disabled.
- On the Power Management tab, uncheck to box: ‘Allow this device to wake the computer’.
- Click OK to save the changes and exit.
That’s it!
Conclusion
This guide showed you how you can enable wake on LAN on Windows 11 PC or laptop. And also, what it is, how to wake your computer remotely on Windows 11 and how to disable it. If you encounter any problems above, please tell us using the comments section below.