In this guide, we will show you how to connect Galaxy Buds to a Windows 11 PC or laptop. Besides, It’s just as simple to pair Galaxy Buds with a Galaxy device as it is to pair AirPods with an iPhone. Furthermore, they can be linked to any of your other devices, such as computers, tablets, and phones.
Meanwhile, the Galaxy Buds are Samsung’s true wireless answer to Apple’s wildly popular AirPods, and according to our analysts, they’re even better. If you’re a die-hard Samsung Galaxy user, these are the earbuds for you.
Table of Contents
Steps to Connect Galaxy Buds to a Windows 11 PC
You can follow the below steps to pair Galaxy Buds to Windows 11. Remember that you can connect other Galaxy Buds models the same way. For example, Galaxy Buds Live, Galaxy Buds Pro, Galaxy Buds and Galaxy Buds+.
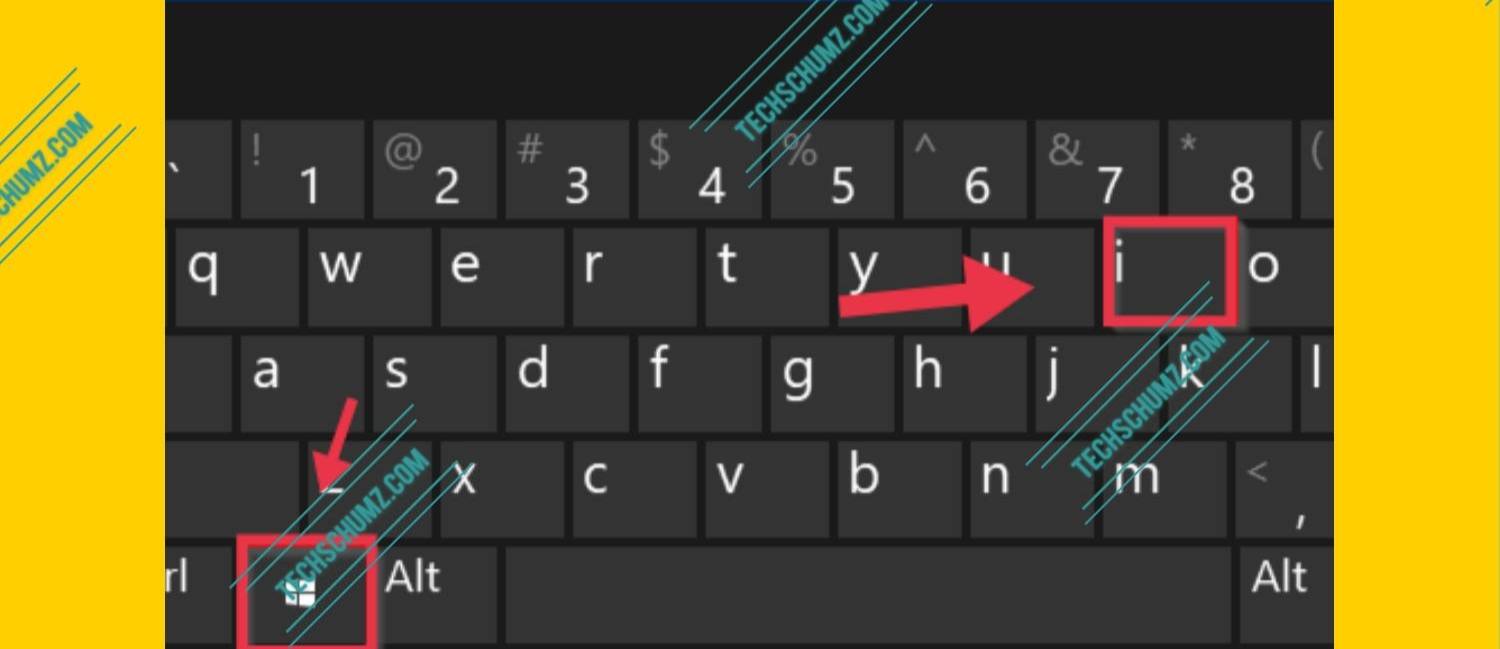
Step 1. To pair your Galaxy Buds to a Windows 11 computer, first, open the Settings app by using the ‘Windows + I‘ shortcut keys.
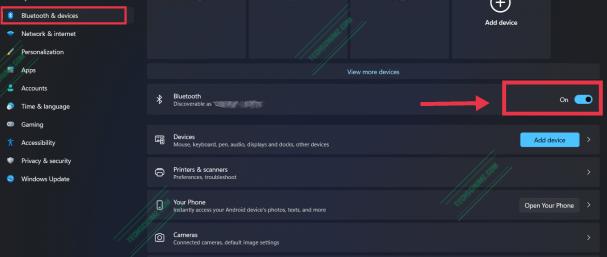
Step 2. Then, click on ‘Bluetooth & devices’ from the left pane of your screen and turn on the ‘Bluetooth‘ from the right side pane.
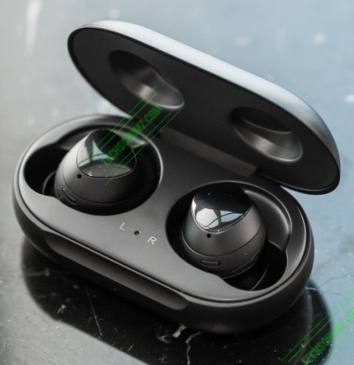
Step 3. To connect the Galaxy Buds to your device, you must first open their charging case. Although it may not appear so, by opening the case, the earbuds automatically enter pairing mode, allowing your computers to find them via Bluetooth.
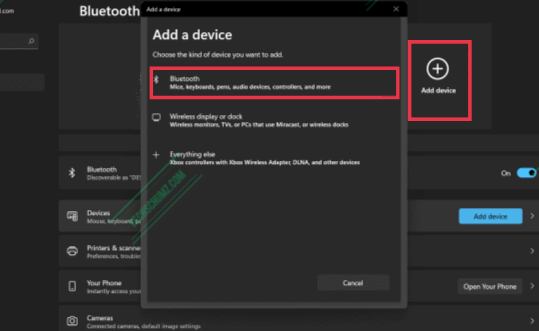
Step 4. After turning on the Bluetooth and putting your buds into pairing mode, click on ‘Add device‘ option under the Bluetooth & devices, and from the list of options, under Add a device option select ‘Bluetooth‘.
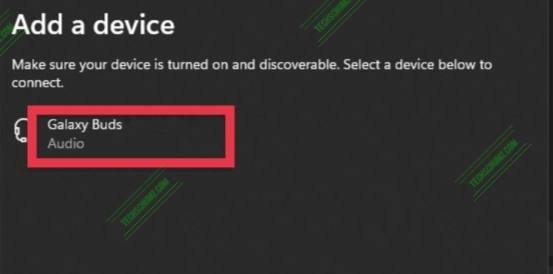
Step 6. Next, if your earbuds are within pairing distance, you will see them besides the available devices. After you see it, just select it and your Galaxy Buds will be connected to your Windows 11 PC.
Unpair Galaxy Buds from a Windows 11 Computer
If you want to use your earbuds no more, you can simply disconnect them by following the below steps:
- Open the Settings app by using the ‘Windows + I‘ shortcut keys.
- Next, click ‘Bluetooth & devices‘ from the left pane of your screen
- Then, click on the ‘three dots‘ next to the Galaxy Buds and select ‘Disconnect‘.
What Samsung Buds Can be Connected to a PC or Laptop?
If you are wondering what buds can be connected to your Windows 11 PC or laptop, then look at the list below. And besides, you can connect your Galaxy Buds to different laptops, like, Samsung, Lenovo, HP, Dell, Acer, etc…
- Samsung Galaxy Buds – First Gen
- Samsung Buds Live
- Samsung Buds Pro
- Samsung Galaxy Buds2
- Samsung Galaxy Buds+
Final Words
This article was about how you can pair your Galaxy Buds to a Windows 11 computer. Remember that you can follow the same steps with different Samsung Buds, like, Buds Live or Buds Pro. Also, we have some articles that will show you how you can connect Galaxy Buds to Windows 10, Mac or an iPhone. Lastly, we hope you find this article useful, and please let us know if you face any problems.
Nice little article about Samsung Buds. Unfortunately, I was able to pair mine the first time, then I had to roll back my os as it was a new laptop. When I went to pair again….no dice. Can’t determine what is causing this. Very odd.
You can try the following fixes if you can’t connect your Samsung Galaxy Buds to your laptop:
1. Use your phone’s settings to disconnect/forget the earbuds.
2. Install the most recent Bluetooth driver.
3. Factory reset your Samsung earbuds. To do that, open the Galaxy Wearable app and tap Watch settings, then tap Reset.