Many reasons require you to understand some basic network terminology when setting up network devices on a Windows 11 PC. MAC addresses, IP addresses, and DNS addresses are some of the most commonly used terms. Knowing its details will help you set up a new router or troubleshoot network problems. So, in this guide, I will show you how to check or find your IP address on a Windows 11 PC or laptop using seven easy methods. But first, let’s learn about IP addresses and their types.
Table of Contents
What is an IP address?
An IP address is the address of your network hardware. This helps connect your computer to the network and other devices in the world. IP addresses consist of numbers or characters. All devices connected to an Internet connection have a unique IP address, which means billions of IP addresses are required. The new IP upgrade, IPv6, meets this criterion.
There are two versions of IP: IPv4 and IPv6. IPv4 is an older version with over 4 billion IP addresses. Nevertheless, recent versions of IPv6 can provide up to a trillion IP addresses to meet the needs of all Internet users and devices. Meanwhile, the IPv4 version was used to construct numeric IP addresses (numbers) that could potentially conflict with other IP addresses. Therefore, IPv6 introduced the hexadecimal method of providing unique IP addresses to trillions of users around the world.
Types of IP Address
There are various types of IP addresses, such as private IP addresses, public IP addresses, static IP addresses, and dynamic IP addresses.
Private IP Address
A private IP address is the address of a device connected to a home or corporate network. If you have multiple different devices connected to one ISP (Internet Service Provider), all of your devices will have a unique private IP address. This IP address cannot be accessed from devices outside of your home or corporate network. Dedicated IP addresses are not special, because the number of devices on the network is limited.
Public IP Address
Your public IP address is the main IP address that your home or business network connects to. This IP address connects you to the world and is unique to all users.
Static and Dynamic IP Addresses
Public and private IP addresses can be static or dynamic. The IP address that you manually configure and patch on the device network is called a “static IP address.” Static IP addresses can not be changed automatically. When you configure a router on the Internet, the dynamic IP address will automatically configure and assign an IP address to your network. This IP address assignment is handled by the Dynamic Host Configuration Protocol (DHCP). DHCP can be your Internet router, which assigns IP addresses to your home or business area network.
7 Quick Ways to Find Your IP Address on a Windows 11 PC or Laptop
After knowing all about IP addresses, here you will see seven different ways to find your IP address on your Windows 11 computer. Follow each step carefully.
Method 1. See IP Address on Windows 11 using Taskbar
The easiest method to find your IP address in Windows 11 is to look it up in System Settings.
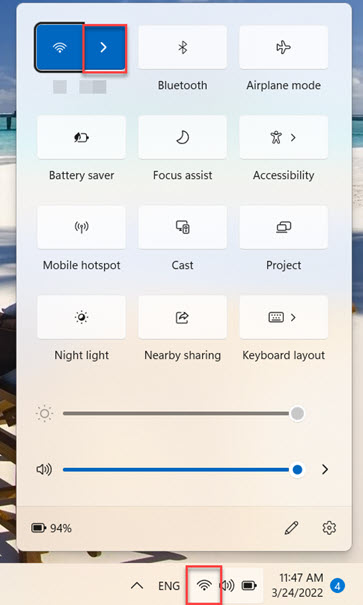
- First, tap on the WiFi or Ethernet adapter icon at the right corner of the taskbar to go to the Action Center.
- Next, tap the arrow button next to the WiFi or Ethernet icon.
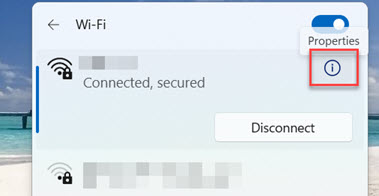
- Then, select your connection and tap on the “Properties” icon (which is an “i” in a circle), or you can right-click on your connection and select the “Properties” option.
- Finally, scroll down, and you will find your IPv4 and IPv6 addresses. That’s it!
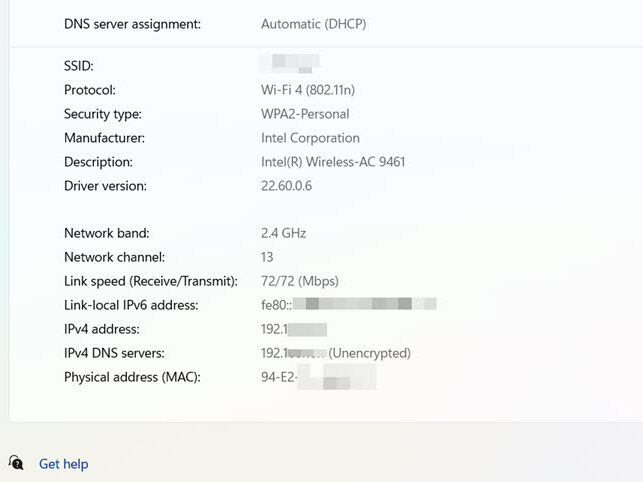
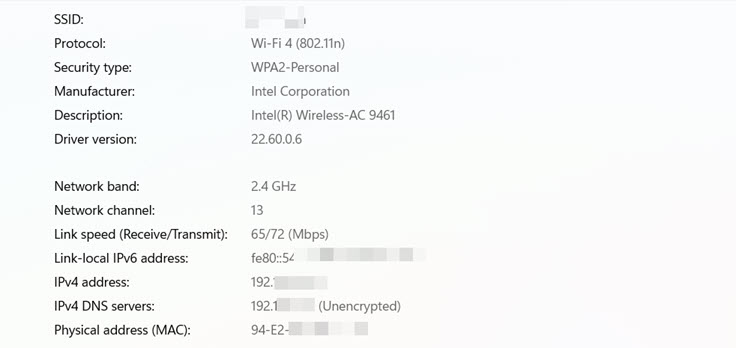
This page will display other TCP/IP address information for your network adapter, including DNS settings, IPv4 and IPv6 addresses, MAC address, manufacturer, link speed information, Link-local IPv6 address, and driver version.
Method 2. Know your IP Address on Windows 11 via Settings App
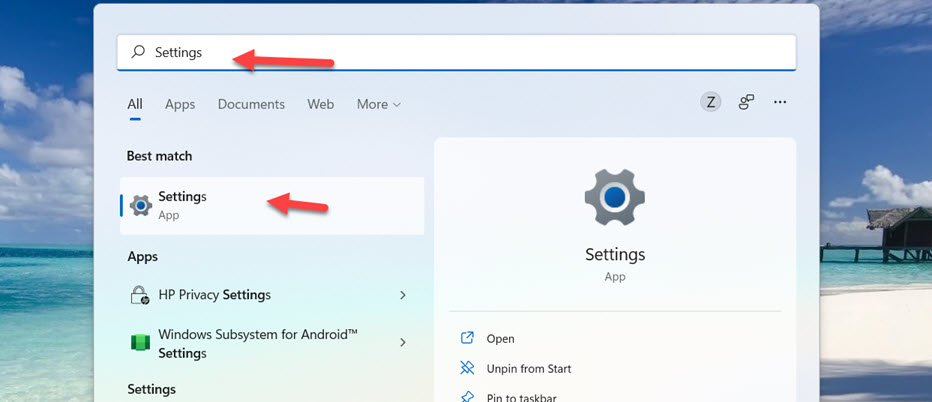
- To find your IP address using the Settings app, open the Settings app by searching for it in the Start Menu.
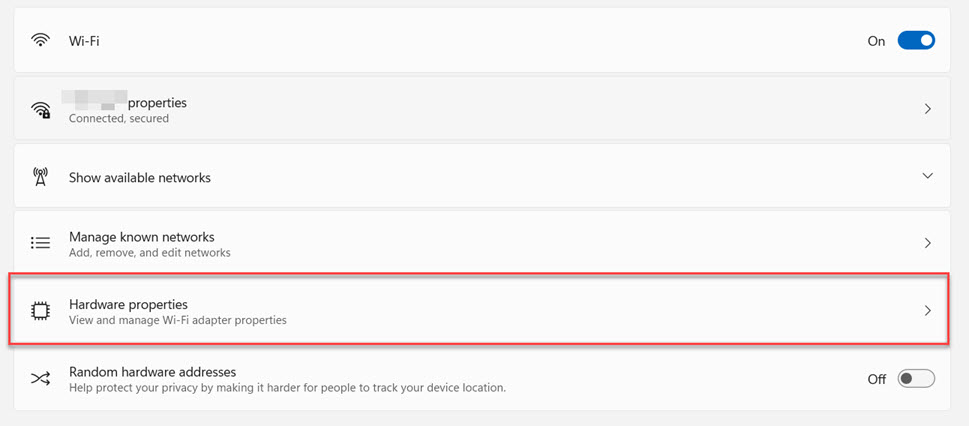
- Click on “Network & internet” on the left pane of your screen, and select “Wi-Fi” from the right menu (or Ethernet if you are connected via LAN).

- Next, select “Hard properties.“
- That’s it! On the next page that opens, you can see your IP address.
Method 3. Check Your IP Address on Windows 11 from Task Manager
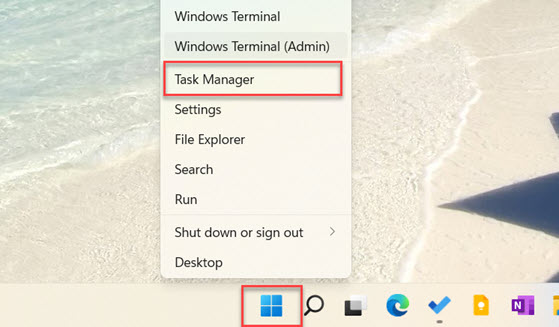
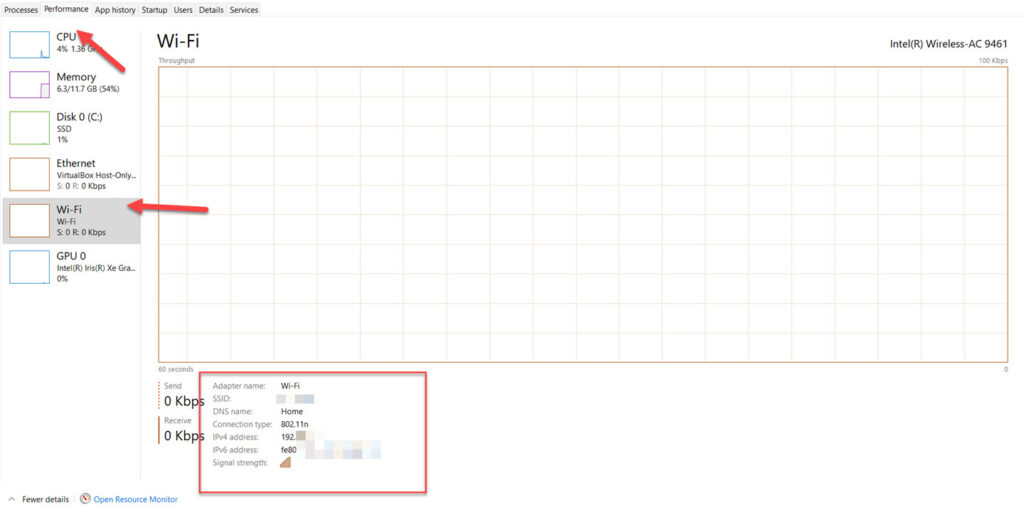
- To find your IP address in Task Manager, right-click on the Windows Start button on the taskbar and select “Task Manager” to open Task Manager.
- Next, select the “Performance” tab and on the left panel, tap on your network (WiFi, if you’re connected to WiFi).
- Now, you can see your local IPv4 and IPv6 addresses in the right panel.
Method 4. Know your IP Address on Windows 11 in the System Information App
The Windows System Information tool collects and displays all the important detailed information about the operating system, hardware, and software environment on your computer system. You can also use the system information tool to check your IP address.
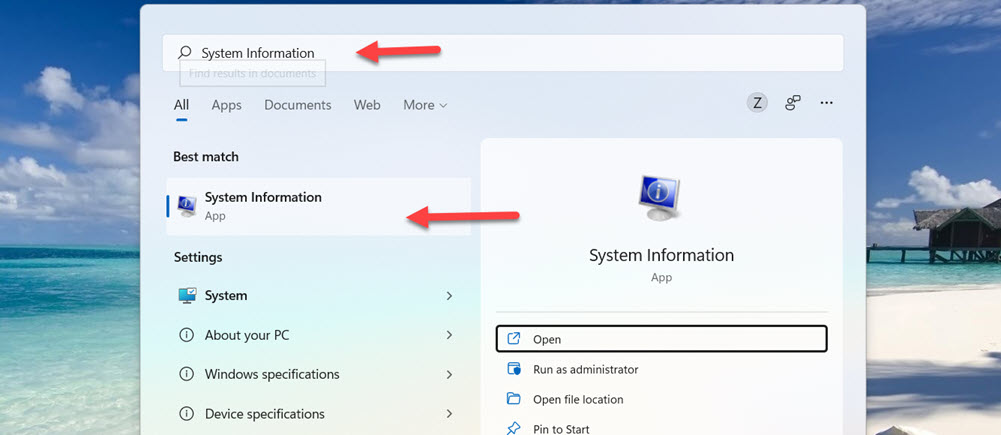
- To get started, search for “System Information” in the Windows search bar and click on the search result.
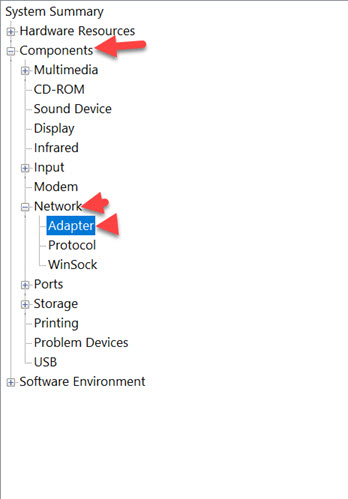
- In the System Information window, on the left pane, go to “Components > Network > Adapter.“
- On the right pane, scroll dow. You will find your IP address next to the field named “IP Address.” If your computer has a dual-stack IP configuration, then both IPv4 and IPv6 will appear next to the IP Address field.
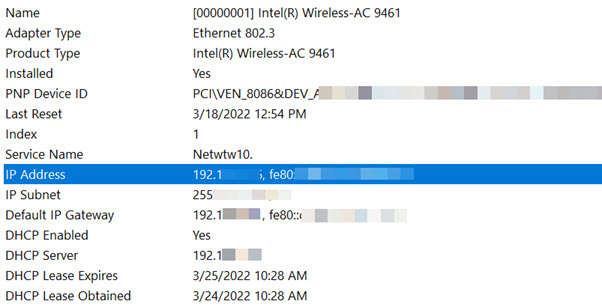
Note: If an adapter is disconnected, it will show its IP address as “Not Available.”
Method 5. Find Your IP Address on a Windows 11 PC via Control Panel
Another easy way to find public and private IP addresses in Windows 11 is to use the “Network and Sharing Center” in the control panel. This method can also be used for all other versions of Windows to find the IP address.
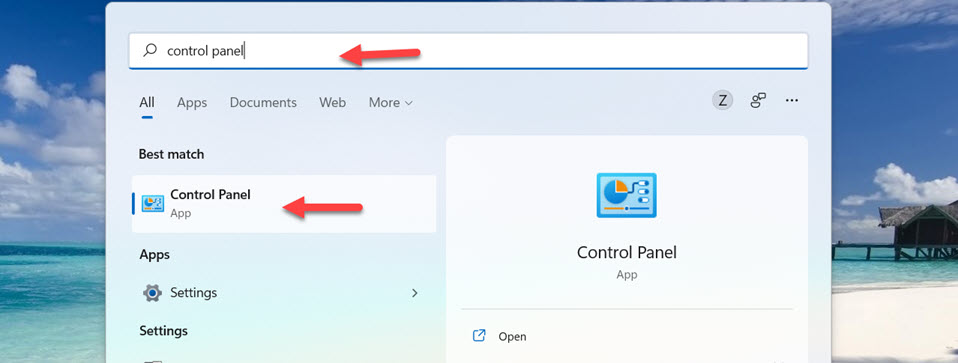
- To find your IP using the Control Panel, search for “Control Panel” in the Windows search and open it.
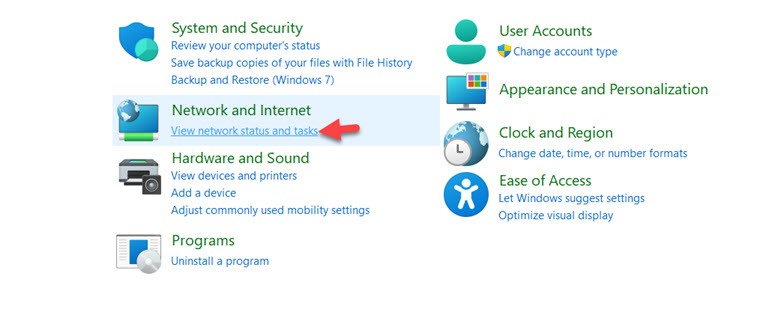
- Next, tap on the “View network status and tasks” link under the “Network and Internet” category in the Control Panel.
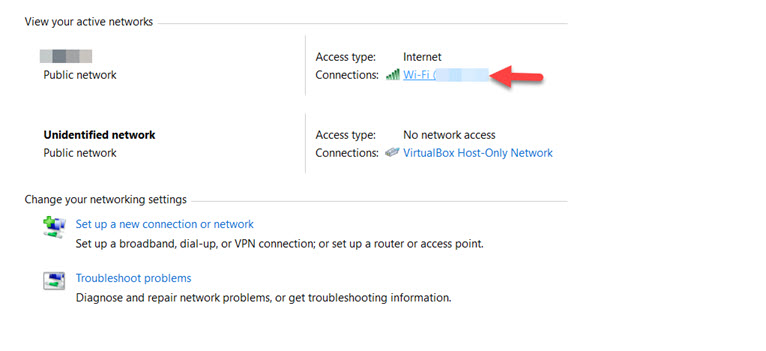
- Then tap on your network name next to “Connections” in the Network and Sharing Center window.
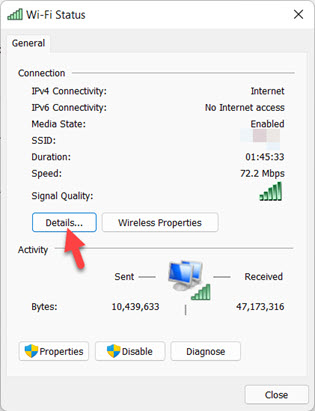
- Now, you will see a network status dialogue box. Click the “Details” button.
- This will open up the Network Connection Details dialogue. Here, you can find your private IPv4 and IPv6 addresses, as well as all other network connection details. If you’re looking for your public IP address, then this information will be shown next to ‘Temporary IPv6 Address’.
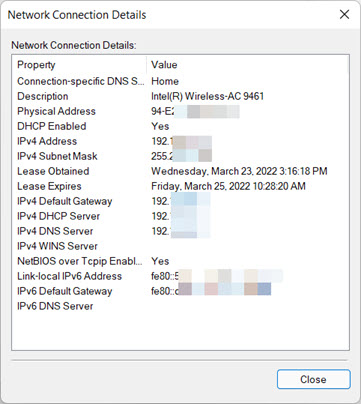
Here, you will also find the “Default Gateway” address, which is your router’s address.
Method 6. Check your IP Address on Windows 11 Using Command Prompt
- Open the Command Prompt by searching for “cmd” in the Start Menu.
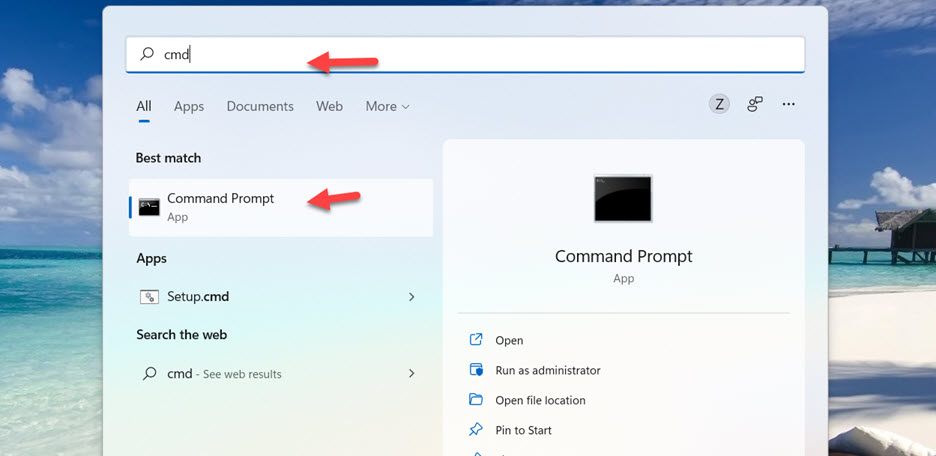
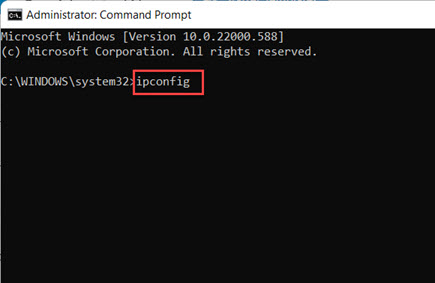
- Next, type “ipconfig” in the command prompt and press Enter.
- Now, if you are connected to a WiFi connection, you will see your IP address in the “Wireless LAN adapter WiFi” section. Or, if you have an Ethernet connection, your address will be in the “Ethernet adapter” section.
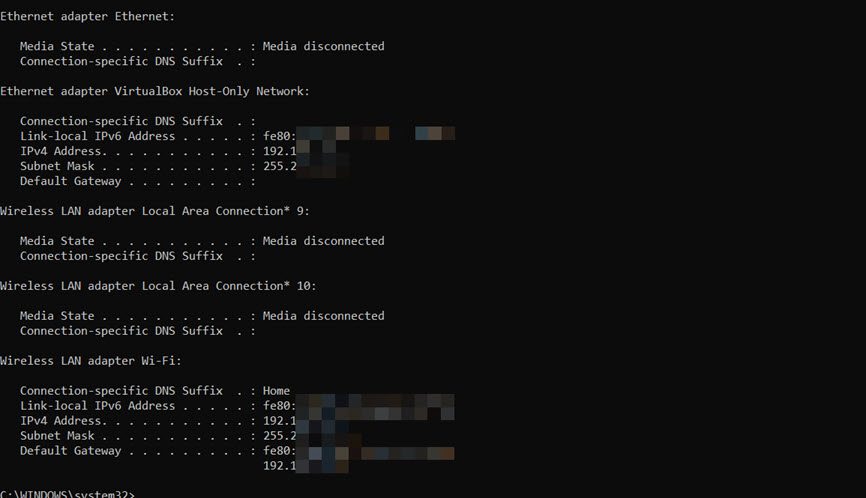
Tip: If you want to see all the details of your network adapter, enter the ipconfig/all command.
Method 7. See Your IP Address on Windows 11 using a Browser
Here are two ways in which you can use your internet connection to search for and find your IP address.
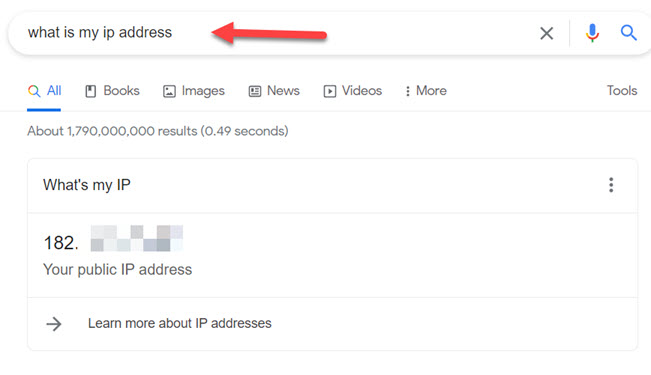
Using Google
This method is the simplest way to find your computer’s IP address. You need to search “what is my IP address” on a search engine such Google, Bing, etc. You will see your IP address in the beginning.
Using Websites
In addition to searching in Google or Bing, there are several websites that you can use to find your IP addresses (IPv4 and IPv6). A couple of those websites are whatismyipaddress.com and whatismyip.com.
Conclusion
That’s it! These are seven quick and easy methods that you can use to check or find your IP address on a Windows 11 PC or laptop. Below are the six methods.
- Using Taskbar
- Using Settings App
- Using Task Manager
- Using Control Panel
- Using System information app
- Using Command Prompt
- Using Browser
I hope you find this article helpful. If you encounter any kind of question, please let Techschumz know in the comments sections below. Good Luck!
Read also:
