If you want to promote trusted users or restrict permissions for not trusted users on a Windows 11 PC or laptop, then there are several ways to change the account type from standard to administrator, and vice versa. A standard account allows a user to access the device and make changes that do not affect other users but to have full control over your Windows 11 computer, its apps and sensitive settings, you need an administrator account.
In this tutorial, I will help you learn how to make a user an administrator on Windows 11 PC and laptop. You can change a user account type from Standard to Administrator and vice versa in four quick ways.
Table of Contents
What are Standard and Administrator Account on Windows 11?
There are two types of user accounts on Windows 11:
- Standard Accounts: When you create a new account on Windows 11, you have a Standard account type by default. A standard account is a limited type of account that can use existing applications, perform basic tasks, and modify system settings, as long as they do not affect other users on Windows 11.
- Administrator Accounts: They have full control and autonomy over Windows 11 computers or devices. An account with administrator rights can perform anything from installing software and hardware to accessing protected system files, changing security settings, and performing advanced tasks.
You must also be an administrator to manage other user accounts on your Windows 11 PC, including changing their type to administrator or standard, as shown in this tutorial. If you want to demote an administrator to a standard user, you must authenticate with an administrator account that is different from the administrator account you want to switch to.
4 Methods to Change a Windows 11 User Account Type
Below you will learn 4 easy methods on how to change the account type from a Standard user to an Administrator and vice versa.
Method 1. Change Administrator On Windows 11 via Control Panel
Besides the new Windows 11 Settings app, the old buddy, Control Panel utility also exists that can also be used to change the account type of a user account.
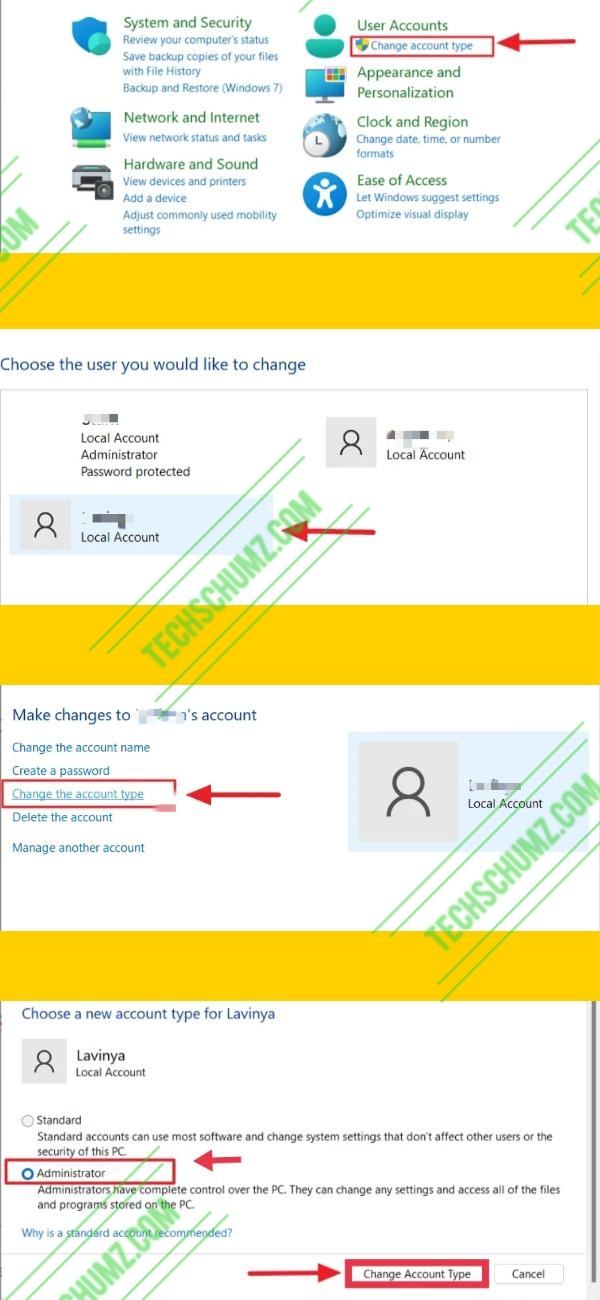
- To change a Windows 11 user account type from Control Panel, open Control Panel by searching for it in the Windows Search.
- Now, tap on the Change account type option under the User Accounts category.
- Tap on the user account that you’d like to change to administrator from the list of local accounts on your Windows 11.
- Next, tap on the Change Account Type option on the left.
- Finally, select Administrator and then click ‘Change Account Type’.
- The selected account will turn into Administrator. Now restart your computer to apply the changes.
Note: By following above step you can also change an Administrator account type back to ‘Standard’ this way using Control Panel.
Method 2. Make a User an Administrator on Windows 11 via netplwiz
You can also use the account management utility ‘User Accounts’ to turn a user into an administrator in Windows 11.
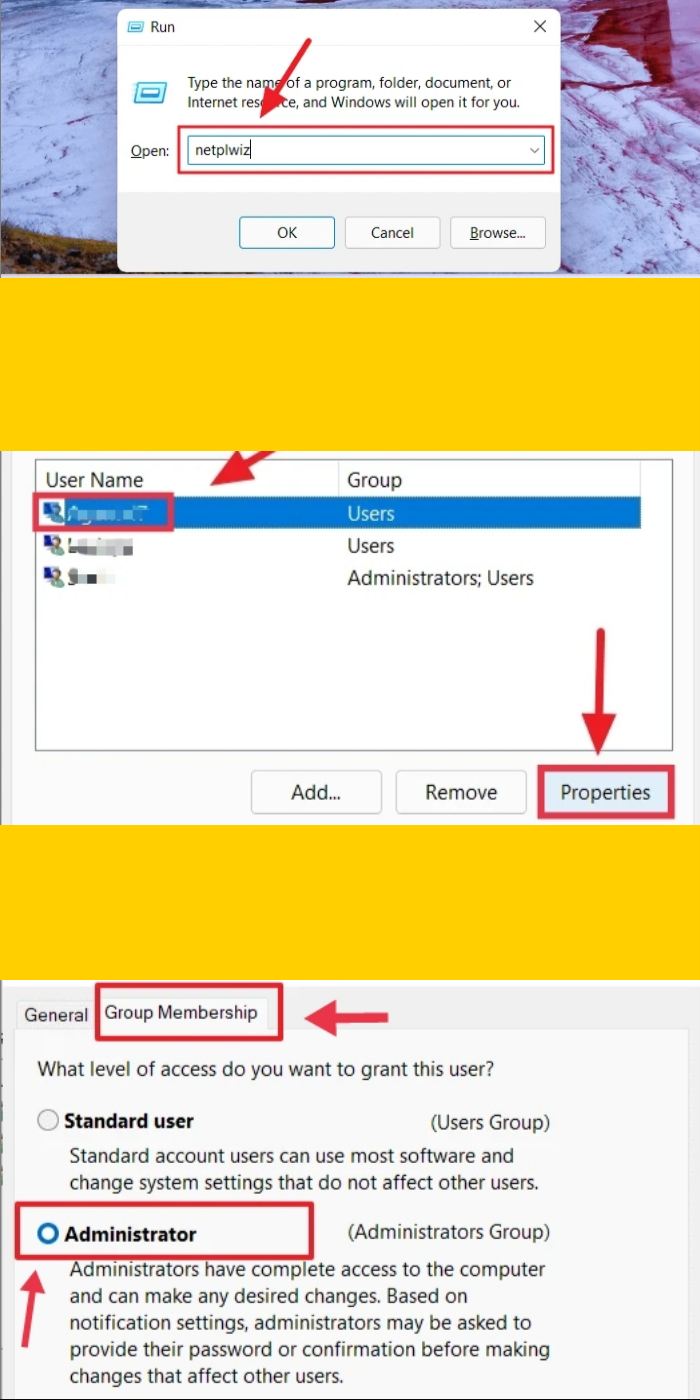
- To make a user an administrator using the User Accounts tool, open the Run dialogue via the shortcut key Windows + R and type netplwiz, and press Enter.
- Next, under the ‘Users’ tab of the User Accounts window, and choose the account from the list. and tap on the ‘Properties’ button.
- In the next window, switch to the ‘Group Membership’ tab, and then tap on the ‘Administrator’ option. Then, click ‘Apply’ and press ‘OK’.
- That’s it! The user now will be the administrator.
Note: If you tap on the ‘Other’ option, you can select from an array of different user groups such as Device Owners, Guests, Event Log readers, Remote Management Users, backup operators, etc.
Method 3. Change Administrator on Windows 11 using Windows Settings
First, let’s see how to use Windows 11’s Settings utility to change an existing Standard account into an Administrator account. You can only use any of the following methods if you logged in to an Administrator account.
- To Change an account to Administrator or Standard, open Settings by pressing Windows + I shortcut in Windows 11.
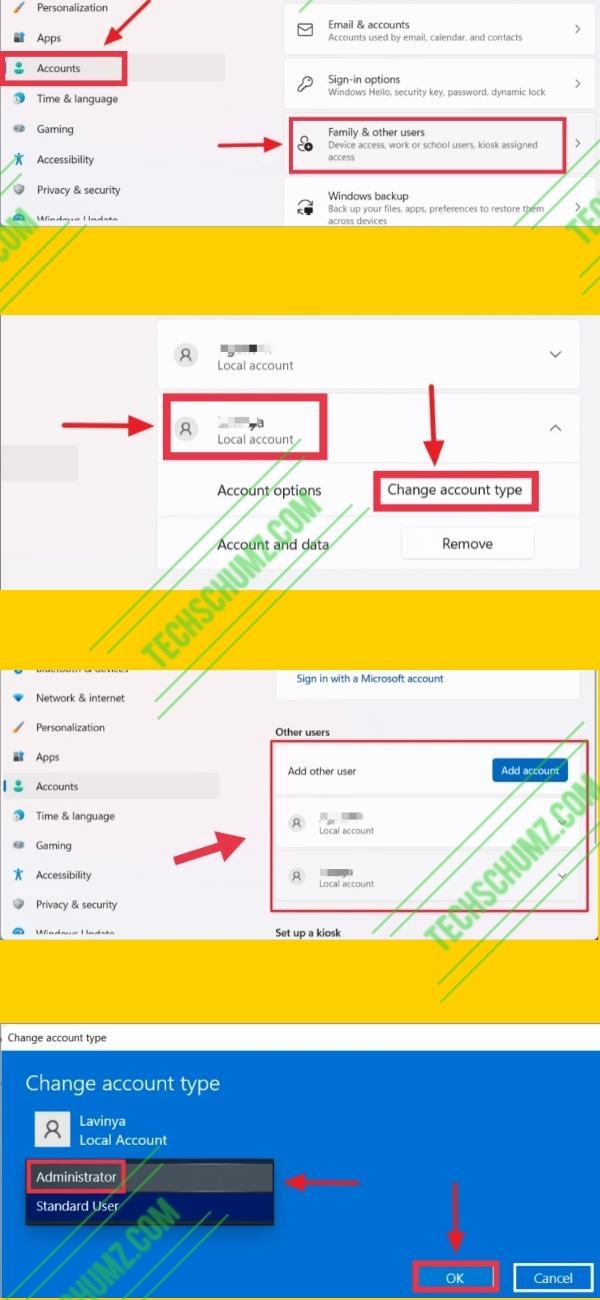
- Next, tap on the ‘Accounts’ section in the left pane, and select the ‘Family & other users’ option on the right pane.
- Now, tap on the name of the user account you want to make an Administrator and click on the ‘Change account type’ button that’s revealed.
- Now, you’ll see the account name and its type. Open the dropdown menu under the Account type option and select ‘Administrator’.
- Finally, tap on ‘OK’ to apply the change, and the selected Standard User account will now change into an Administrator account.
Note: If you don’t want a user to have admin privileges and want to change an Administrator account into a Standard User account from Windows Settings, just tap on ‘Standard User’ and click ‘OK’ in the ‘Change account type’ window.
Method 4. Make a User an Administrator on Windows 11 via Command Prompt
If you are a terminal enthusiast, you can also use an elevated command prompt to change the account type from standard to administrator and vice versa.
- To get started, search for ‘Command Prompt’ in the Windows search bar and select ‘Run as administrator’ on the right pane.
- To list all the local user accounts including default accounts, type the below command and press Enter :
- net user
- Then, type the following command to turn a Standard User account into an Administrator account and press Enter
net localgroup Administrators "Account name" /add
- Remember to replace the Account Name with the name of the User account. After pressing Enter button, the Standard account will change to an Administrator account.
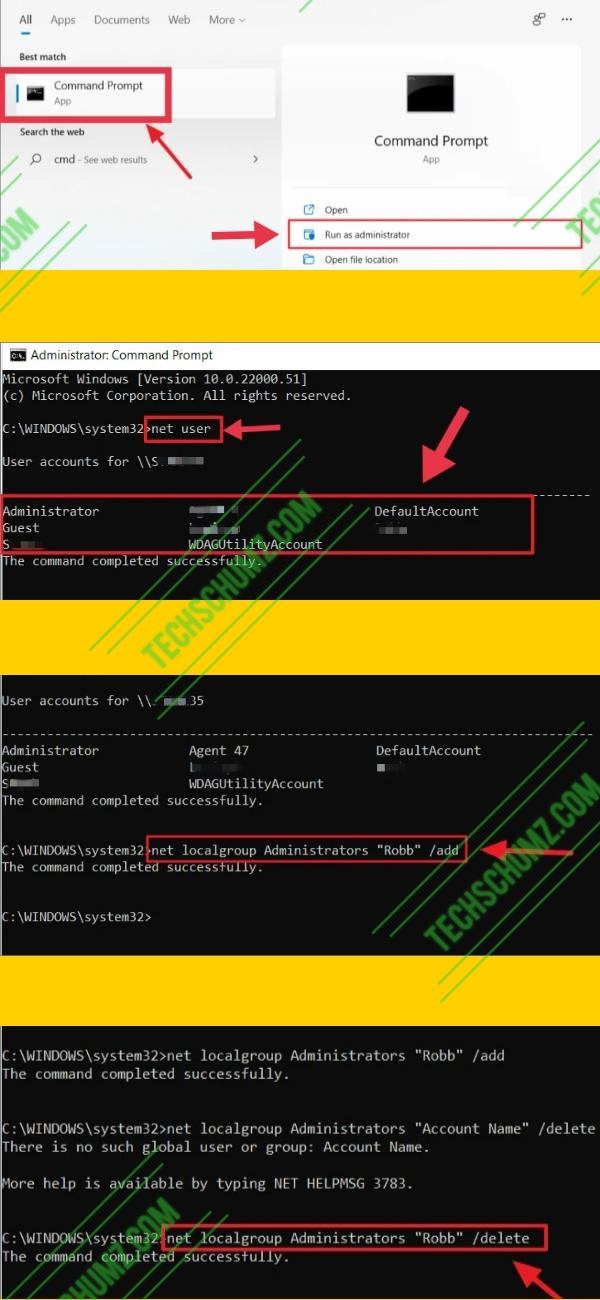
Note: If you don’t want a user to have admin privileges and want to change an Administrator account into a Standard User account using Command Prompt, then use the below command:
Final Words
These 4 simple and quick methods to make a user an administrator on Windows 11 Pc & Laptop. You can simply change accounts types from Standard to Administrator or vice versa using your Windows Settings, Control Panel, CMD and account management utility. I hope you find this guide helpful. If you encounter any kind of questions, please let us know in the comments section below. Good luck! Enjoy Windows 11 😊!
Read also:
Number 2 worked for me “netplwiz”. Thanks !