As we all know, Windows 11 has a very high number of built-in features, one of which is Microsoft Remote Desktop Connection. This feature allows you to remotely connect a PC to an auxiliary system from anywhere. With the help of Microsoft’s remote desktop connection feature, you can access your system remotely as long as your computer is turned on. In this article, we will help you learn how to enable remote desktop on your Windows 11 PC or laptop, add users to it and allow it through the Windows Firewall.
Table of Contents
What is Remote Desktop in Windows 11?
The remote desktop protocol has revolutionized the modern dynamics of the IT industry and business functions. This technology improves customer satisfaction and work efficiency, and reduces employee turnover and maintenance costs.
Microsoft Windows comes with a remote desktop connection tool that allows you to remotely connect to another system from anywhere. By default, it is disabled in the new Windows 11. However, when you enable it on your Windows system and allow remote connections to your PC, you can use another device to connect to your PC, and you can access all your applications, files, network resources, etc. from anywhere.
People use remote desktop access capabilities to do a variety of things, including the following:
- Access a computer in the workplace from home or when traveling.
- Access a computer at home from other places.
- Fix a computer problem.
- perform administrative tasks.
- Demonstrate something, such as a process or a software application.
How To Setup Remote Desktop on Windows 11
Windows 11 is the latest version of Windows, and it is also the successor to Windows 10. If you don’t know how to configure and use Remote Desktop in Windows 11, this article will be very helpful.
Enable Remote Desktop on your Windows 11 PC or Laptop
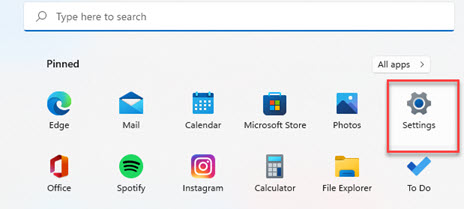
- To turn on or allow Remote Desktop Connection on Windows 11, open the Settings page by clicking the Start button and selecting the “Settings” icon gear.
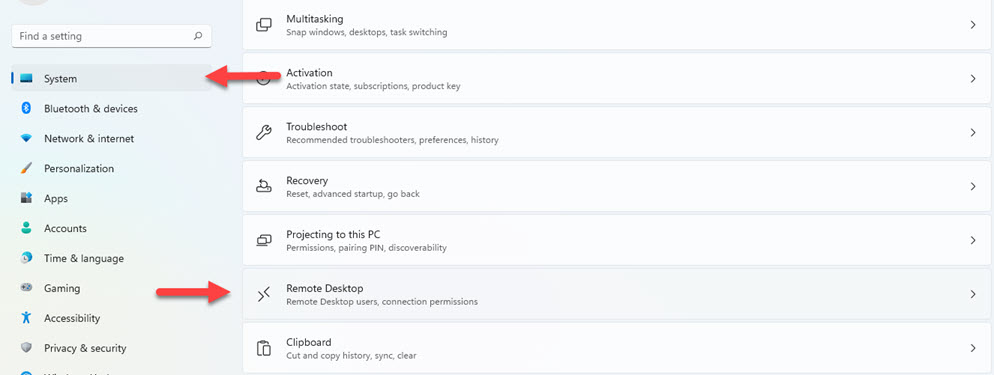
- Next, go to “System” from the left pane, and select “Remote Desktop.”
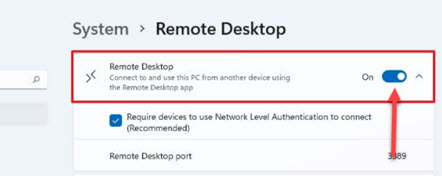
- Now, on the Remote Desktop settings page, enable or turn on “Remote Desktop.” When this is enabled, you will be able to connect to and use the PC from another device using the Remote Desktop app.
By default, the first account created on the machine is automatically added to the administrator group. Users who want to connect via Remote Desktop must be members of the Administrators group or Remote Desktop group on the local PC.
Add Users to the Remote Desktop Users group on Windows 11
- To add users to the Remote Desktop Users group, open the Settings page by using the “Windows +I” shortcut key.
- Next, scroll down and tap on the “Remote Desktop” option.
- Now, on the Remote Desktop window, tap on the Remote Desktop users link highlighted.
- After the pane opens, click on “Add“.
- Now begin by adding users who should connect to the machine remotely.
That should do it!
Allow Remote Desktop On Windows 11 Firewall
Regardless of which option you choose to configure a remote connection on your computer, you must adjust the remote desktop settings in the Windows firewall. If you don’t allow it on the firewall, it will also block any incoming connection to your device. Here’s how to configure the firewall settings:
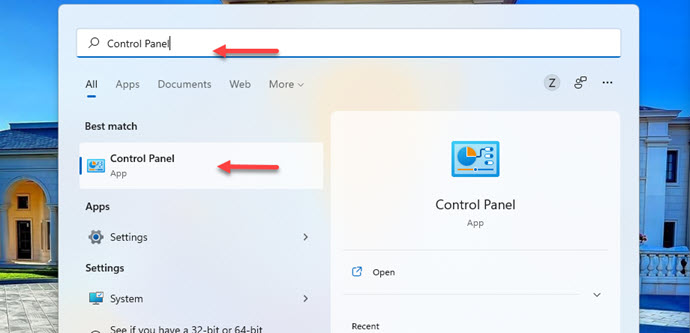
- Open the Control Panel by searching for it in the Start Menu.
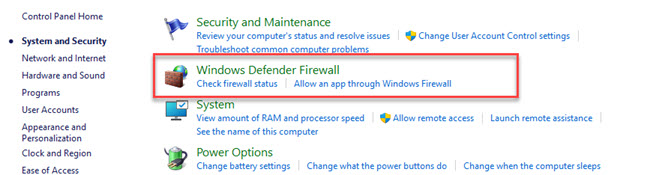
- Select “System and Security” from the Control Panel.

- Tap on “Windows Defender Firewall.”
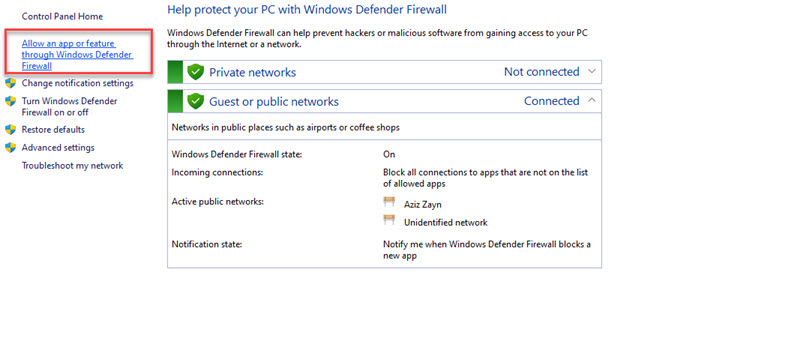
- On the left pane, click on the “Allow an app or feature through Windows Defender Firewall” link.
- Tap on the “Change settings” button.
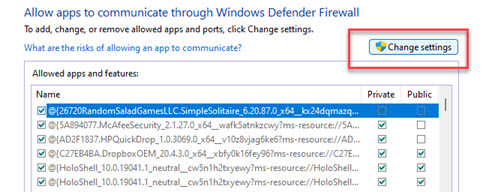
- Scroll down and check the ‘Remote Desktop’ and ‘Remote Assistance’ options.
- Remember to check the options on both Private as well as Public, and hit “OK.”

- Finally, restart your PC so that changes come into effect.
Final Words
That’s how you can enable remote desktop on Windows 11 PC and laptop, add users to it, and allow it in the Windows 11 Firewall. Following the above steps, you will be able to use a remote desktop connection app on Windows 11, and you won’t have to use a third-party app to do so. We hope this article helped you out with setting up a remote desktop in Windows 11. Good Luck!
Read also: