Wget is a widely used free command-line utility for downloading files from the web using the HTTP, HTTPS, and FTP protocols. Supports IPv4 (Internet Protocol version 4) and IPv6 (Internet Protocol version 6) addresses. To force wget to use IPv4 or IPv6 when downloading a file, you must either explicitly select it or change the default settings.
In this article, you will learn how you can force wget to connect to IPv4 or IPv6 addresses when downloading files from the web in Linux.
Before we go further, make sure to install wget on your Linux PC or laptop first if your system does not come with it.
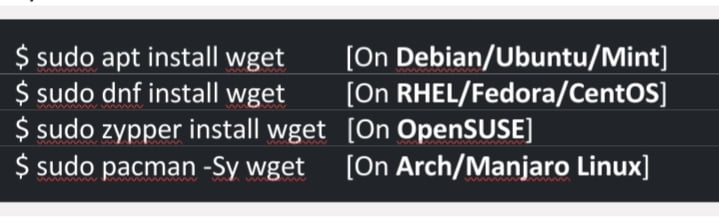
Table of Contents
Force Wget to Connect To IPv4 Or IPv6 Addresses
The regular ‘wget <URL>' command checks all A records in DNS that holds only 32-bit IPv4 address of the given domain and AAAA records in DNS that contains 128-bit IPv6 address.
$ wget https://ftp.gnu.org/gnu/wget/wget-latest.tar.gz
Then, wget most probably connects to IPv6 or IPv4.
Below you’ll see steps that show you how to force wget to use only one of the addresses (IPv4 or IPv6) or use any of them by default.
Force Wget to Only Use IPv4 Connection
If you want wget to only look and connect to IPv4 address, you have to use the ‘—inet4-only’ flag with the wget command as shown.
$ wget --inet4-only https://ftp.gnu.org/gnu/wget/wget-latest.tar.gz
If you use the above command, wget only checks IPv4 address in A records and ignores IPv6 address in AAAA records.
Force Wget to Only Use IPv6 Connection
Similarly, if you want wget to only connect and use IPv6 address, you can use the ‘—inet6-only’ flag to connect wget forcibly to IPv6 address by ignoring A records and IPv4 addresses.
$ wget –inet6-only https://ftp.gnu.org/gnu/wget/wget-latest.tar.gz
If the host DNS records do not contain an IPv6 address, it will show the error as shown in the below picture.
Force Wget to Connect to Either IPv4 Or IPv6 By Default
Instead of “-inet4-only” or “-inet6-only” options, you can also use wget to change the default behavior to fully resolve IPv4 or IPv6 addresses and only connect to one address without receiving a flag each time.
What you need to do is set or unset ‘inet4_only’ in the wget initialization file .wgetrc located either at /etc/wgetrc (system-wide for all users) or $HOME/.wgetrc (for a single user).
It works the same as “-inet6-only” where wget forcibly disables IPv4 connections and connects only to IPv6 hosts. Similarly, you can add the following line to the global initialization file to turn off IPv6 queries and connect only to IPv4.
Inet6_only = on/off
Set Wget to Use IPv4 or IPv6 by Default
If you want wget to always search IPv6 or IPv4 addresses first, you can change the default address selection order.
The only thing you need to do is edit the value of the ‘’–prefer-family’ option in the wget initialization file .wgetrc.
--prefer-family=none/IPv4/IPv6
Based on the above values, when accessing a host that confirms the domain name to IPv6 and IPv4 addresses, it tries to connect to the address of the first specified address system, and if the address is not found, it moves to another address.
This also helps wget to choose between IPv4 and IPv6 connection if the configuration in the host’s DNS record supports both.
Final Words
That’s it. This is how to force wget to connect to IPv4 or IPv6 addresses when you want to download a file from the web on your Linux. By following the above steps now you can set wget to any of them if you want.
Read also: