macOS Ventura (macOS 13) is the new OS for Mac, and you’re probably here to know how to use macOS with your Windows computer. Then you are in the right place. In this article, we will show you how to install macOS Ventura on VirtualBox on a Windows 10 or 11 PC or laptop.
At its annual Worldwide Developers Conference, Apple officially unveiled macOS Ventura, the latest version of its desktop operating system. When MacOS Ventura, also known as MacOS 13, is released this fall, it will have a number of new features for desktops and laptops. As MacOS Ventura is currently available only as a developer beta, so it’s best to try it first on a virtual machine. Below, we will walk you through some features of macOS Ventura and how you can install it on your Windows PC using VirtualBox.
Table of Contents
macOS Ventura
During WWDC 2022, Apple unveiled macOS Ventura, which includes many great features. In addition to updates to Messages, Safari, the Mail app, and Continuity, Stage Manager is a completely new multitasking tool. Below, w We’ve compiled a list of some key features of macOS Ventura for you.
New Message Features
macOS Ventura lets you edit or delete sent messages after 15 minutes, and it also lets you recover deleted texts after 30 days. Those who have read receipts can mark a message as unread, alleviating the need to respond promptly.
Shared Tab Groups
Tab Groups in Safari allow you and your friends to share web bookmarks, and others in your Shared Tab Group can see the website you’re now viewing. It is primarily intended for group planning and research sessions. Apple now allows you to initiate a FaceTime call or a group Messages discussion while on the go.
Stage Manager
Stage Manager is one such feature that allows you to concentrate solely on the app you’re using. This feature automatically organizes all your open windows and apps on the left side of your screen. You can organize windows and apps for certain projects and change the size and position of the windows within your focused workspace.
Mail App Features
Now with macOS Ventura, you can unsend emails shortly after sending them and schedule emails to be sent at a later time. You’ll get reminders to follow up on emails you sent a few days ago but haven’t gotten a response.
Passkeys
Apple has implemented more secure passwords in the form of “Passkeys.” They are only saved on your device and never on a web server, making them virtually impervious to phishing attacks. Passkeys will sync across all of your iCloud-enabled devices, including iPhone, iPad, and Apple TV, as well as Mac.
Continuity Camera
Continuity Camera is a new feature in macOS Ventura. It will function wirelessly. If you have a recent MacBook (with an M1 or M2 processor), it will detect your iPhone camera whenever it is close by. From there, you can access the same capabilities seen on modern Mac cameras.
Steps To Install macOS Ventura on VirtualBox on a Windows PC
Below, we will show you how you can install and use macOS Ventura with Windows in five easy steps. The steps are as follows:
- Enable virtualization on your Windows 10/11 PC.
- Install VirtualBox and the VirtualBox Extension Pack on Windows 10/11.
- Create a New Virtual Machine for macOS Ventura.
- Customize macOS Ventura’s Virtual Machine.
- Running VirtualBox Codes on CMD.
- Perform a macOS Ventura clean installation.
Before starting the process, you need to download the below files:
- Download and install VirtualBox.
- Download the VirtualBox codes.
- Download macOS Ventura (macOS 13) ISO Image.
Note: Please, keep in mind to install the macOS Ventura on an SSD-equipped PC otherwise it will run at a sluggish pace. Also, adding more RAM to your computer will also have an effect on performance.
Step 1. Enable Virtualization on your Windows 10/11 PC
VirtualBox-created virtual machines run faster thanks to hardware virtualization technologies found in modern CPUs. However, in order to use this feature, you must first enable it on specific PCs. Please bear in mind that your system must have virtualization enabled. Otherwise, you will receive the error message “Can’t open a session on the virtual machine” when installing macOS Ventura on VirtualBox. To learn more about it and how to enable it on your Windows PC, click on the link below.
=> Enable virtualization on your Windows 10/11 PC
Step 2. Install VirtualBox and its Extension Pack on Windows 10/11
Installing macOS Ventura on your Windows 10 or 11 computer requires you to first install VirtualBox. Therefore, you must first install it on your PC or laptop. If you don’t want to have any problems while installing macOS Ventura, you also need to install the extension pack. Without the VirtualBox Extension Pack, the mouse and keyboard may not work.
If you don’t know how to install them, we have a step-by-step guide for you. Simply, click on the link below:
=> Install VirtualBox and its extension pack on your PC
Step 3. Create a New Virtual Machine for macOS Ventura (macOS 13)
The second step in installing macOS Ventura on your Windows 10 or 11 computer after installing VirtualBox is to create a virtual machine from which the macOS Ventura will boot. Follow the steps below to do this:
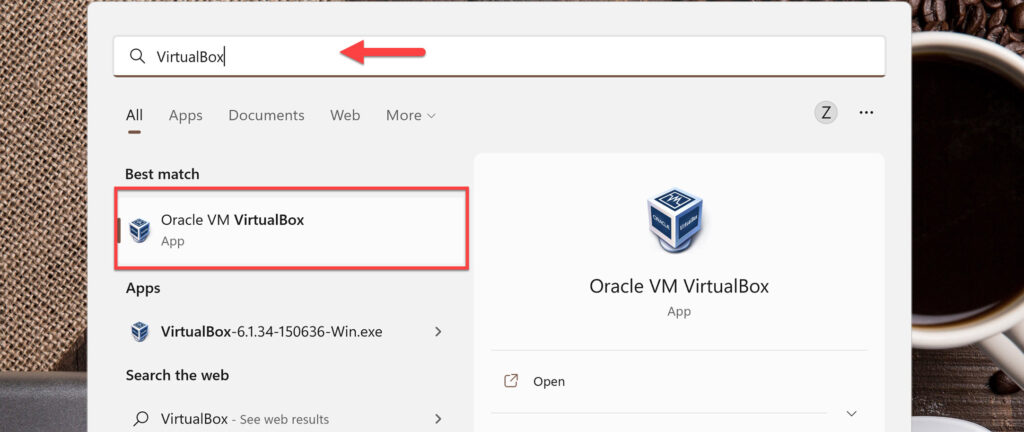
- To begin, search for VirtualBox in the Start Menu and open it.
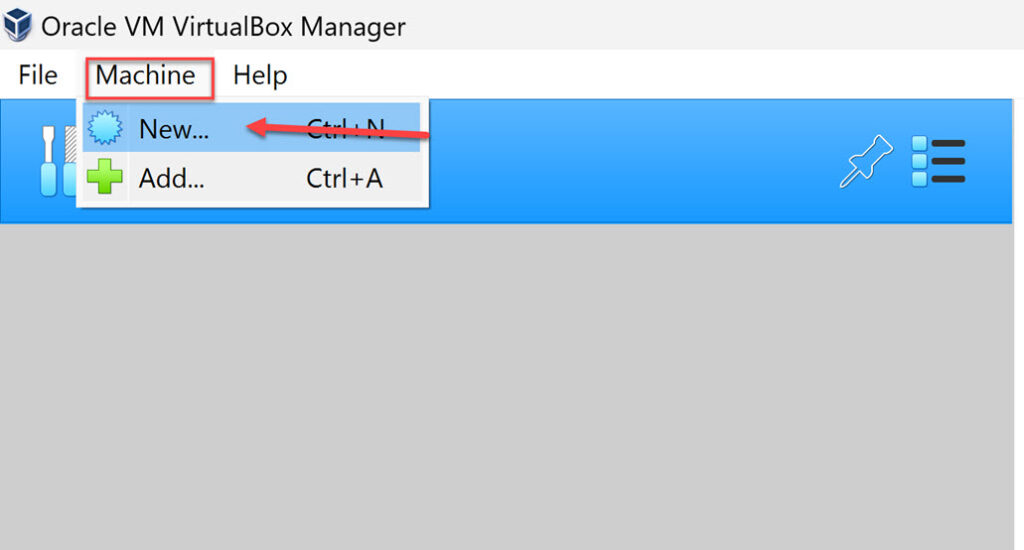
- Then, select “New” from the “Machine” menu. Alternatively, you can start a new virtual machine by using “Ctrl + N.”
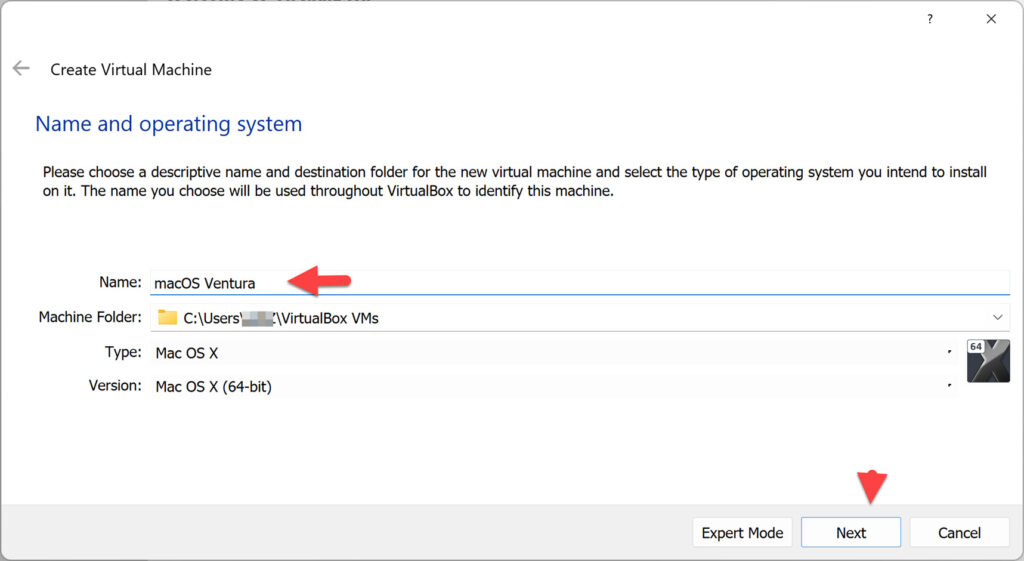
- Next, give your virtual machine a name and a location, then click “Next” to proceed. Begin the name with “macOS.” The VB will automatically select the macOS version and type it once the macOS is typed.
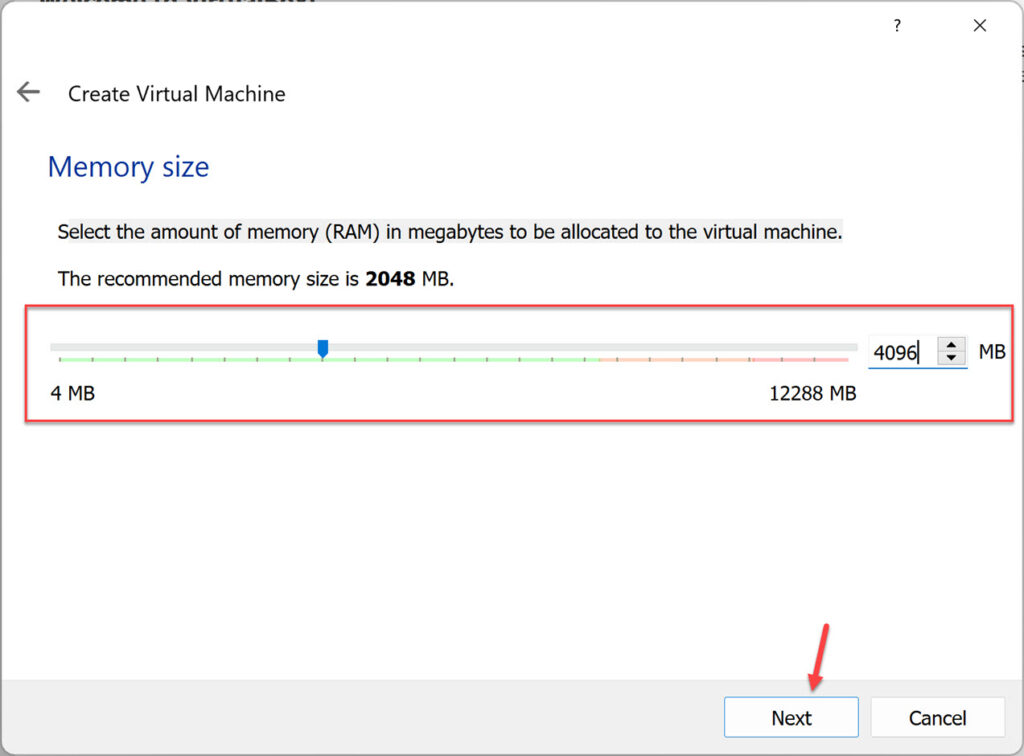
- Now, select the amount of RAM for the macOS Ventura virtual machine (4GB is recommended) and click “Next.” Please keep in mind that more RAM means better performance.
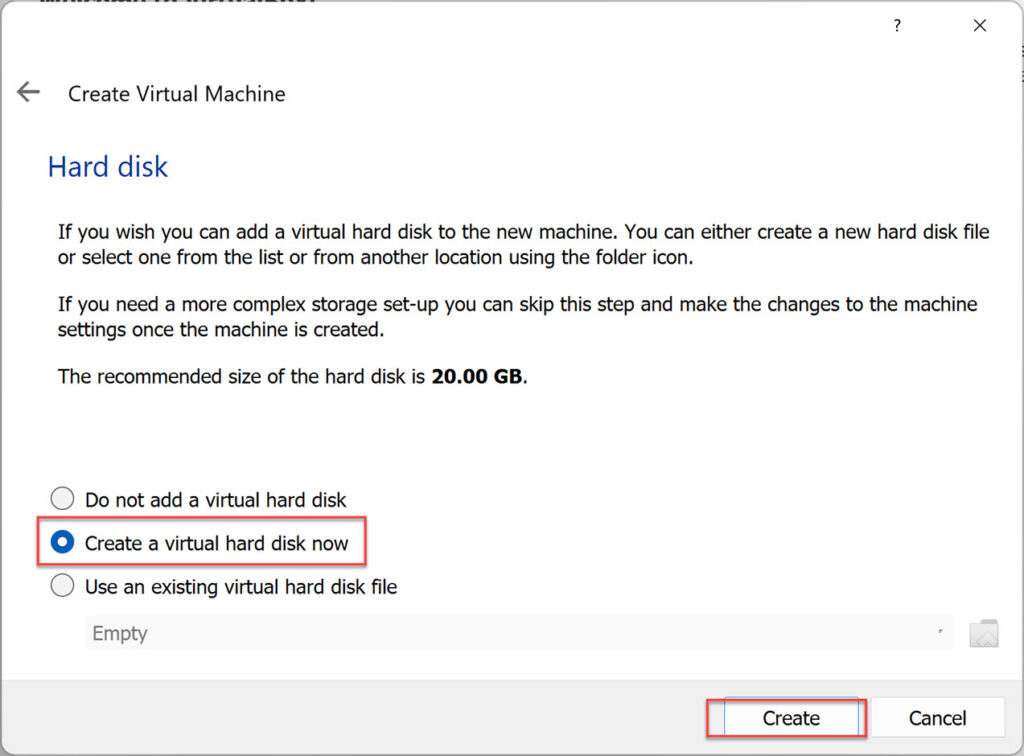
- Next, select “Create a virtual hard disk now” and click on the “Create” button to create the VM.
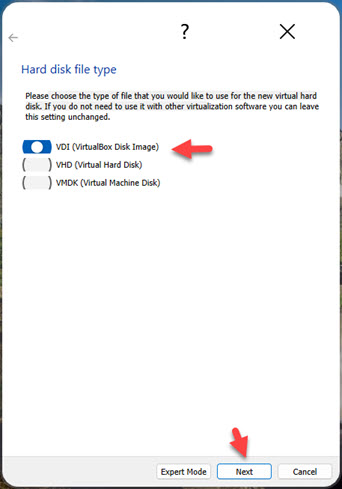
- Here, you can select the type of hard disk file you want to use for the new virtual hard disk here. You can go with the default settings.
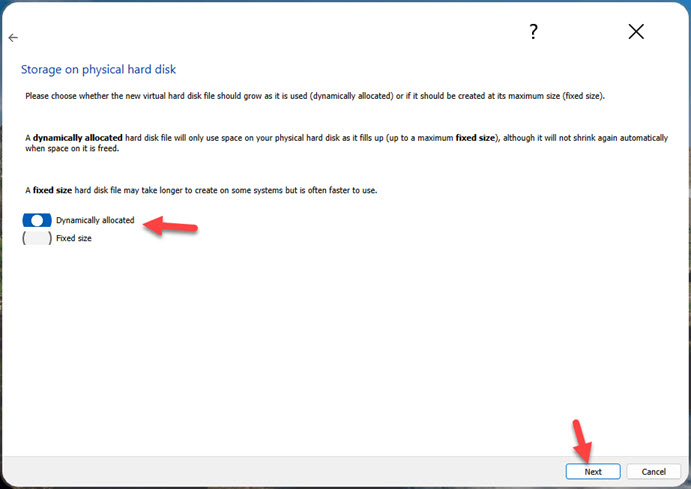
- Next, you can choose whether the new virtual hard disk file should be dynamically allocated or generated at its maximum size (fixed size). To continue, select “Dynamically allocated” and click “Next.”
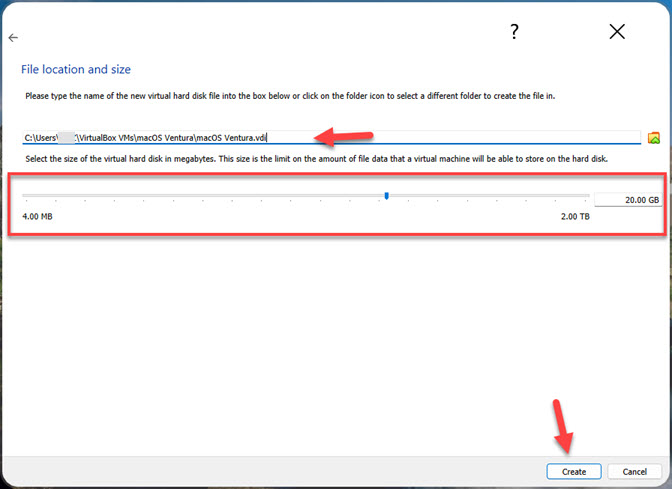
- Finally, select the file directory for the virtual hard disk and the virtual machine’s storage capacity. To start creating a virtual machine for macOS Ventura, click “Create,” and you are done.
Step 4. Customize Virtual Machine of macOS Ventura
Creating a virtual machine for macOS Ventura is simple, but setting and customizing it is important, so carefully follow the steps below.
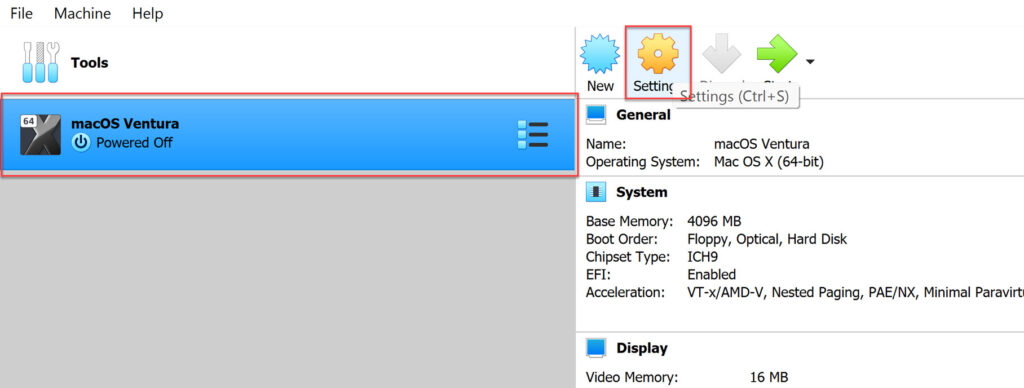
- To begin, return to the main VirtualBox page after creating the virtual machine, select macOS Ventura VM, and click on “Settings“.
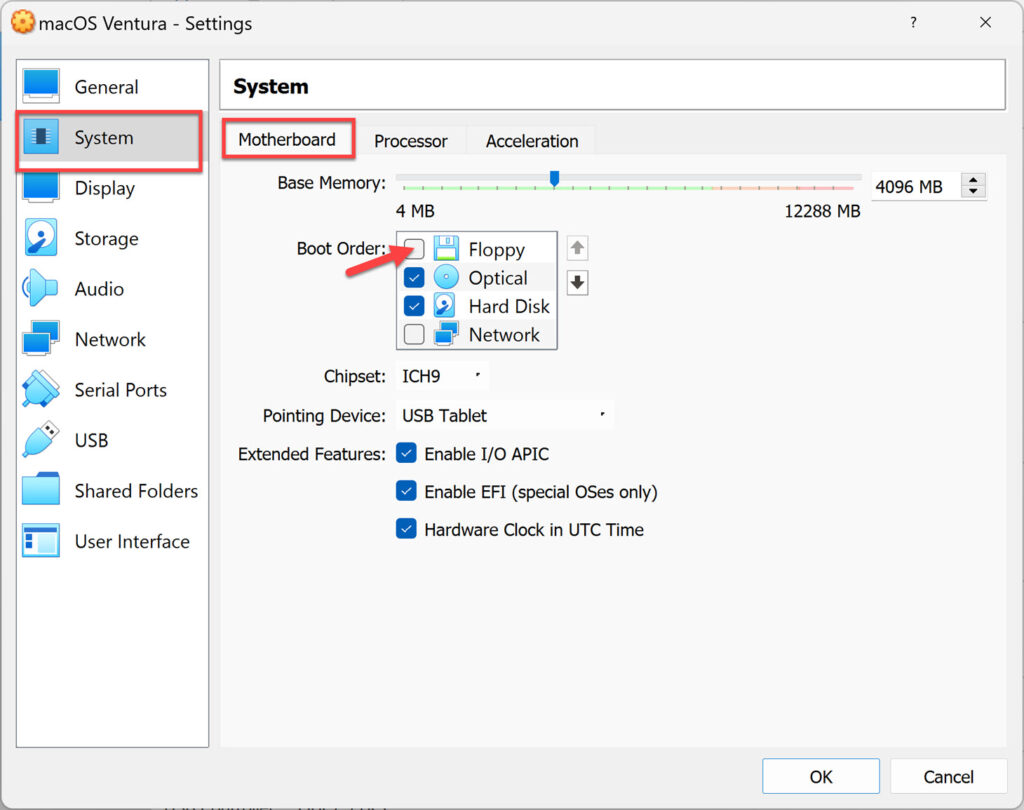
- Next, go to “System” settings, go to the “Motherboard” tab, and uncheck the “Floppy” option.
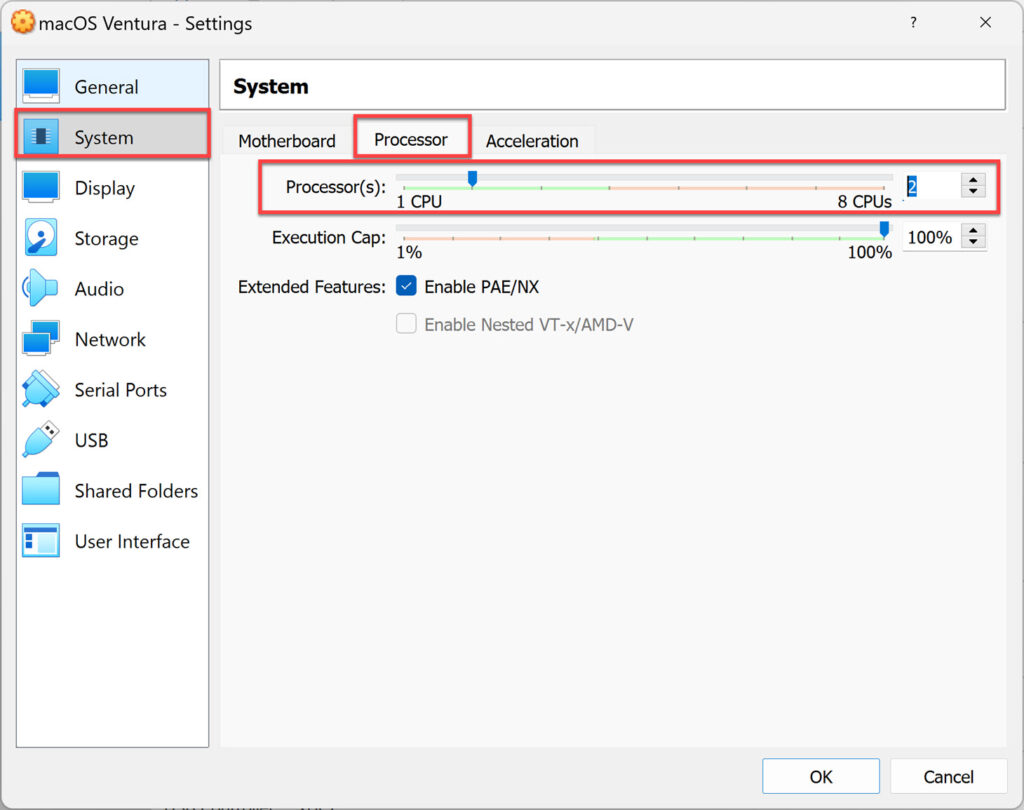
- Then, in the same system settings, navigate to the “Processor” page and change the number of processors to more than one. Please keep in mind that more CPUs equals higher performance.
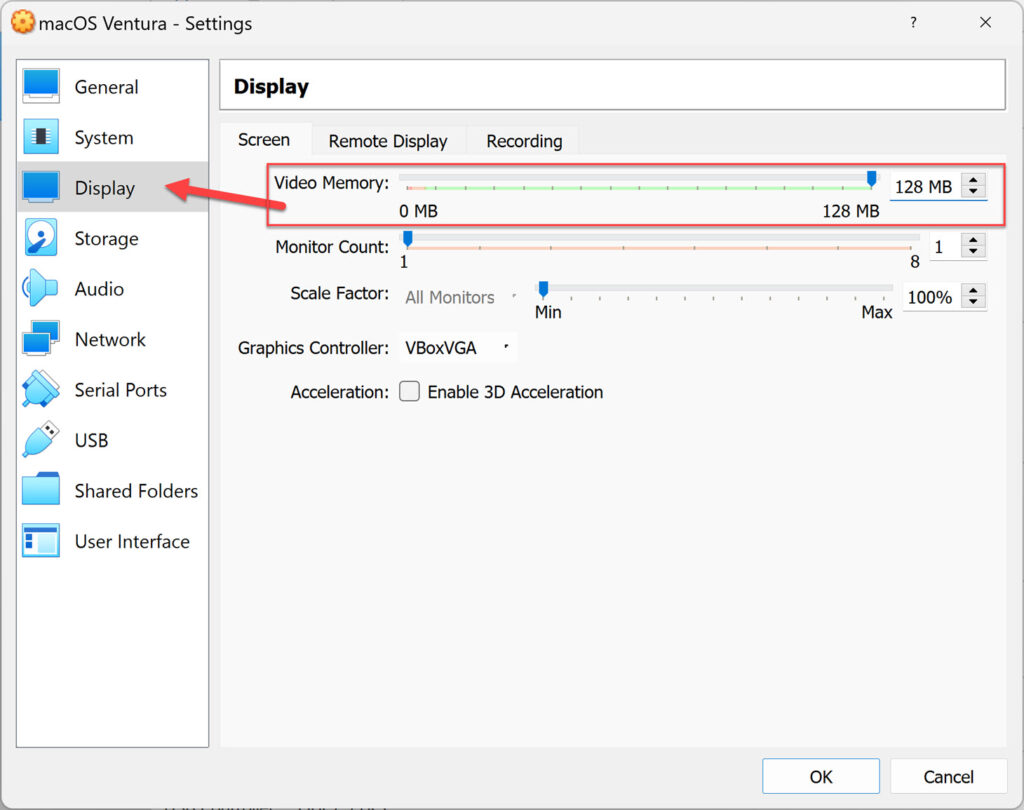
- Now, go to the “Display” tab and change the video memory to “128 MB,” leaving the rest alone.
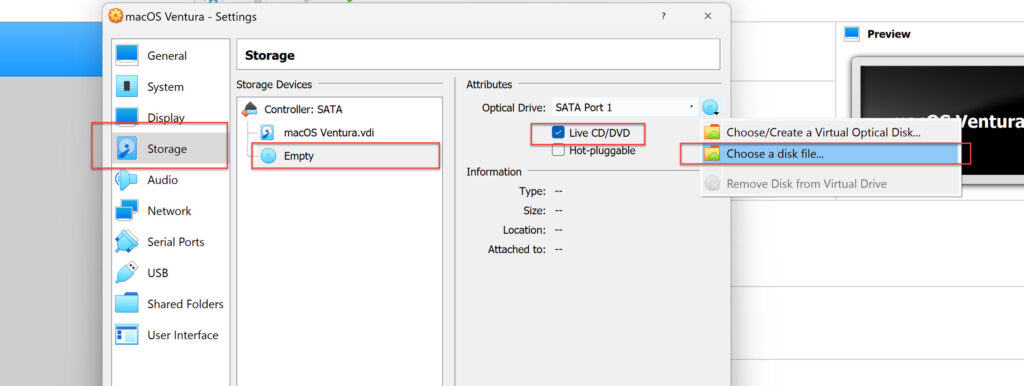
- Then, we need to attach the macOS Monterey ISO image to the virtual machine. Go to the “Storage“, click “Empty“, click on the CD icon, and select “Choose a Disk file“. Also, make sure to check the box “Live CD/DVD.”
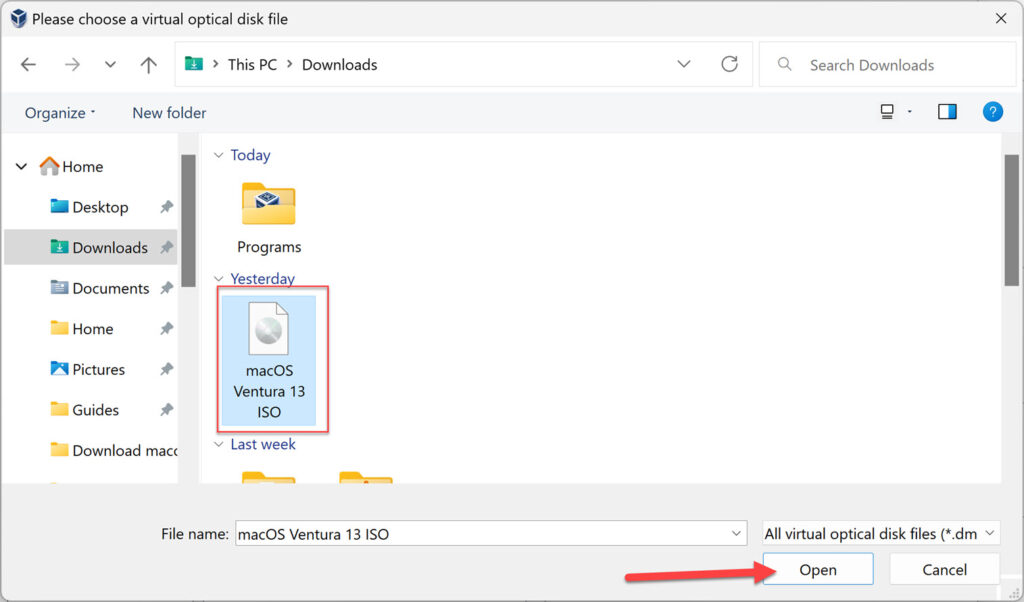
- Then, in the new pop-up window, find and open the macOS Ventura ISO image.
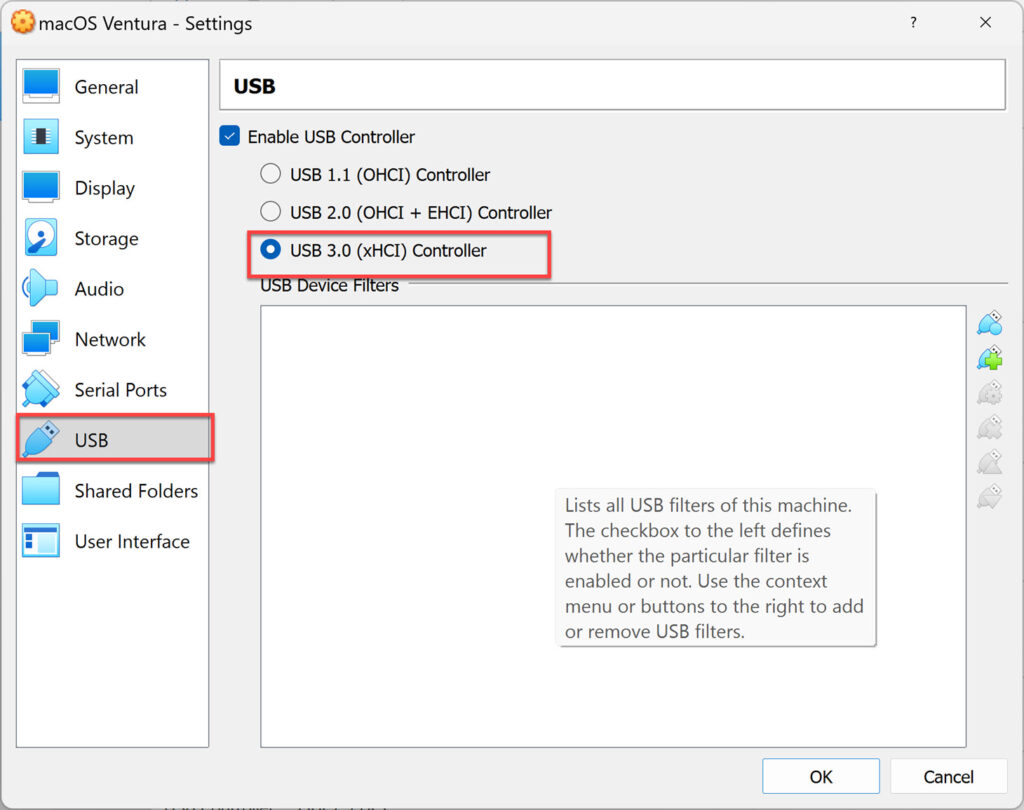
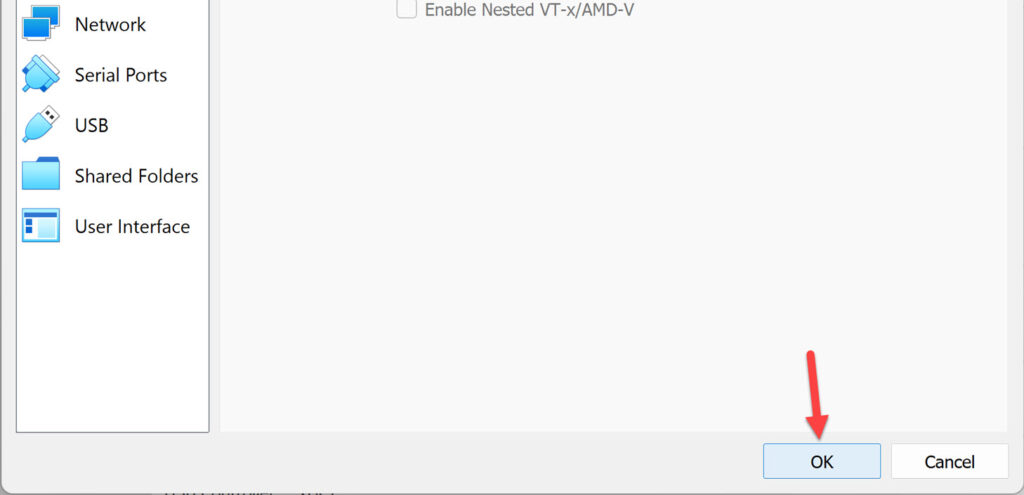
- Now, you need to enable USB 3.0 to solve the mouse and keyboard freezing issues. When we install the VirtualBox expansion pack, USB 3.0 is enabled, otherwise, it is disabled.
- Finally, click “OK” to save the changes.
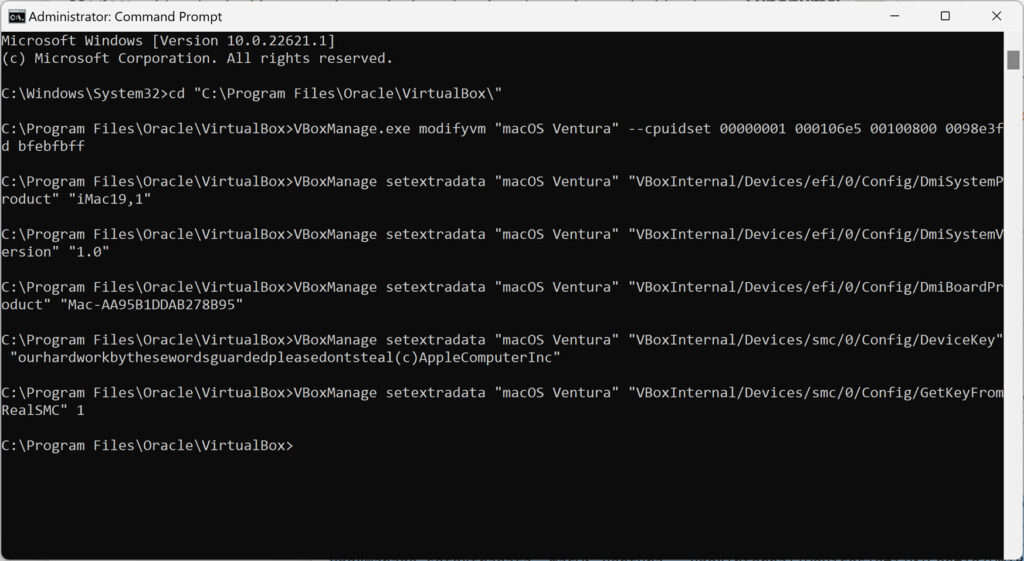
Step 5. Run VirtualBox codes for macOS Ventura on CMD
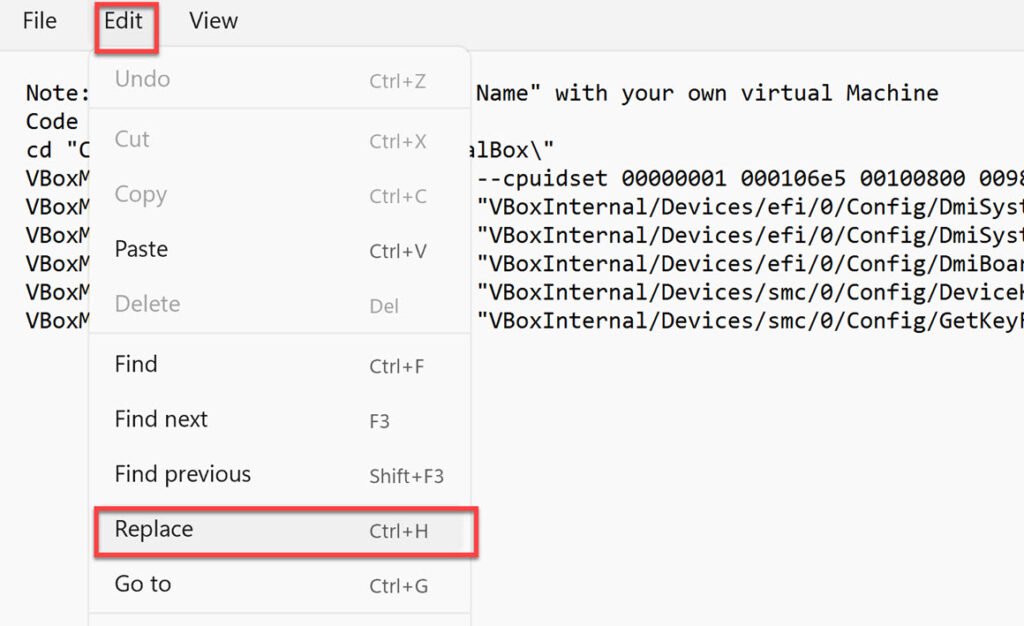
The VirtualBox code is required to install and use macOS Ventura in VirtualBox on Windows 10 and 11. The virtual machine hosting macOS will be in a loop if the code is not implemented or is applied incorrectly. To do that, follow the below steps:
- Open the downloaded codes, then go to the “Edit” menu, and select “Replace“.
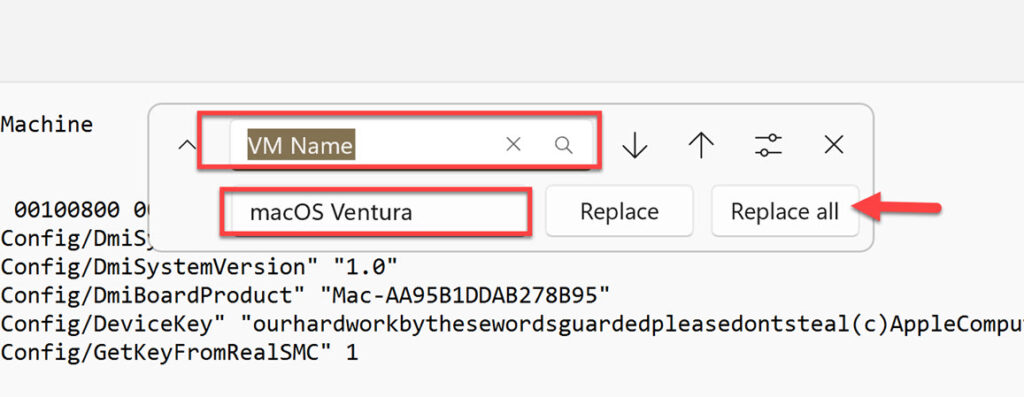
- Next, replace the VM Name with the name of the virtual machine you created a moment ago, and click “Replace All” to continue.
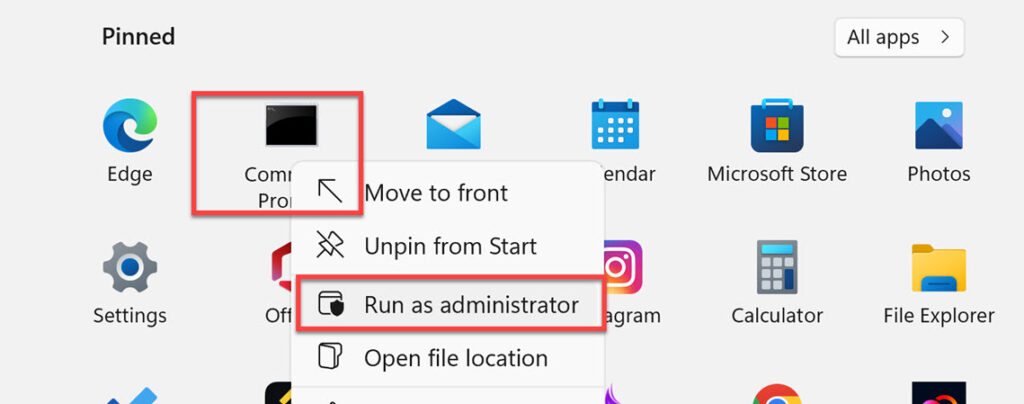
- Now, open CMD and run it as an administrator.
- Finally, copy the code and paste it into CMD, then press Enter. Remember that if the code is entered incorrectly you will see an error, try to paste it correctly.
Step 6. Install macOS Ventura on VirtualBox
This is the final step to install and use macOS Ventura with Windows using VirtualBox after completing all the five steps above. It is now time to perform a clean installation of macOS Ventura on VirtualBox. So let’s get started with the installation. For that, follow the steps below:
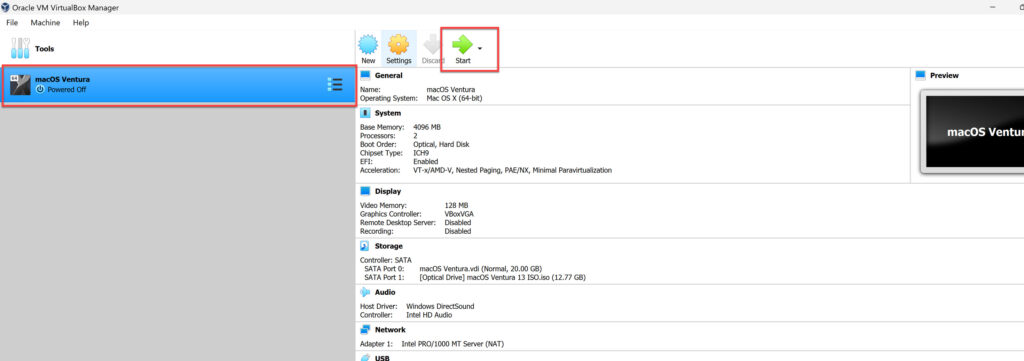
- Open VirtualBox, select the virtual machine you created earlier for macOS Ventura, and click “Start.” Following that, a series of codes will flash on the screen before landing on the Apple logo.
- The next step is to select your preferred language.
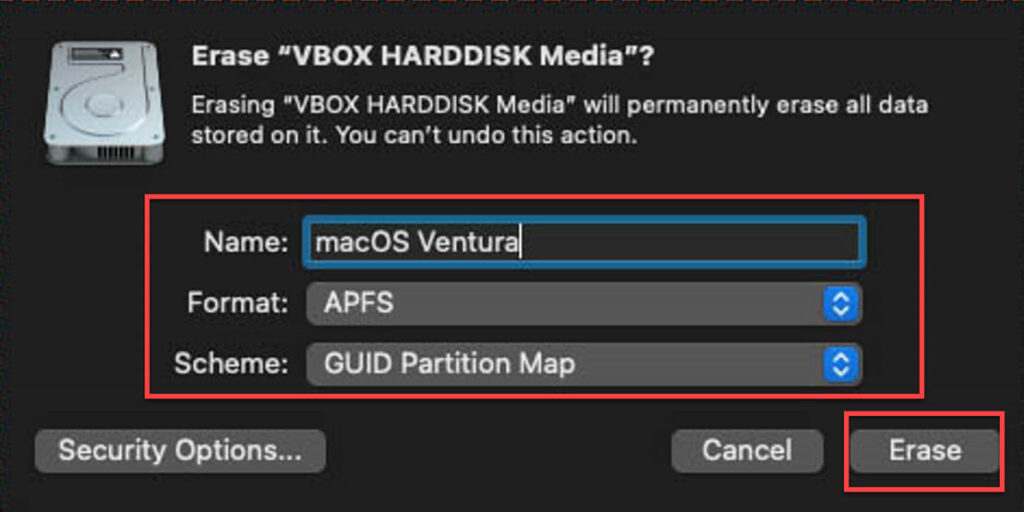
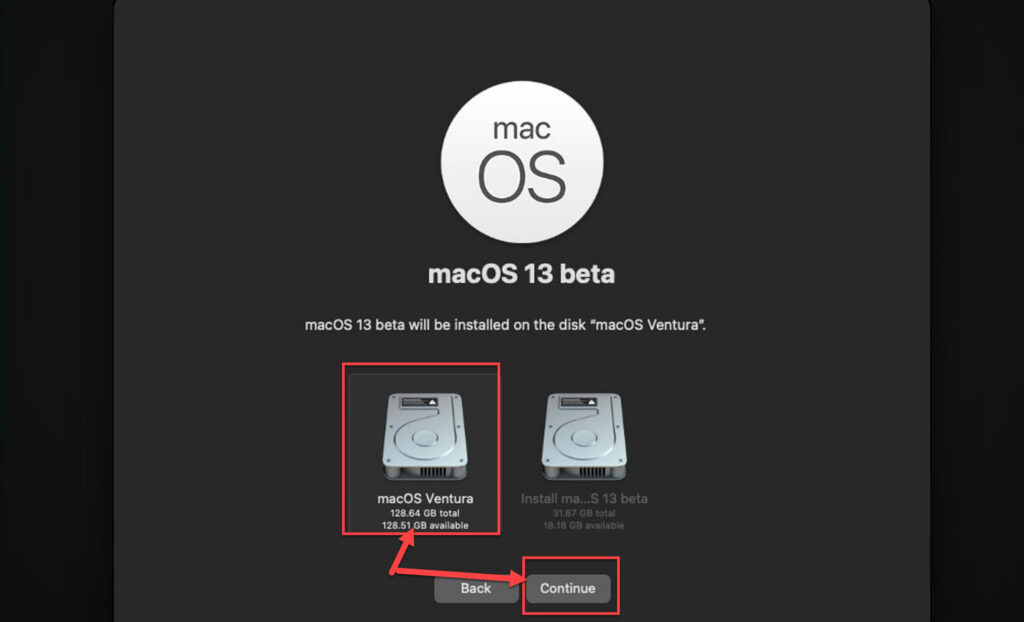
- Next, you must partition the storage before installing macOS Ventura (macOS 13) on the VM. To do so, navigate to “Disk Utility” and select “Continue.”
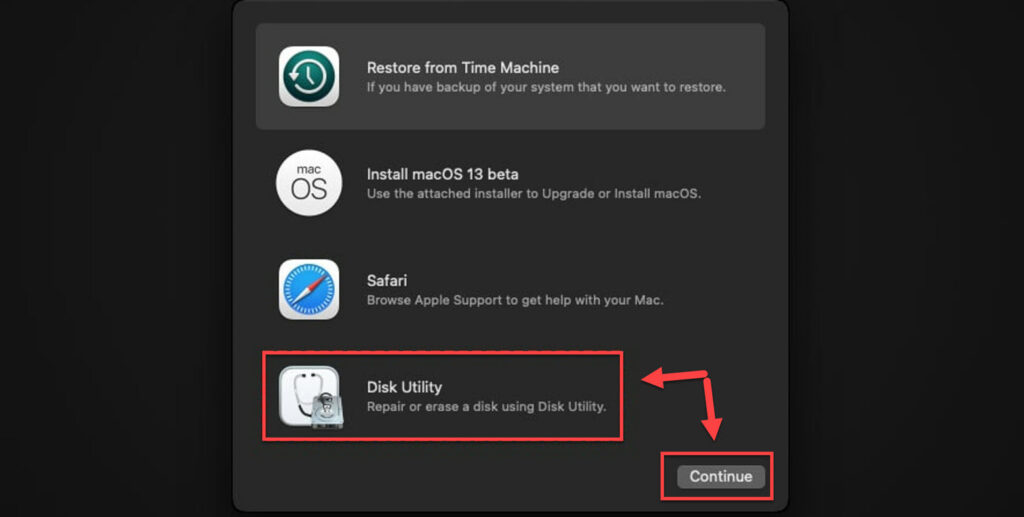
- Now, you need to choose the storage when you created the virtual machine. Then select “Erase” and partition it so that macOS Ventura may be installed.
- Next, quit Disk Utility, then pick “Install macOS 13 Beta” from the main menu and press “Continue.”
- Now you need to accept the terms and conditions and select the disk to install macOS Ventura.
- Next, choose whether the national input keyboard should be added by default based on where you live. When done, tap “Continue” twice more.
- I will not go for accessibility, so I will pass this step by clicking “Not Now.”
- Here, select “My computer doesn’t connect to the internet.” Because of the virtual machine, neither WiFi nor Ethernet function. Don’t worry, this type of Mac can connect to the internet. To continue, use the “Continue” button.
- Tap on “Continue” with data and privacy.
- Here, users migrating from another Mac or Windows PC can use Apple’s Migration Assistant. To put it simply, you can move your files here. There is no need to configure it because we are performing a clean installation, so click “Not Now.”
- Now, you need to read and agree to the macOS Ventura’s terms and regarding the license.
- Next, create an account for your macOS Ventura’s VM and then click ‘”Continue.”
- Apple is showing that location services and device analytics have already been enabled. If you are concerned about your security and privacy, you can disable them. Click the “Continue” button.
- You can enable Screen Time if you wish to track your weekly, downtime, content, and privacy restrictions.
- Another feature that you can enable or disable is the voice assistant. Given how popular voice assistants are these days, you should give Siri a shot. To add Siri, tap “Continue.”
- Finally, select your preferred look for macOS Ventura (macOS 13) and press the “Continue” button.
Final Words
That’s it! These are the steps to install macOS Ventura on VirtualBox on your Windows computer. If you have any kind of question or encounter any kind of problem, please let me know in the comment section. Good Luck!
Read also:
Sorry, but the Installer won’t boot. I get stranded in the UEFI Interactive Shell.
did anyone get the solution to this?
Tried to install and got locked on [EB|LOG: EXITBS:START]
Same here, the UEFI shell crashes
I take that back…had to wait a while, but it began to respond. My bad; the instructions seem to work fine 🙂
Seems to go through entire installation but instead of completing it goes back to install screen.
Shouldn’t I detach the .iso after install process?
Normally yes
The code keeps erroring
VBoxManage.exe modifyvm Mac –cpuidset 00000001 000106e5 00100800 0098e3fd bfebfbff
VBoxManage.exe: error: Could not find a registered machine named ‘Mac’
Now it says
Win error:
this app cant run on your pc
Cmd:
Access is denied