
Ubuntu is a popular operating system, it is open source and easy to install. It is very flexible due to its unlimited customization options and its inherent high security. For many developers, the Linux journey begins with Ubuntu, so in this guide as well, we will show you how to install Ubuntu along with Windows 11 in dual boot. But first, let’s have a thorough information about Ubuntu.
Table of Contents
What is Ubuntu?
Ubuntu is an operating system developed by the global programmer community and employees of Canonical, the commercial sponsor of Ubuntu. Ubuntu is based on the concept of free or open-source software, which means you can download, use and share the operating system for free without paying any licensing fees for Ubuntu.
However, in recent years, Linux has also become feasible on desktops and laptops, making it a choice for individuals and businesses. Ubuntu is generally considered to be the most widely used version of Linux. Canonical’s founder and CEO Mark Shuttleworth estimate that Ubuntu has 6 to 8 million users. Since the software can be downloaded and shared for free, it is difficult to track the exact number of uses.
However, in recent years, Linux has also become feasible on desktops and laptops, making it an option for individuals and businesses. Ubuntu is generally considered the most widely used version of Linux. Mark Shuttleworth, founder and CEO of Canonical, estimates that Ubuntu has between 6 and 8 million users. Since the software is free to download and share, it is difficult to track the exact number of uses.
What Ubuntu distros can you dual boot with Windows 11?
Ubuntu has 7 different official distributions and they are the following: Kubuntu, Lubuntu, Ubuntu Budgie, Ubuntu Kylin, Ubuntu MATE, Ubuntu Server, and Ubuntu StudioXubuntu.
Third-party distributions have about 40 if not more. About Popularity These are the top 3 most popular Ubuntu-based distros:
- Linux Mint
- Pop!_OS
- elementary OS
All Ubuntu distributions can dual boot with Windows 11 without major issues, and installing in dual boot mode are all similar.
Ubuntu’s hardware requirements
- CPU: 2GHz or higher.
- RAM: 4GB or higher.
- Storage: 25GB or higher.
- GPU: Graphics card with at least 256MB of memory.
As you can see, Ubuntu has relatively modest hardware requirements compared to the requirements of Windows 11, and some distros will work on PCs that fall below these requirements.
Steps to Dual Boot Windows 11 and Ubuntu
Dual booting is the most likely way to have two operating systems that you plan to use on a regular basis, and there are several ways to run them.
If you already have Windows 11 installed on your PC, like most users, follow the procedure below.
- Create a partition drive to dual boot Ubuntu with Windows 11.
- Download the Ubuntu ISO image file for installation.
- Create a bootable USB drive for Ubuntu.
- Install Ubuntu along with Windows 11 in dual boot.
Note: Before dual-booting Windows 11 and Ubuntu, Remember to charge your laptop or computer to at least 70%, backup your data in a separate hard drive and have an 8GB or 16GB flash drive for OS installation.
Step 1. Create a partition to dual boot Ubuntu
To install Ubuntu along with Windows 11 in dual boot, first you need to create a partition for Ubuntu. This is how you can do it:
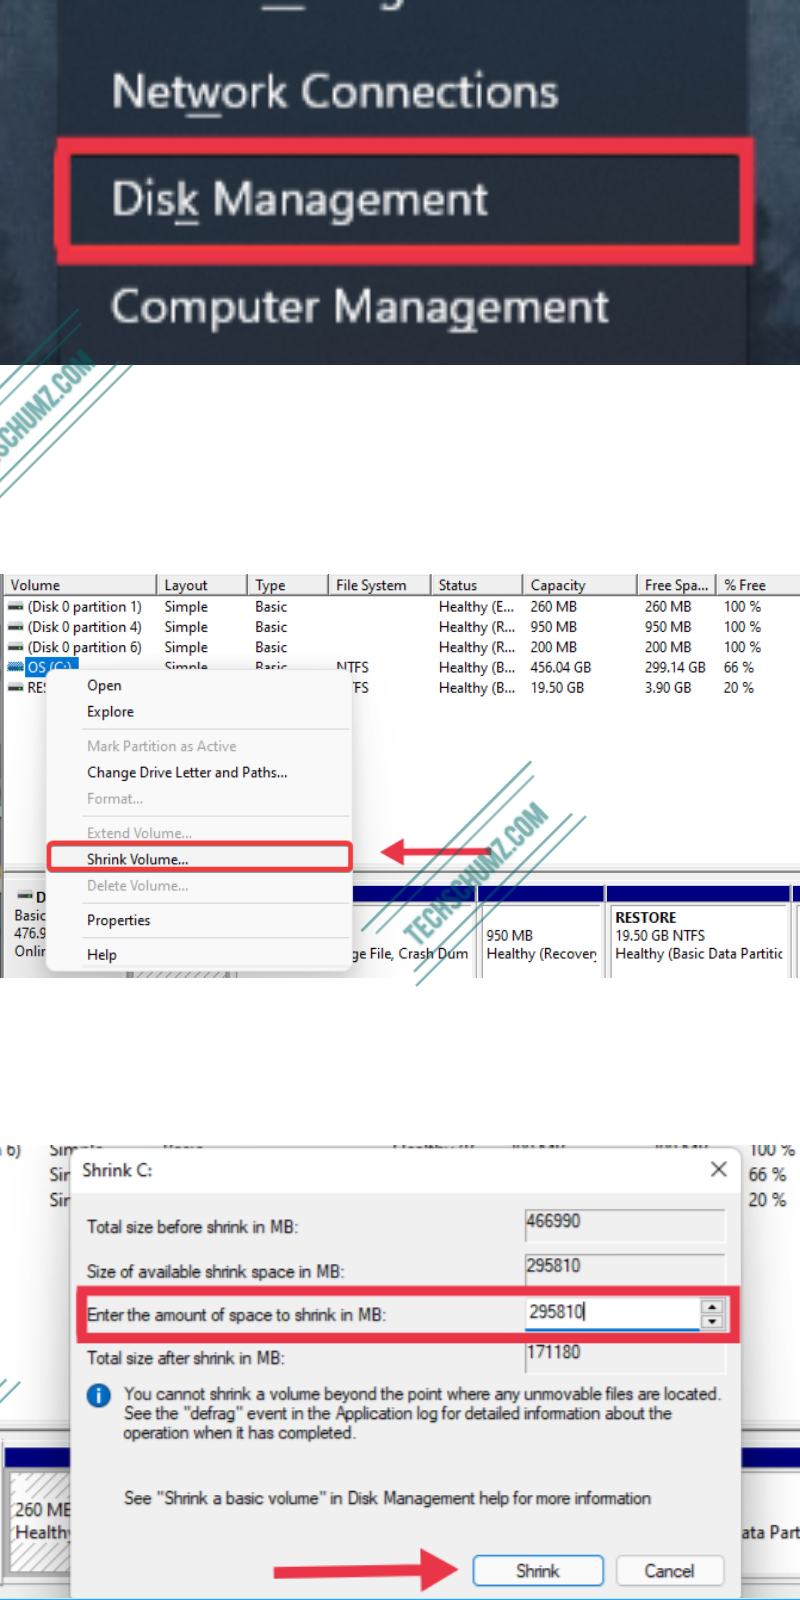
- Open Disk Management by using Windows + X and selecting Disk Management.
- Next, select a drive, right-click on it and choose Shrink Volume.
- Then, Set the Enter the amount of space to shrink 50000MB or more and click Shrink.
- Now, click the space that you just created and choose New Simple Volume.
- Set the Simple volume size in MB to the maximum value and click Next.
- Finally, use a drive letter and label and click Finish.
Step 2. Download Ubuntu ISO image file
Search for the latest version of Ubuntu and download it to your PC. There are many versions available, but here we download and install Ubuntu 21.04. However, the steps for other versions are the same, but this version is compatible with Windows 11. Download the file and make sure the download version has the ISO file extension.
You can go to the downloading page by simply clicking on the below link.
–> https://ubuntu.com/download/desktop

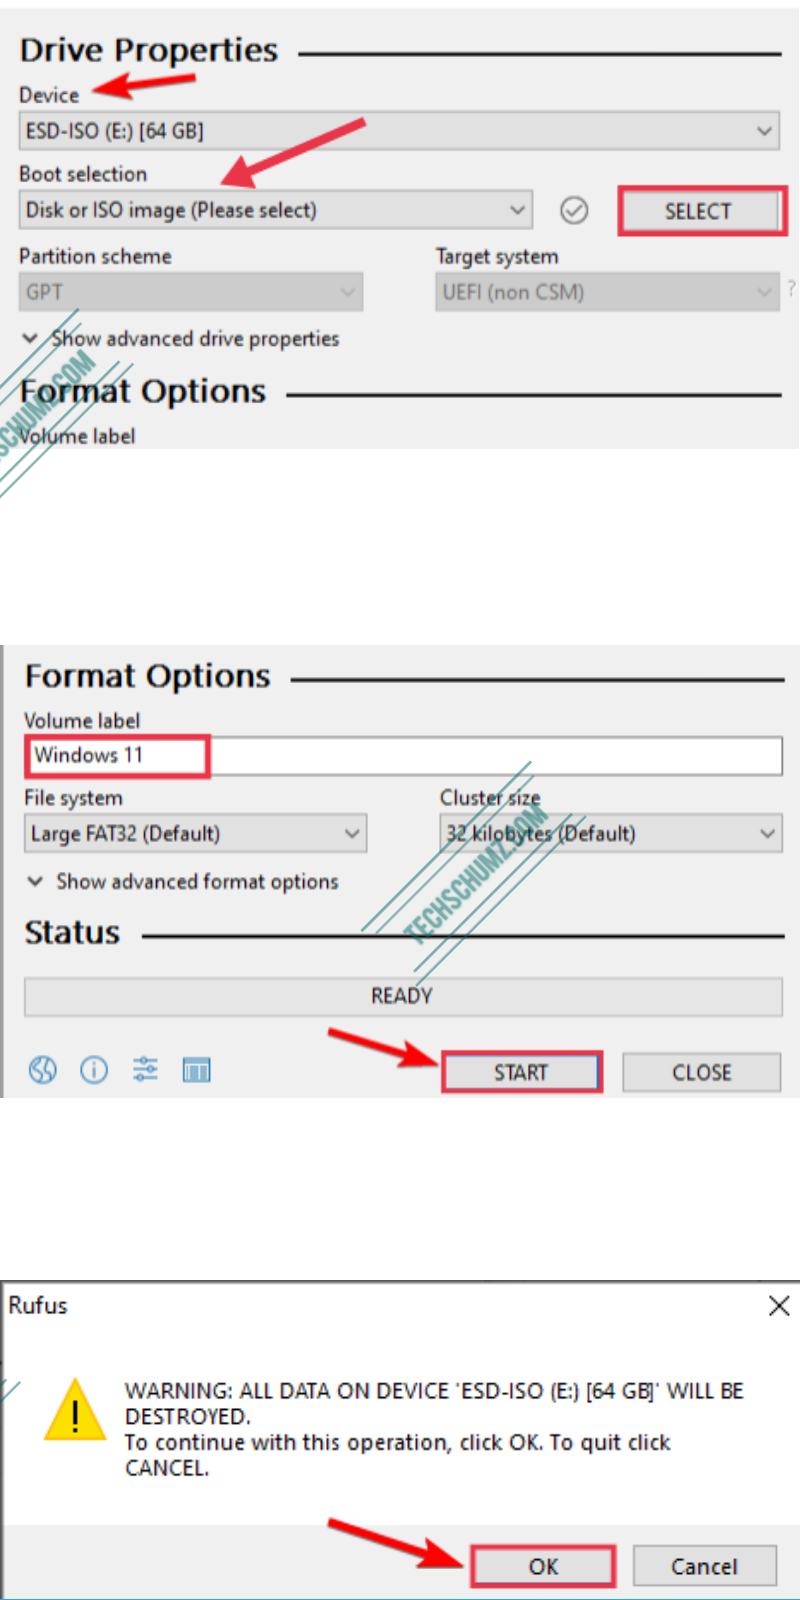
Step 3. Create a bootable USB drive for Ubuntu on Windows 11
To dual boot Windows 11 and Ubuntu, you need a bootable USB drive, and to create a bootable USB flash drive, we use an application by the name of Rufus. Download it from here, and follow the steps below to make the flash drive bootable:
- Connect the USB drive to your PC, and find it on the list of devices.
- Click the Select button and find the downloaded Ubuntu ISO file.
- Click Start to begin the process, and click OK to format it.
- Wait for the process to finish. After creating a bootable USB drive for Ubuntu, you can install Ubuntu.
Step 4. Install Ubuntu along with Windows 11 in dual boot
After completing the above three steps, it is time to install Ubuntu along with your Windows 11 system. Ubuntu will be installed on the new partition that you created.
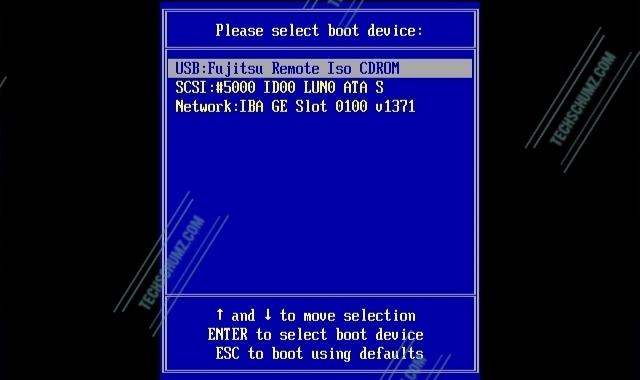
- First, unplug the bootable USB drive, plug it back in and restart your PC.
- After booting, the system will show you with options to use the device. Select the inserted USB drive by pressing Enter.
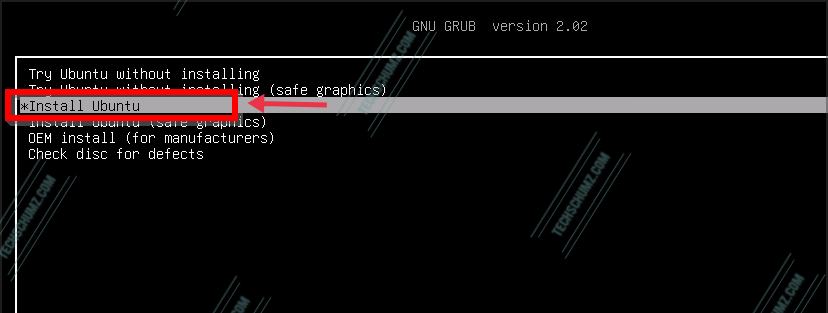
- Now, in the new window that opens, select Install Ubuntu.
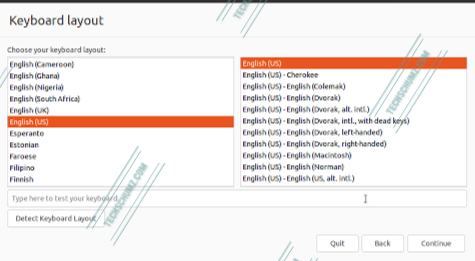
- Select a language and a keyboard layout for your Ubuntu.

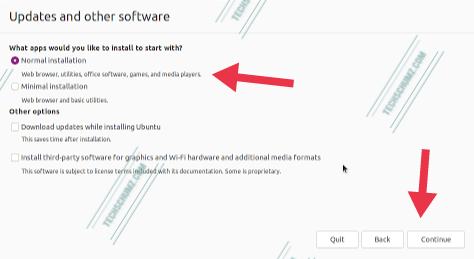
- Then, from the options, select Normal installation and click Continue. Remember, you can also go for the Minimal installation and download the necessary updates later.
- Select Something else.
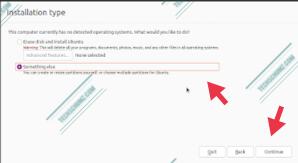
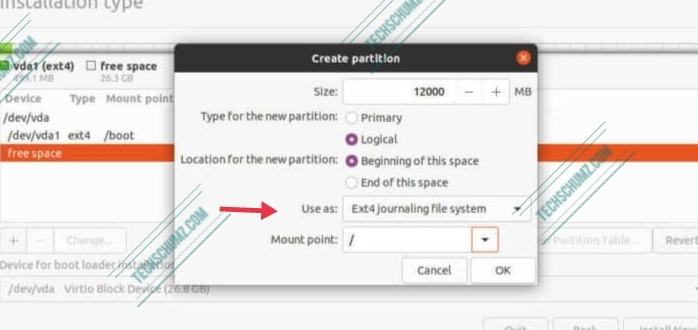
- Up next, select the partition that you created for Ubuntu and format it to the ext4 file system.
- Click on Install Now.
- Select your location.
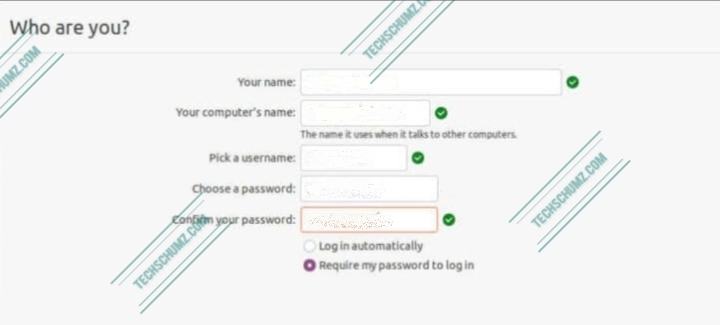
- Enter a username and password for your Ubuntu system and click on Continue.
- Now, wait for the installation to finish, and click on the Restart Now button.

That’s it! That’s how you can dual boot Windows 11 and Ubuntu. It is easy, especially if you already have Windows installed.
How to switch between Windows 11 and Ubuntu after dual booting
After installing Ubuntu or any other Linux distribution along with your Windows 11, you should have the option to start it immediately, but this may not happen. If your Windows partition is set as a priority in your BIOS settings, it will continue to boot to Windows. The behaviour will vary depending on your computer, so you may not need to take any action.
If you find yourself stuck in Windows 11 and want to switch to Ubuntu or vice versa, here’s what you can do:
- Open the Setting on your Windows 11 PC, then go to the System. After that, click Recovery then click on Restart Now.
- Next, tap on Troubleshoot and then Advanced options. After that, select UEFI Firmware Settings.
- Now, you’ll be redirected to the UEFI/BIOS settings of your system. Now use the F1 key to enter the BIOS settings.
- Now, find the Boot options under the System Configuration tab. This may be different from computer to computer.
- Next, find the Boot order option, and then see whether the Ubuntu drive is above the Windows 11 drive. Use F5/F6 buttons to move the drive.
- After you make the changes in BIOS, then save the changes and exit from the BIOS Settings.
- Your system will now restart automatically, and then you will see the Ubuntu start menu that allows you to choose between Ubuntu and Windows 11. Every time you restart the system, it will ask you to select from these two operating systems on your PC.
Some disadvantages of dual-booting Ubuntu and Windows 11
- Dual boot requires a lot of space on the PC. This is especially true if you use both operating systems regularly to install various software.
- Another downside to dual-booting is multitasking. When you use dual boot, you cannot boot into other operating systems quickly and easily. Instead, you have to restart the PC and select the operating system you want to access.
- There may be booting issues, but this mainly occurs when installing Windows after Ubuntu or any other version of Linux.
- Your Windows 11 and Ubuntu may show different time when dual booting. If you encounter this problem, to fix that, read this article.
Summary
This is how you can install Ubuntu along with Windows 11 in dual boot. Remember you can dual boot any other Linux distros and Windows in a similar way. To install you needed to follow some steps, that were as follows:
- Create a partition to dual boot Ubuntu with Windows 11.
- Download the Ubuntu ISO image file for installation.
- Create a bootable USB drive for Ubuntu.
- Install Ubuntu along with Windows 11 in dual boot.
I hope you find this article useful. If you have any issues related to the above-mentioned steps, please let us know in the comments section below. Good luck!
Read also:
I have a PC with two hard disks, UEFI and Secure Boot.
I put Windows 10 Pro with Bitlocker on one disk and Linux Ubuntu MATE 21.04 (with full-disk encryption) on the other disk.
On bootup, I got a grub2 menu, and I could choose which operating system I wanted to use. They both worked well.
This does not work for me with Windows 11 Pro.
I can boot into Linux most times but it often fails with an initramfs prompt.
If I have successfully booted previously into Linux, Windows fails to boot, and I am asked to type in the Bitlocker recovery key (a 48-digit number).
I then need to put that number in every time I want to boot into Windows 11.
If I disable Secure Boot, both operating systems work OK but I am still asked for the Bootlocker recovery key about once or twice a month.
How could I get the grub2 entries into the Windows boot menu? That only seems to work with legacy BIOS booting, so probably not with Windows 11. Has anyone done this?
Any ideas or better solutions?
Acer 14″ Swift 3 with Win 11, Mate-Ubuntu 2022.4.1
In Step 4, options for boot do not show with boot USB inserted. Cannot move forward in installation.
Win 11, Mate 2022.4.1 on Acer 14″ Swift 3.
I successfully set up dual booting thanks to these instructions.
Step 4 required a bit more than provided in this post:
– Booting with the jump did not work, boot went straight to Win 11. I needed to boot by entering the BIOS, then selecting the USB to boot.
– Installing required that MATE be installed at “/”, ie, at root on the new partition. And I believe I made the partition primary for the MATE install, not sure.
– Based on a SSD of 512GB, I allocated 100GB to the partition.
But again, I would not have had a clue how to set up the dual boot without this post by Techschmuz.com