Have you heard about the new OS, known as macOS Monterey or macOS 12, for the Mac? Do you want to try it on your Windows 10 computer? If you want, then you are in the right place. This article will show you how to install macOS Monterey on VMware on Windows 10 PC or laptop step-by-step. I need you to read this post to the end and provide your thoughts regarding our guidance.
Related: How to Install macOS Monterey on VirtualBox on Windows 10 PC and Laptop
Table of Contents
Does macOS Monterey Work on your PC?
At WWDC 2021, Apple released iOS 15, iPadOS 15, WatchOS 8, and macOS Monterey. Compared to macOS Big Sur, macOS Monterey (macOS 12) is striking in appearance and style. I know about universal controls, shortcuts, emojis, and other great new features, but you can’t ignore the look and feel. With macOS Monterey (macOS 12), its M1 chip works fine, but some features will not be available on some Intel Macs.
The same goes for virtual machines; some features may not be available, but you can continue to use them if you are a developer. You can use XCode in VMware, and it will solve your problem, although I am 100% sure because it is currently in beta.
Also, you might be wondering how macOS feels and what the difference is between Windows and macOS 12. How to create a bootable USB, how to install software on a Mac, or even uninstall apps on macOS? These simple and curious questions will take you into the macOS environment and let you find the answers yourself.
Steps to Install macOS Monterey on VMware on Windows 10 PC & Laptop
I’ll show you how you can install macOS Monterey on your Windows 10 computer in seven easy steps. The steps are as follows:
- Download and install the prerequisites.
- Enable virtualization on your Windows PC.
- Download and install Workstation Pro/Player on your PC.
- Unlock VMware to Install macOS Monterey on Windows.
- Create a New Virtual Machine for macOS Monterey on Windows 10.
- Edit the macOS Monterey VMX File.
- Install macOS Monterey on VMware on a Windows 10 PC and finally do some basic settings.
Step 1. Download and install the prerequisites
To install macOS Monterey on your Windows 10 computer, you should download and install some files and applications. You will need them later on in this tutorial. But remember to skip it if you have done any of the following already. Here is the list of things you need to download:
- Download the macOS Unlocker V3 for VMware.
- Create or Download macOS Monterey ISO
If you already have the VMware Workstation Pro or VMware Player 16.1.x applications, you can skip this step. But make sure it is compatible with your system.
Step 2. Enable Virtualization on Your Windows PC
Modern CPUs contain hardware virtualization technologies that help in the acceleration of virtual machines generated by VMware Workstation. To use this functionality, however, you must first enable it. Please bear in mind that virtualization must be enabled on your system. Otherwise, you will receive the error message “Can’t open a session on the virtual machine.” Click on the link below to learn more about it and how to install it.
=> Enable virtualization on your Windows PC
Step 3. Download and Install VMware Workstation Pro or Player
Installing macOS Monterey on your Windows 10 or 11 computer needs first installing VMware Workstation Pro or Workstation Player; therefore, you must install it on your PC or laptop. VMware Workstation Pro or Workstation Player is a popular hosted hypervisor or virtualization software available today. It enables professional system administrators or power users to operate many virtual computers on a single physical computer at the same time. We have step-by-step instructions for you if you don’t know how to install them. Please follow the link below.
=> Download and Install VMware Workstation Pro on a Windows PC
Step 4. Unlock VMware to Install macOS Monterey on your Windows PC
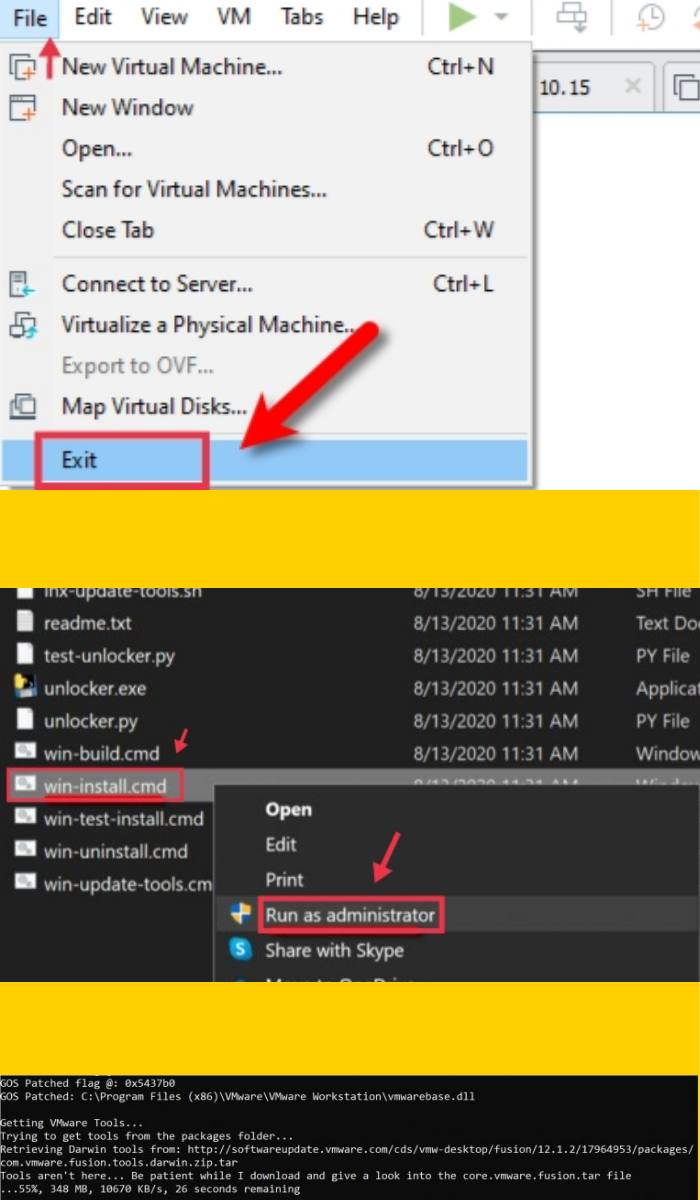
First, make sure that the VMware Workstation application is completely closed; otherwise, the VMware unlocker will not work. You need to tap on the File Tab > Exit to do that.
The reason we installed win-install.cmd is because macOS does not appear in the guest operating system list by default. Therefore, we run this script to enable macOS in the guest operating system list.
Step 5. Create a New Virtual Machine for macOS 12 Monterey on Windows 10
To run macOS Monterey on a Windows 10 PC, you need to create a new virtual machine. You can do it by following the below steps.
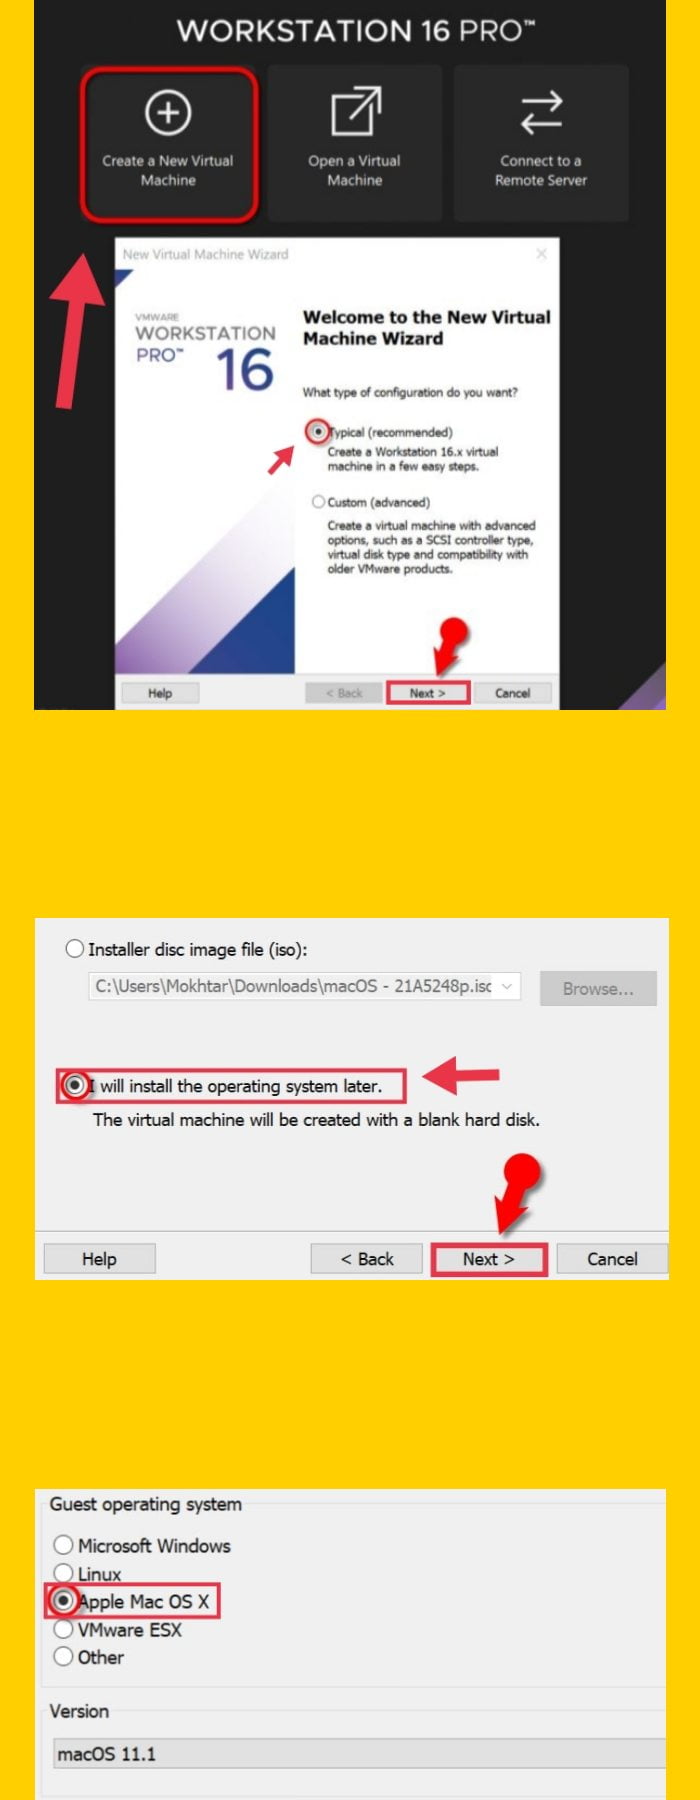
- First, go to VMware, tap on Create a New Virtual Machine (Ctrl+N), click on Typical (Recommended), and tap on Next.
- Next, check I will install the operating system later and tap on Next. Select Apple Mac OS X from the operating system list, then tap on macOS 11.1 from the version drop-down list and tap on Next.
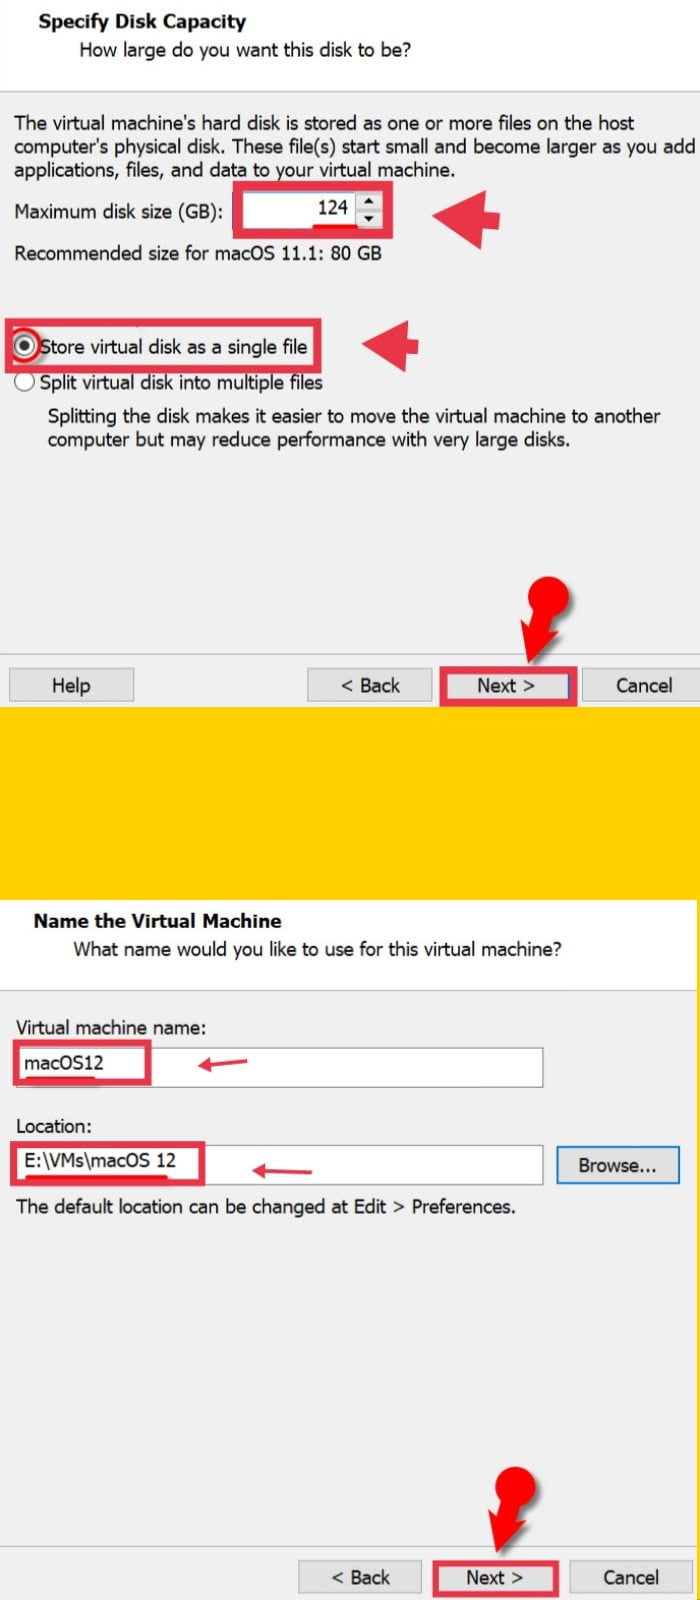
- Now, choose a name for your virtual machine, like macOS Monterey. tap on Browse, then select a location to save virtual machine files and tap on Next, or you may let it as default.
- Next, select a disk size of 124 GB or more than 50 GB. Then choose to store the virtual disk as a single file and tap on Next.
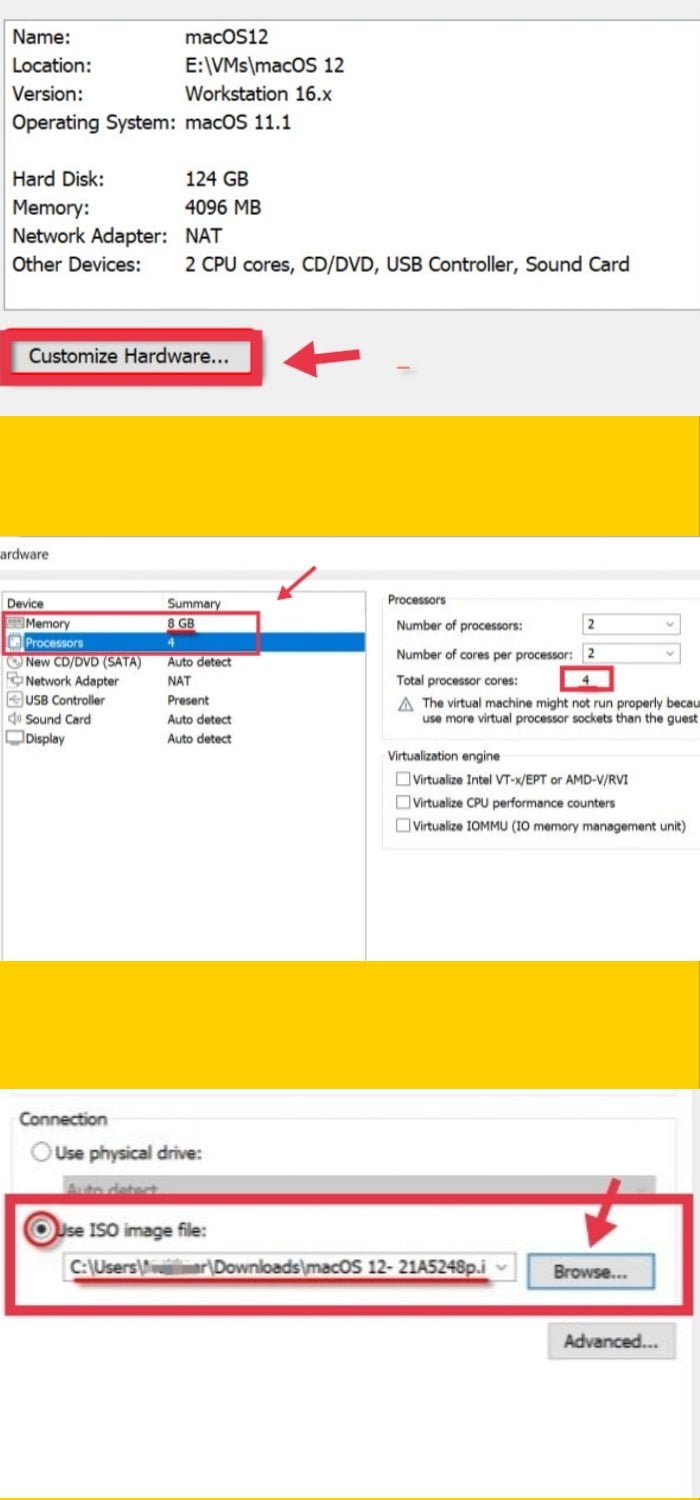
- On the Ready to Create Virtual Machine page, tap on Customize Hardware.
- You may increase the memory from 4 GB to 8 GB or higher for better performance.
- Next, go to the Processors menu. Then, increase the CPU processor core from 2 cores to 4 or higher cores for better performance.
- Note: If you want to run macOS Monterey on a Windows 10 PC, the minimum requirement for Memory and Processor is 4 GB Memory and 2 Cores of Processors.
- Now, you may tap on New CD/DVD (SATA) from the menu, tap on Use ISO image file, and click Browse.
- Find the macOS 12-21A5248p.iso file, then click Open. If you don’t have this file, you need to download it from Step 1: Download and install the prerequisites section.
- After adding the macOS Monterey ISO, click Close to save all changes.
- Finally, tap on ‘Finish‘ on the New Virtual Machine Wizard Window.
Step 6. Edit macOS Monterey VMX File
- To edit the VMX file, go to the virtual machine folder you selected earlier in this guide. If you haven’t chosen a new location, then the default location is in Document > Virtual Machine.
- Now, right-click on macOS12.vmx and open it via Notepad or any third-party text editor.
- Go to the bottom of texts and add the following code; then tap on File > Save. Now you can close it.
smc.version = "0"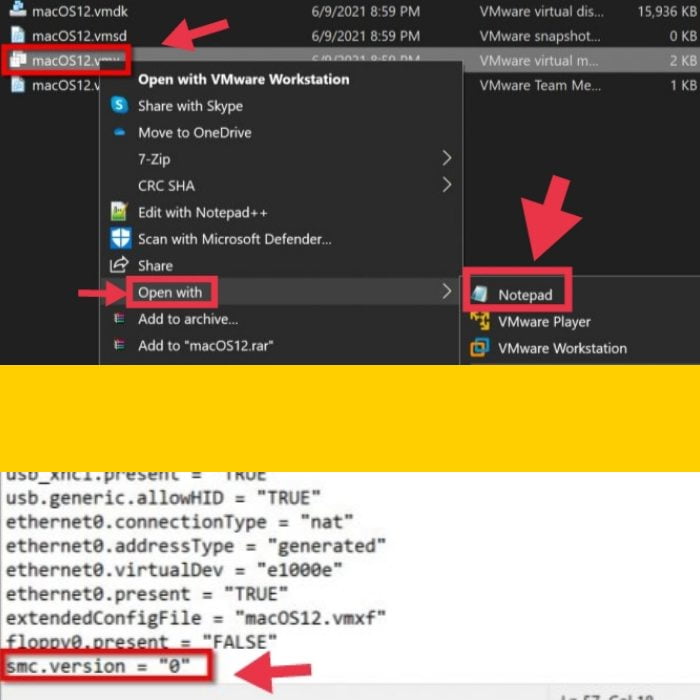
Step 7. Install macOS Monterey on VMware on Windows 10 PC & Laptop
After getting everything ready, now it’s time to install macOS Monetary on your Windows 10 computer. You can do it by following the below steps:
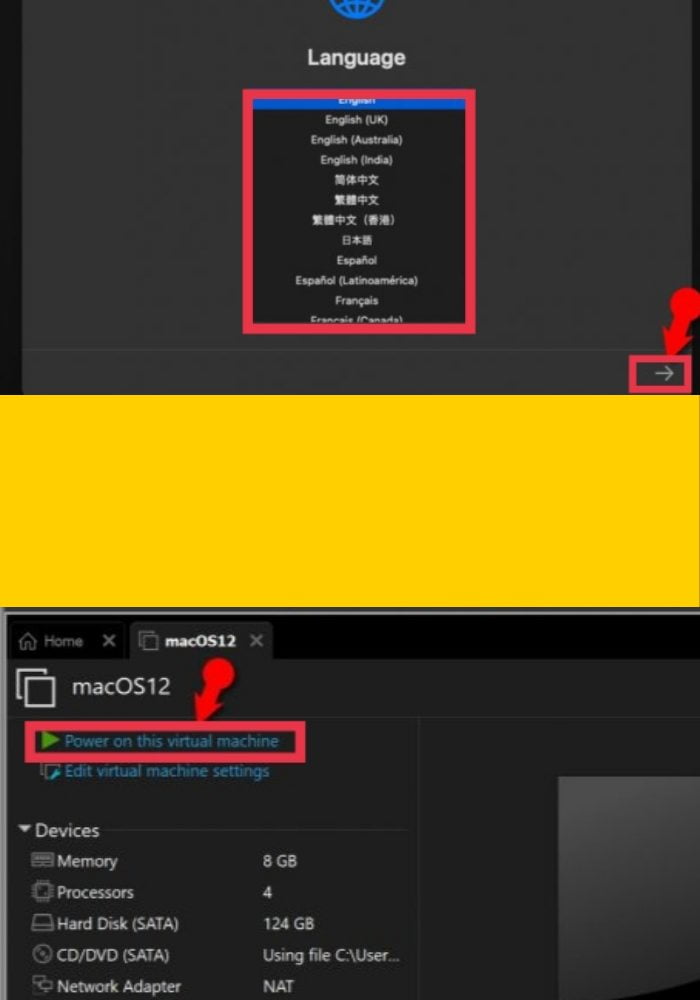
- Launch VMware, tap on ‘Power on this Virtual Machine’ on the macOS Monterey VM window, and wait for it to boot up.
- Next, choose your preferred language on the language page, then tap on the Next Arrow icon.
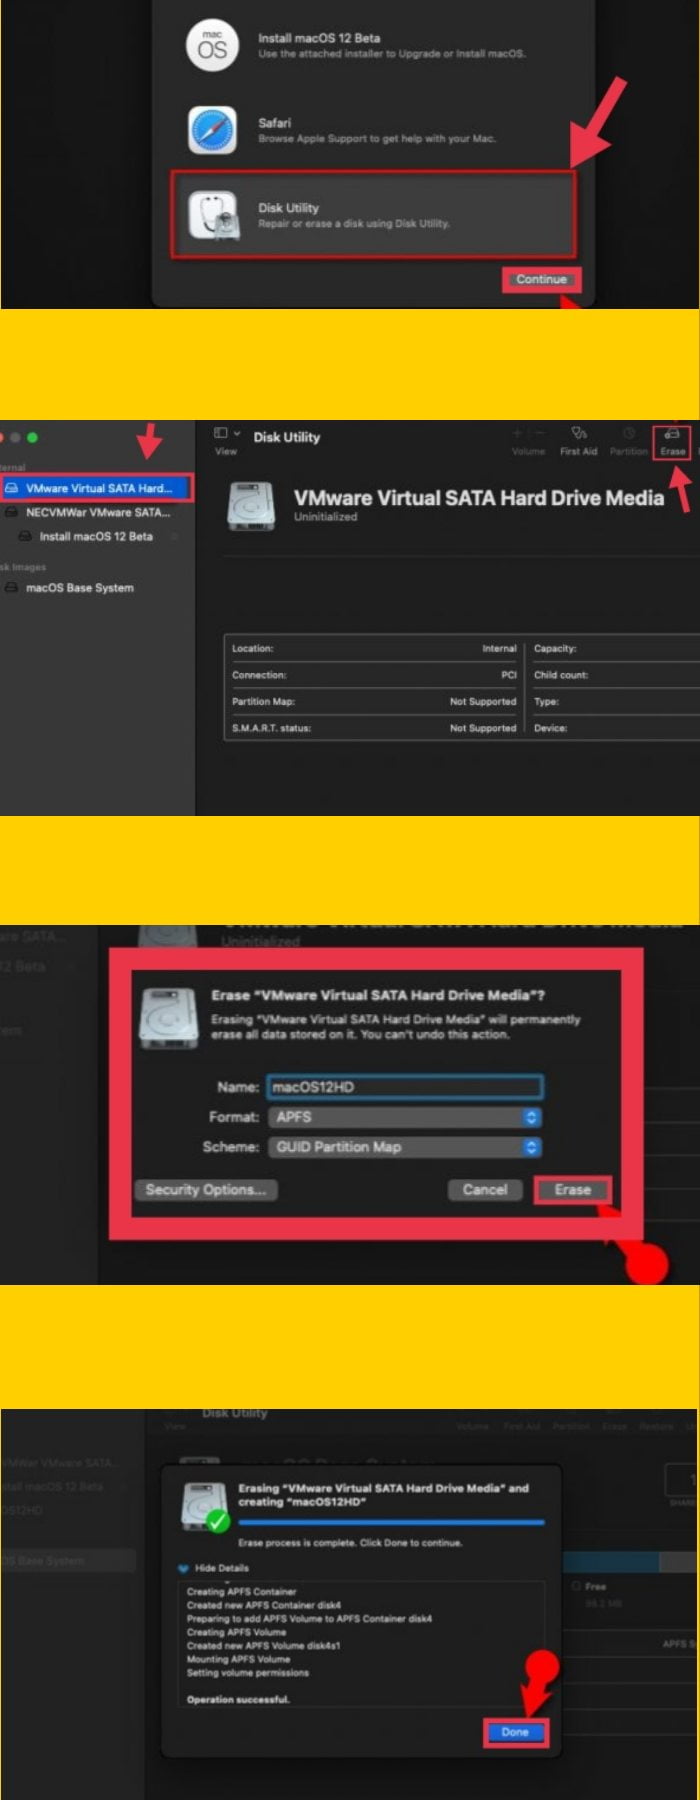
- Now, tap on the Disk Utility and select Continue.
- Next, choose VMware Virtual SATA Hard Drive Media, then tap on Erase.
- Now, for the name, enter disk macOS12HD, then select APFS from the Format drop-down list and tap on Erase.
- Tap on Done to close the dialogue box.
- From Disk Utility Tab, tap on Quit Disk Utility.
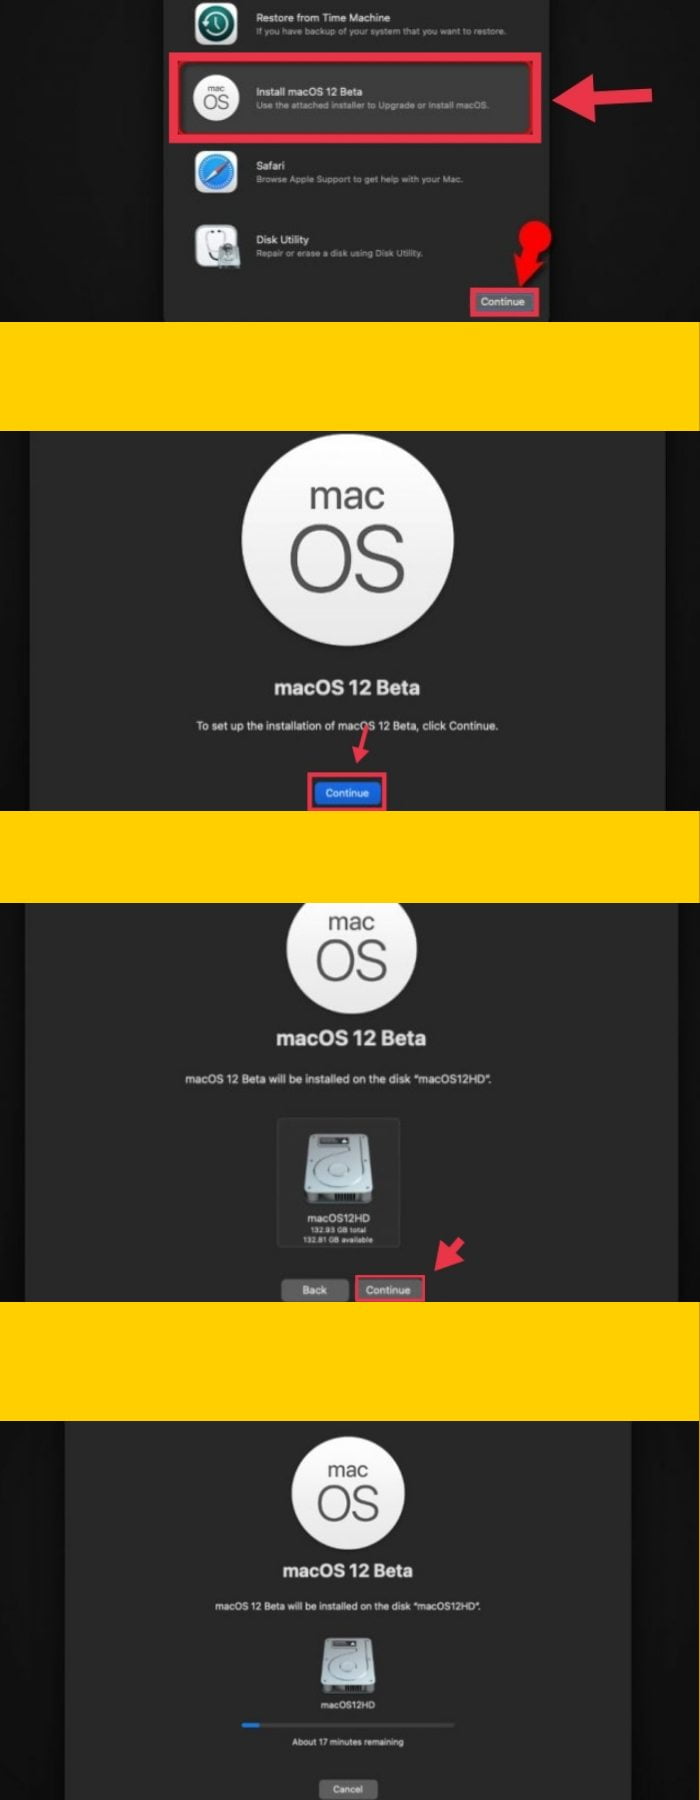
- Tap on Install macOS 12 Beta and tap on Continue twice.
- You need to agree to the terms and conditions of the software license agreement.
- Tap on the available disk, then press the Install button.
- After restarting 2 or 3 times, the installation of macOS Monterey will be completed. It can take about 15-30 minutes, depending on your system.
Complete Basic macOS Account Settings
After you are successful in installing macOS Monterey on VMware on Windows 10 PC or laptop, you need to complete some basic account settings depending on your preferences.
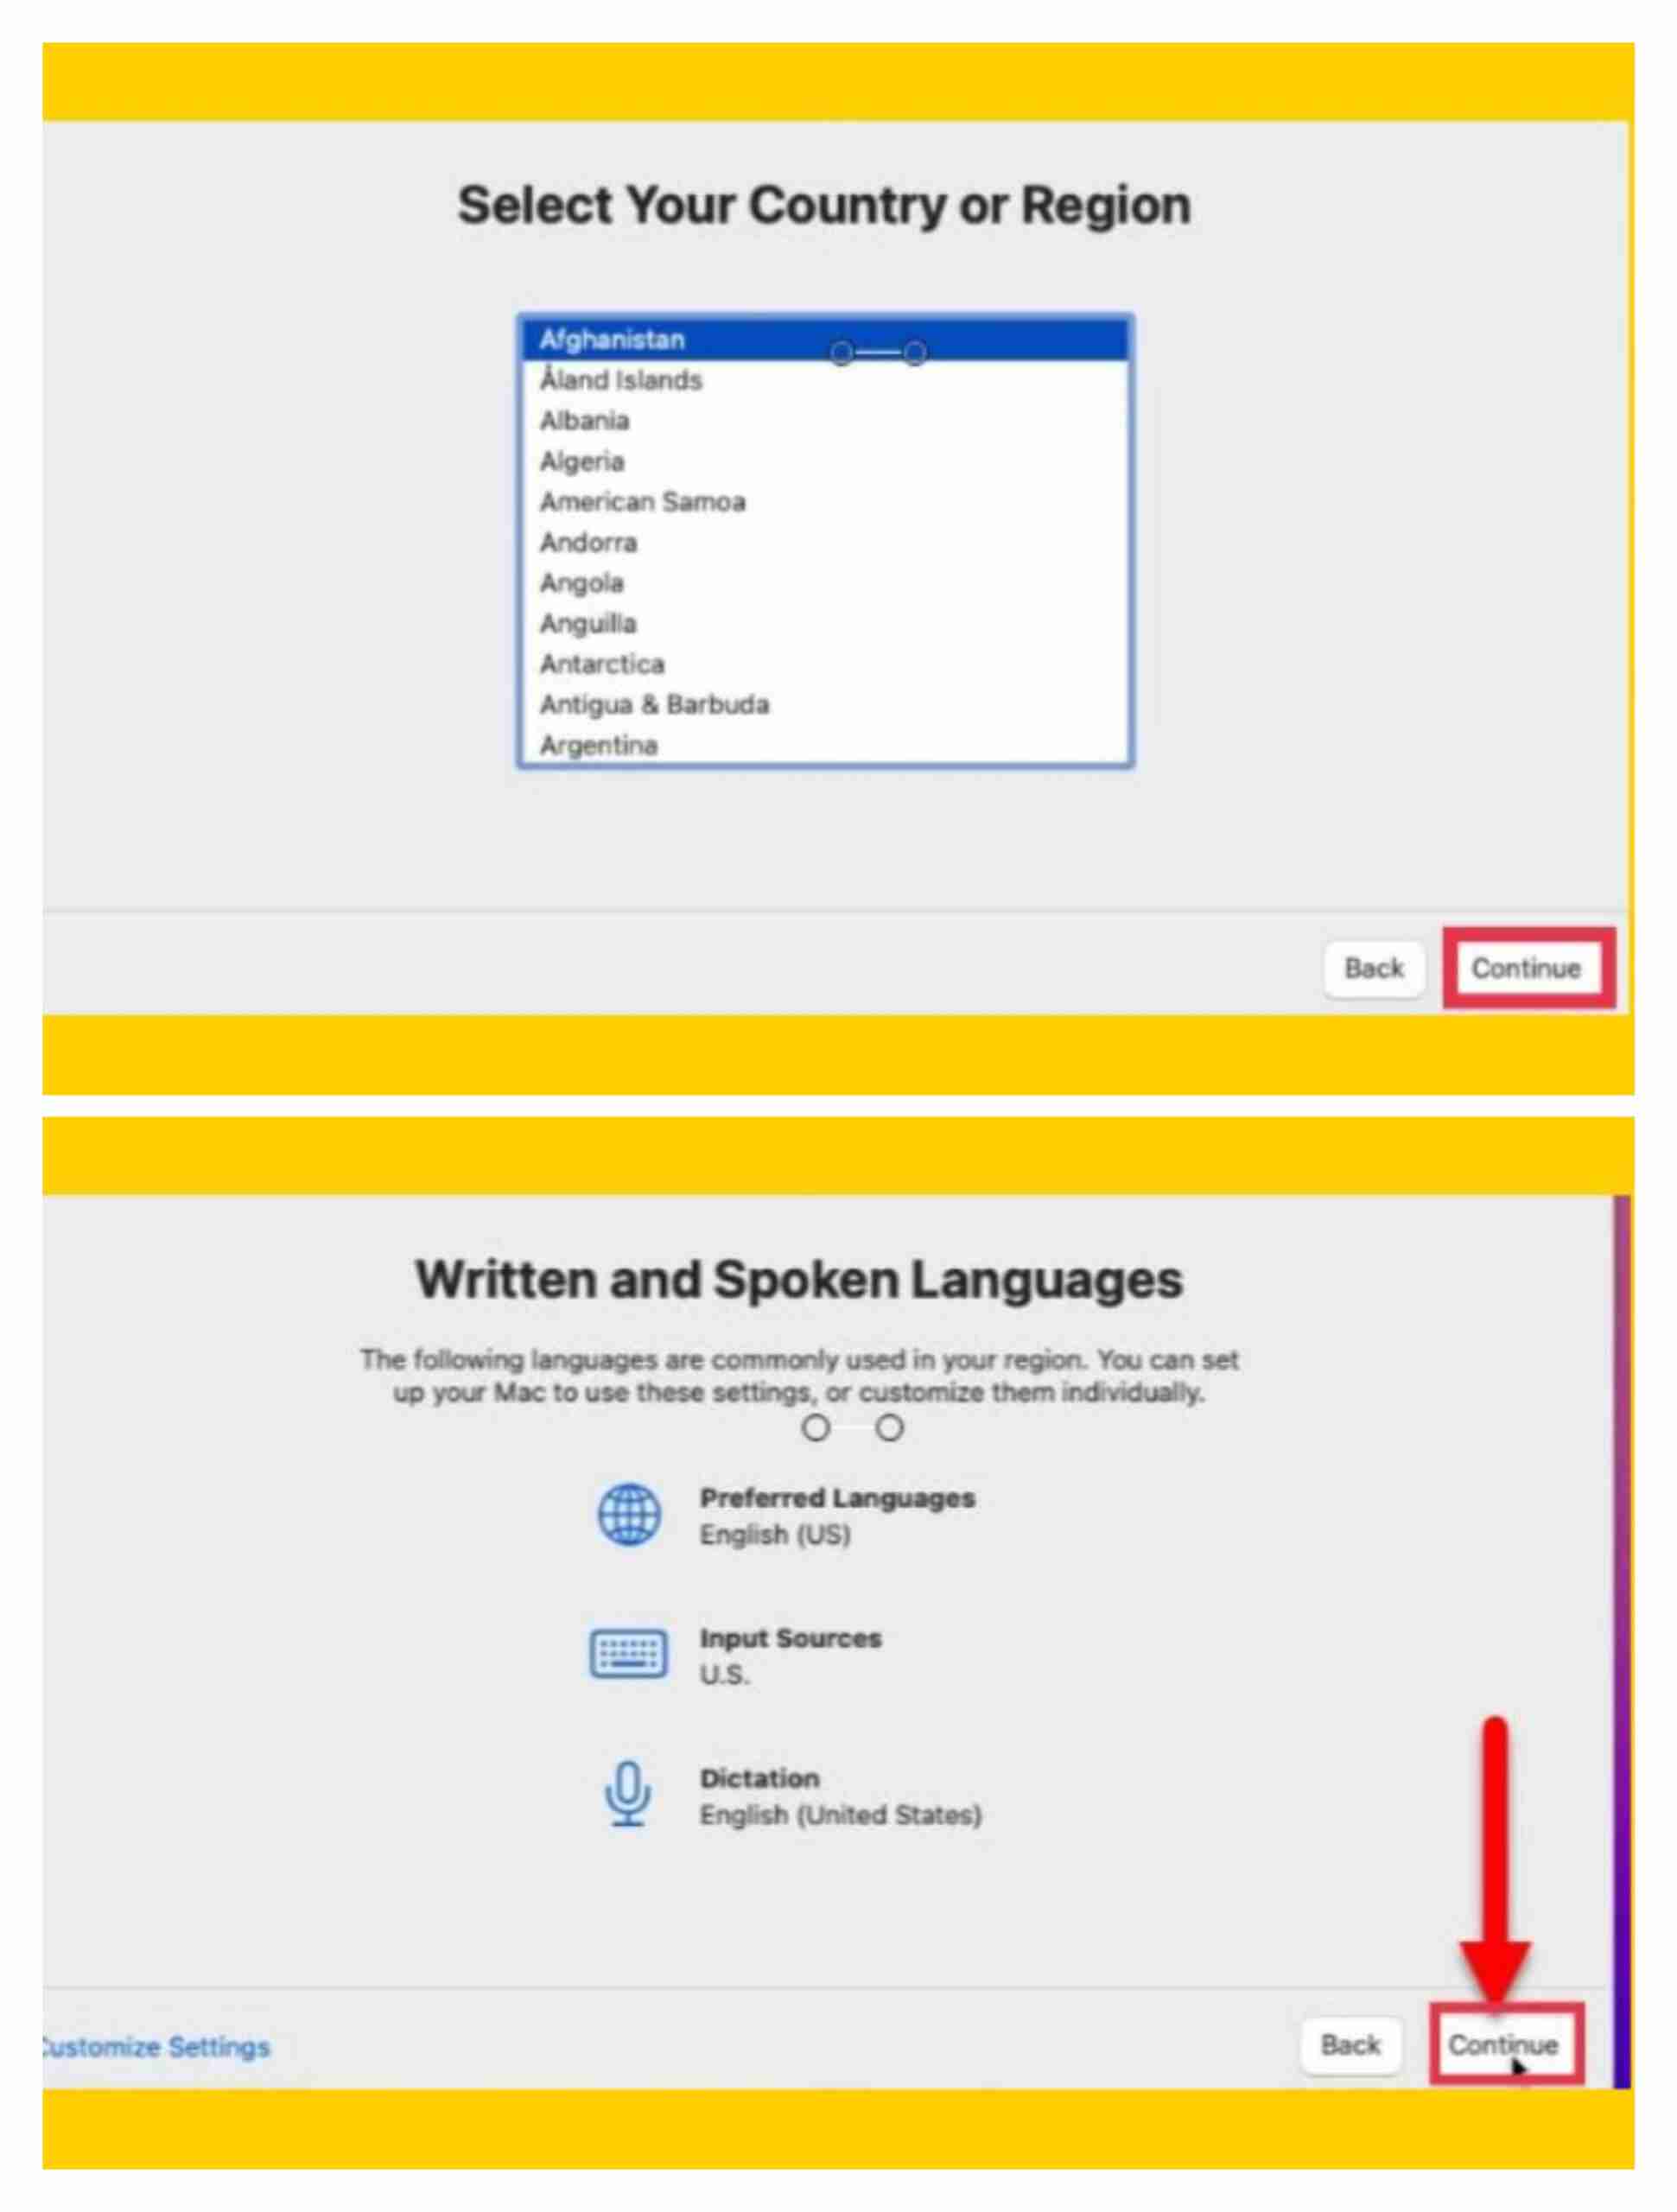
- First, select your preferred language.
- Now you can select the country where you live. Choose it so that country’s language should be input on the keyboard.
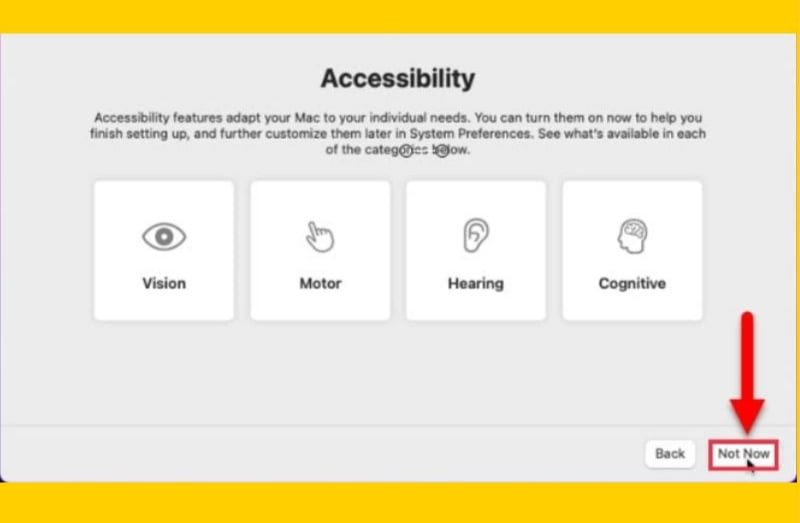
- With accessibility, you can adapt the mac according to your preferences. If you need it, enable it; if not, you can skip it.
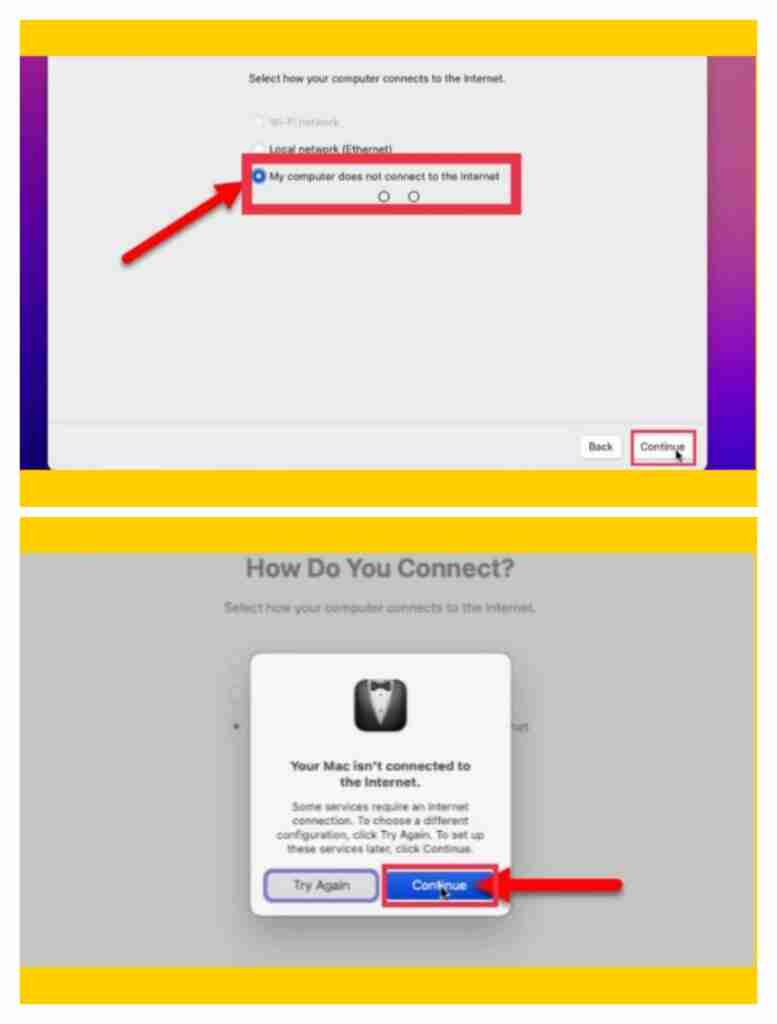
- Choose “My computer does not connect to the internet” and ignore the internet warning. Don’t worry. Your internet will work.
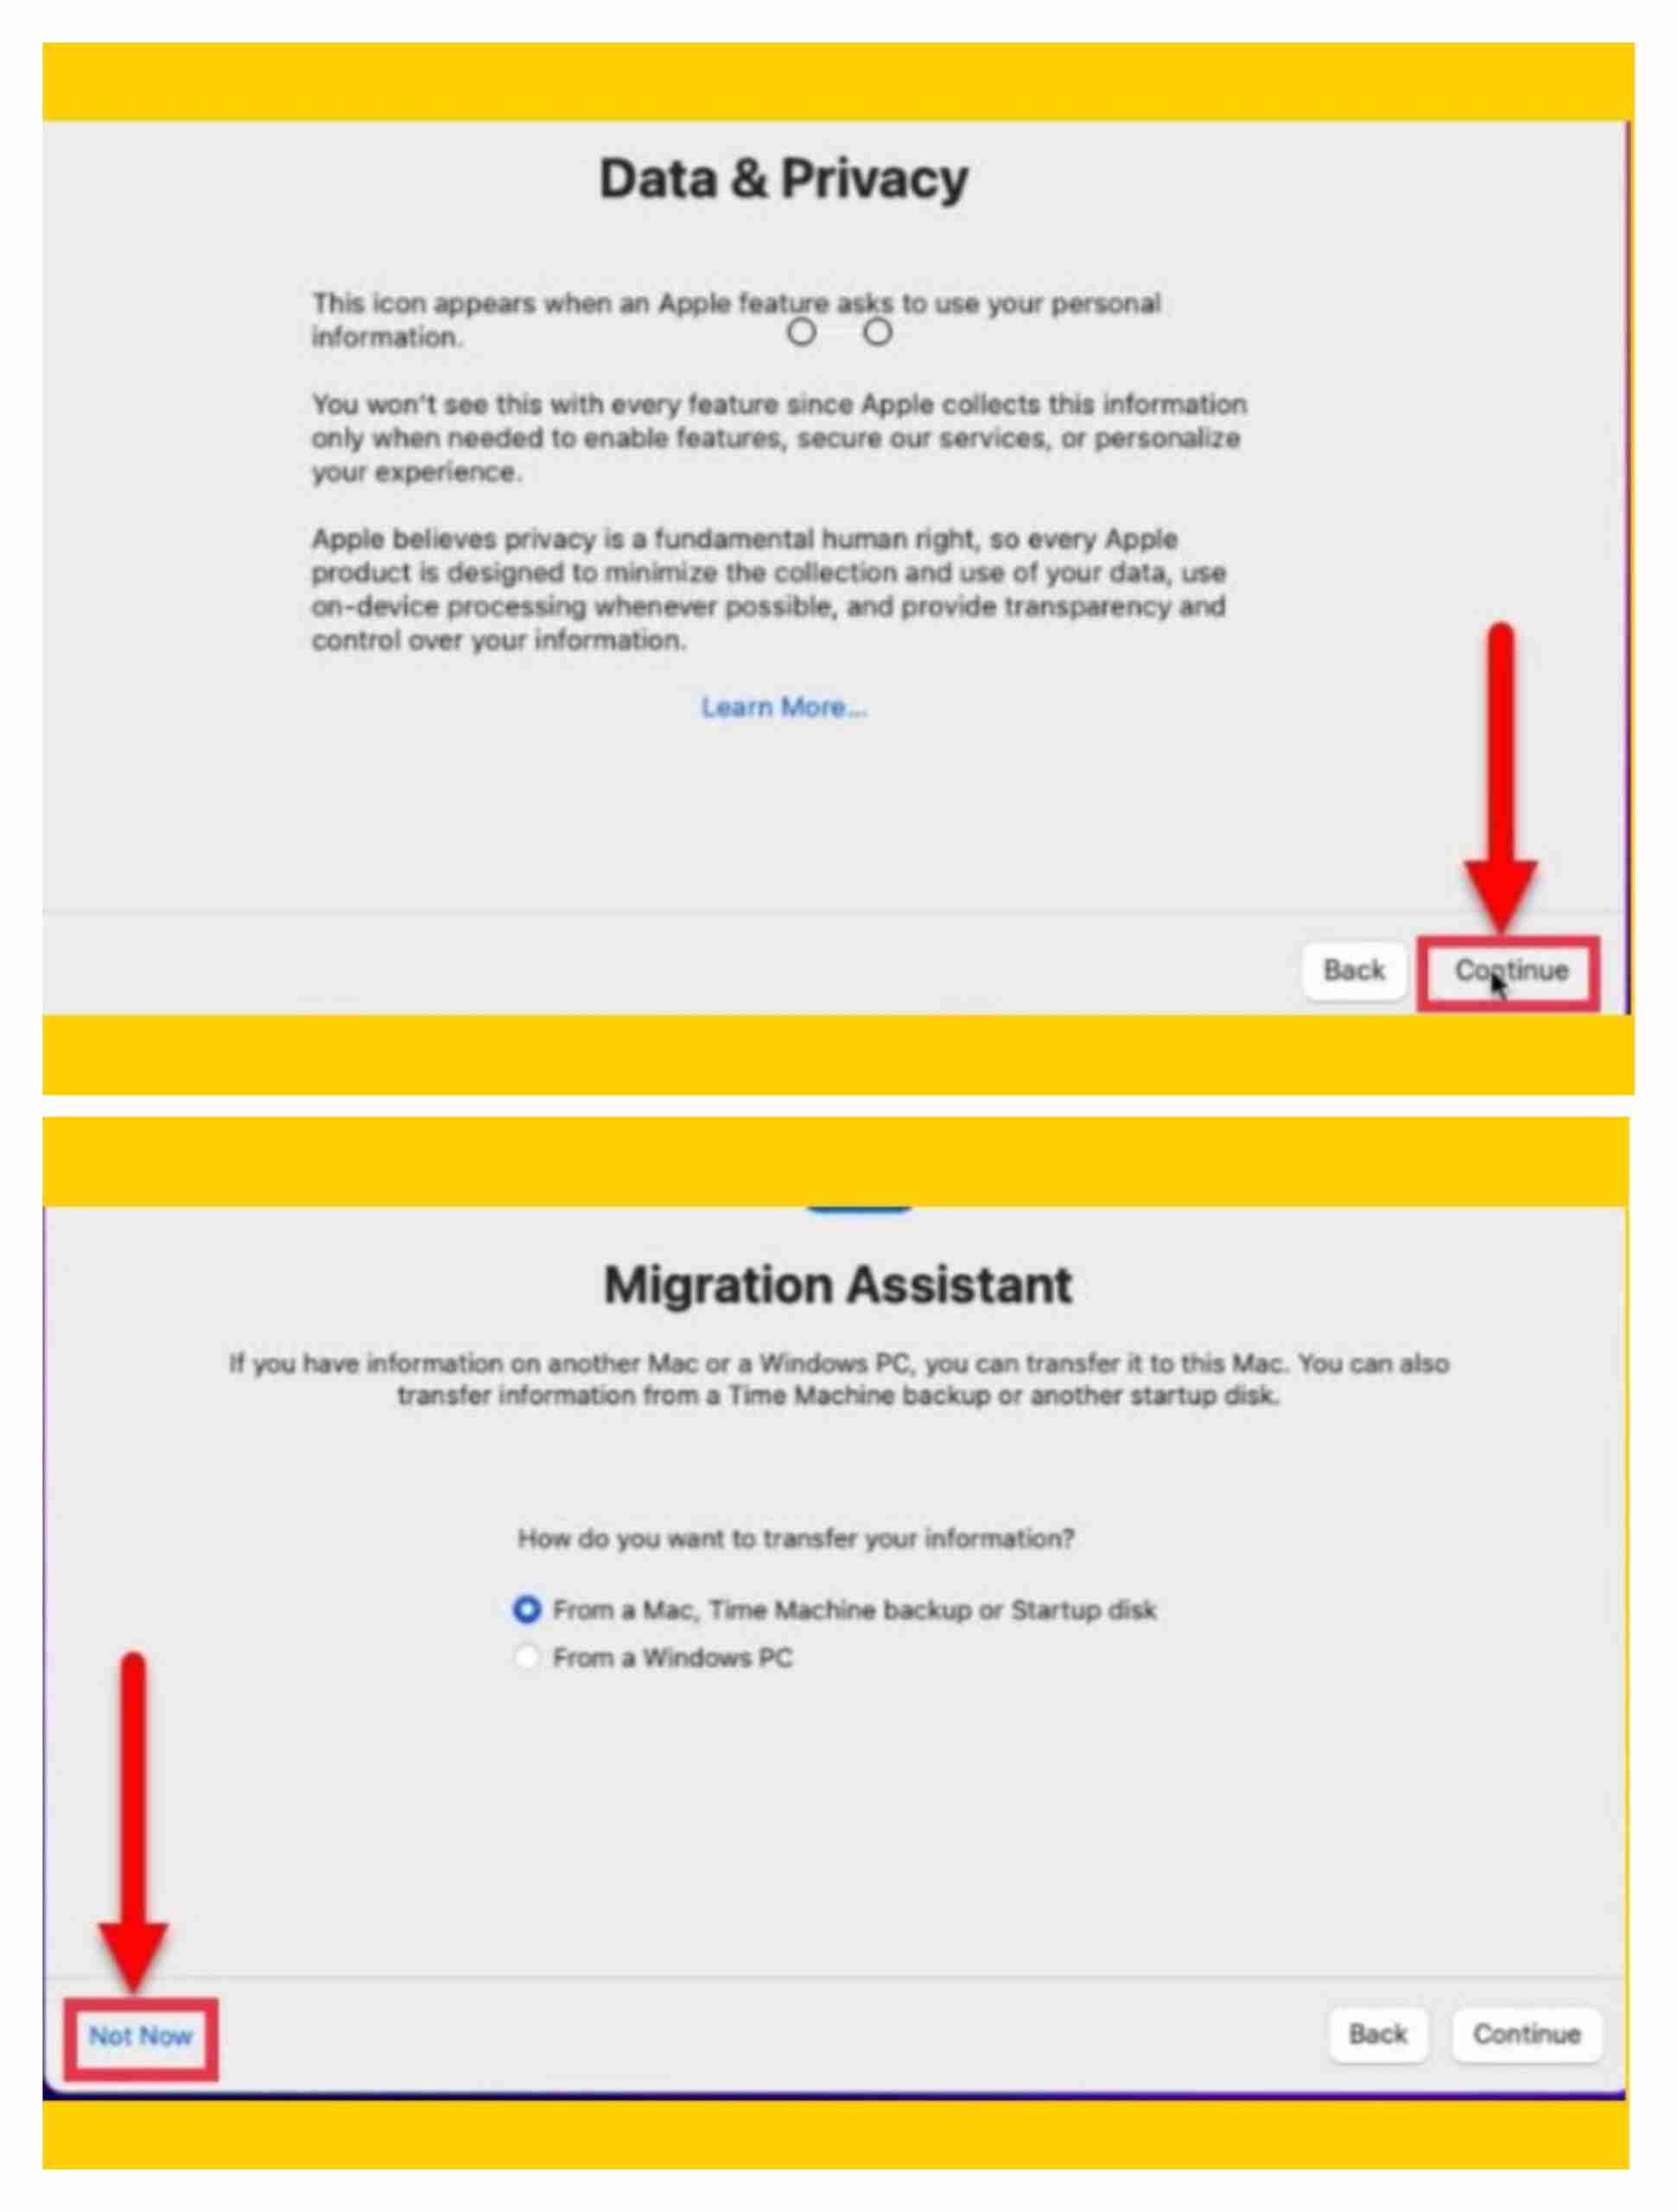
- Read Data & Privacy and click Continue.
- We have no business with migration in this step since we are performing a clean installation. You can tap on “Not now.“
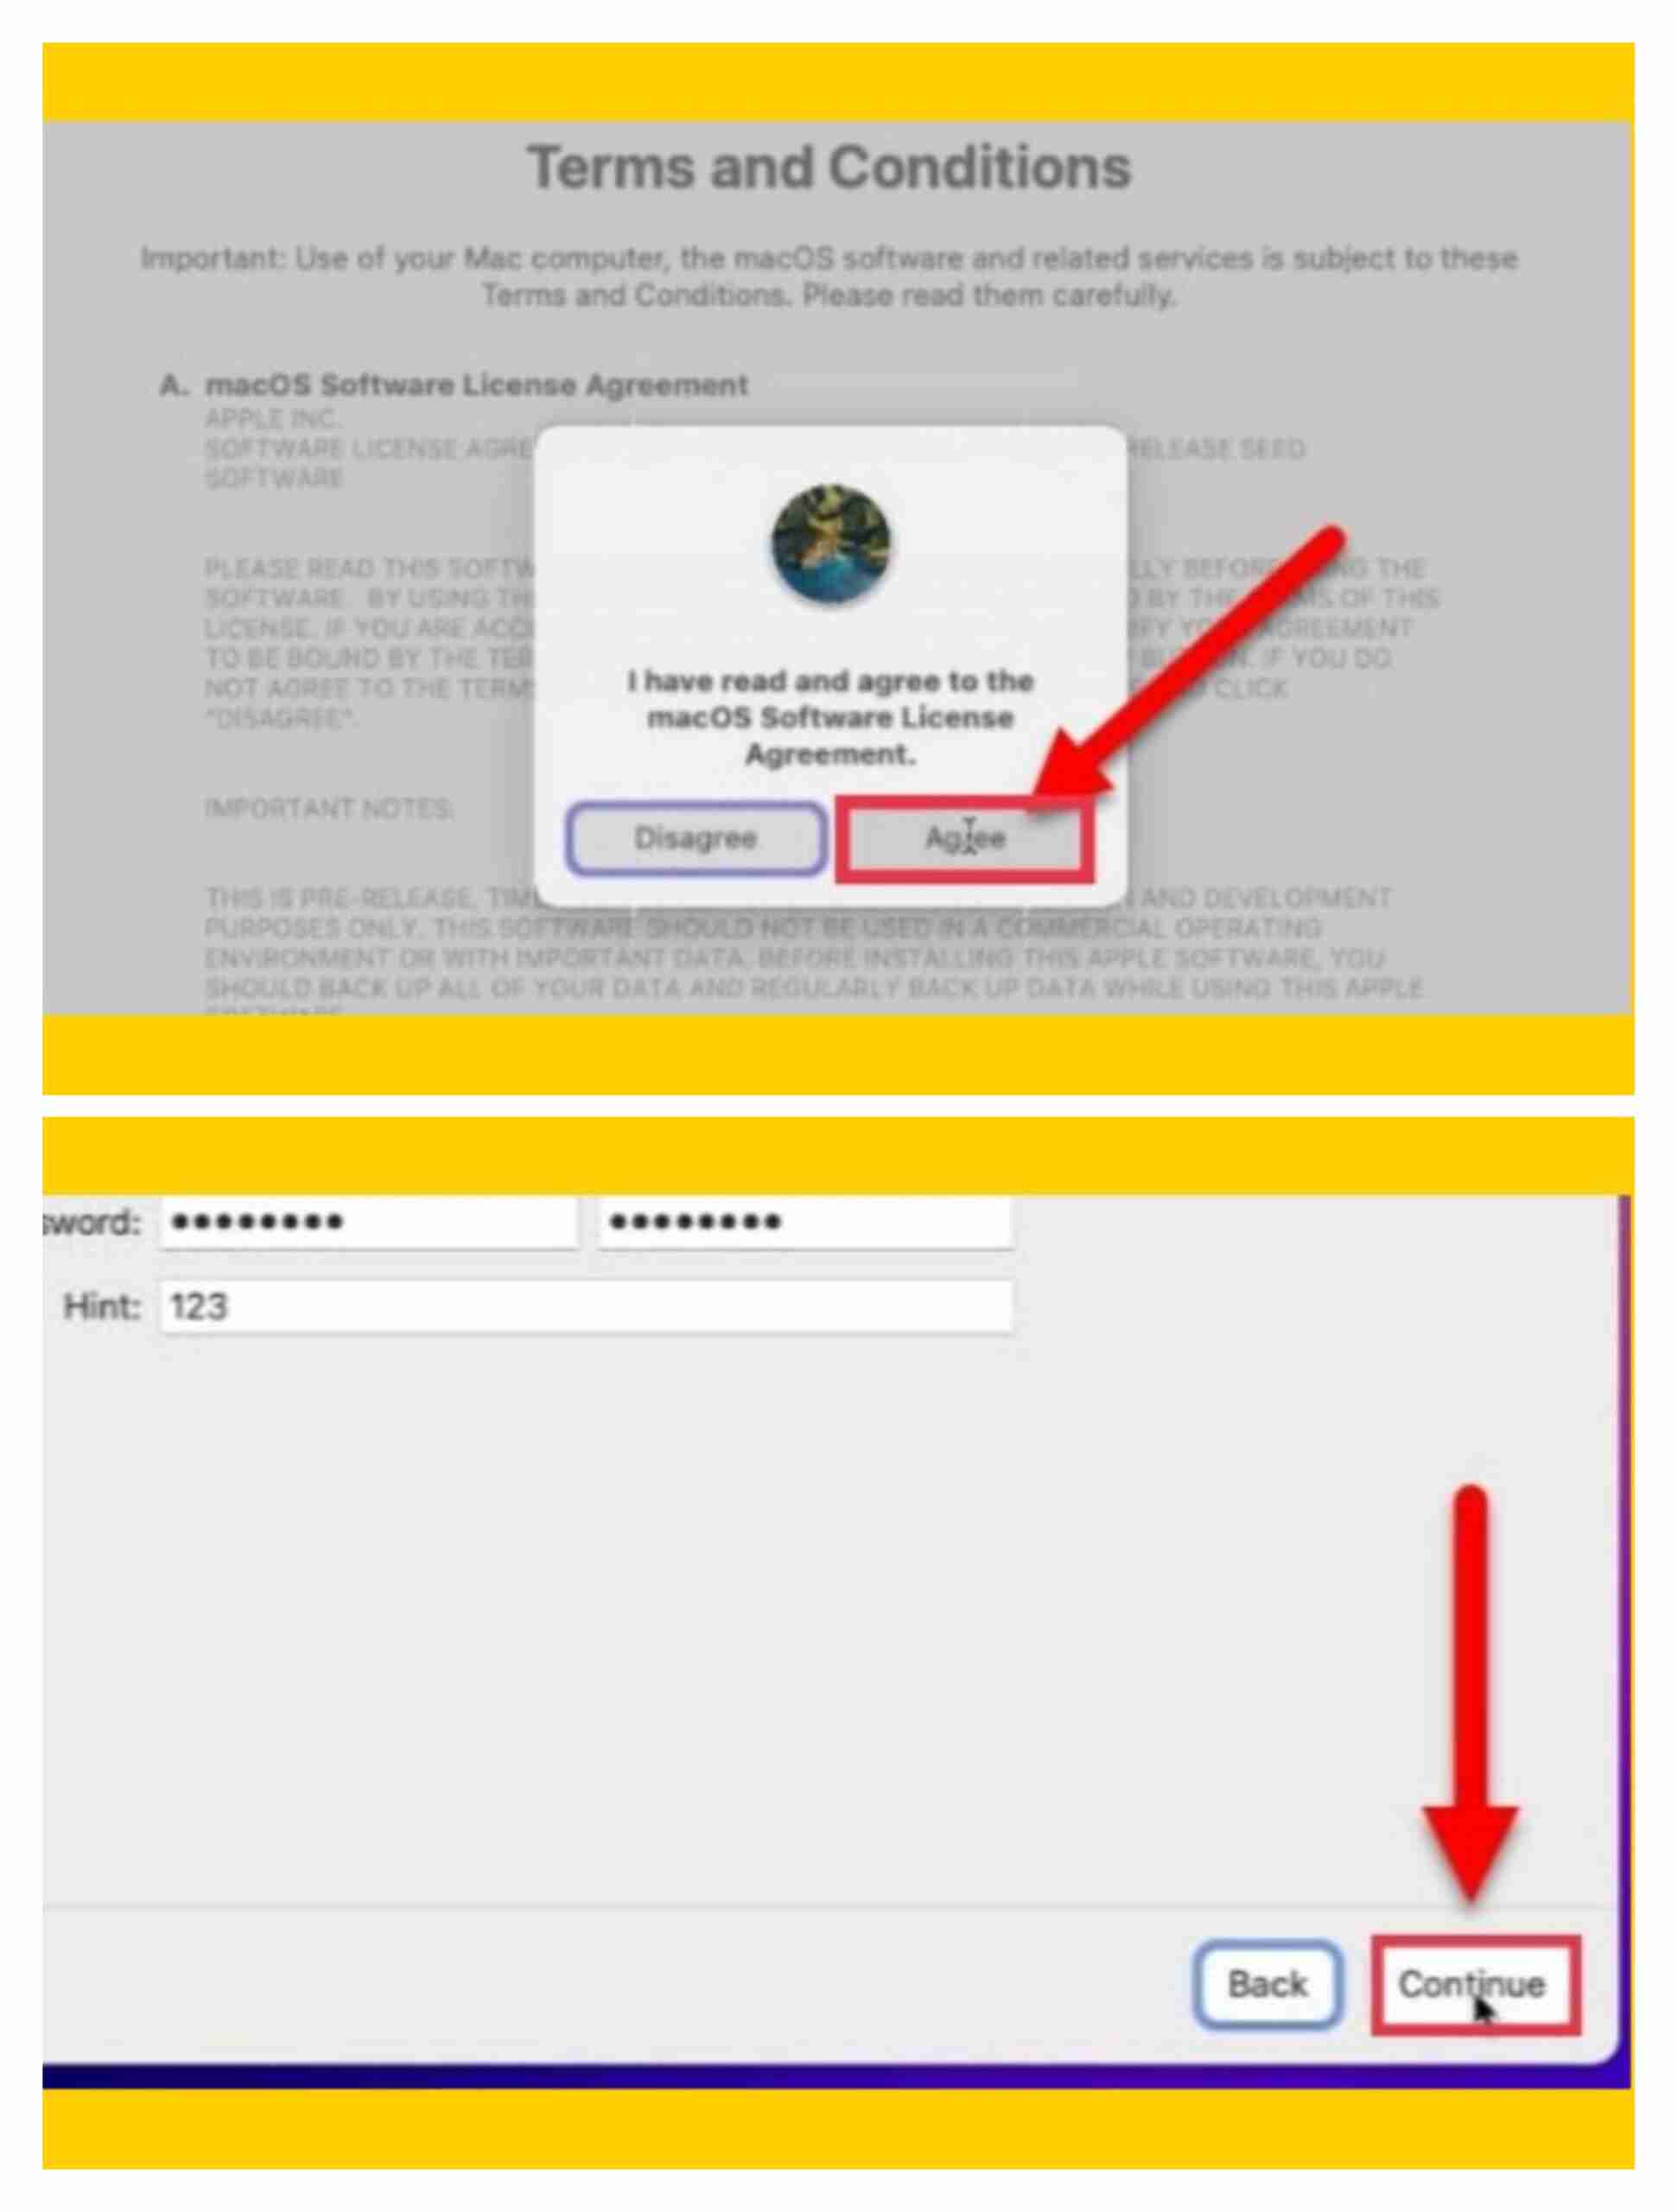
- Now, tap on Agree with the terms and conditions to move to the next step.
- Next, you need to create a computer account with a strong password for your privacy matters and tap on continue.
- Click Continue on Make This Your New Mac Window.
- If you are interested in monitoring your weekly reports, app downtime, or uptime, you can go for Screen time. If not you can tap on setup later and move on to the next step.
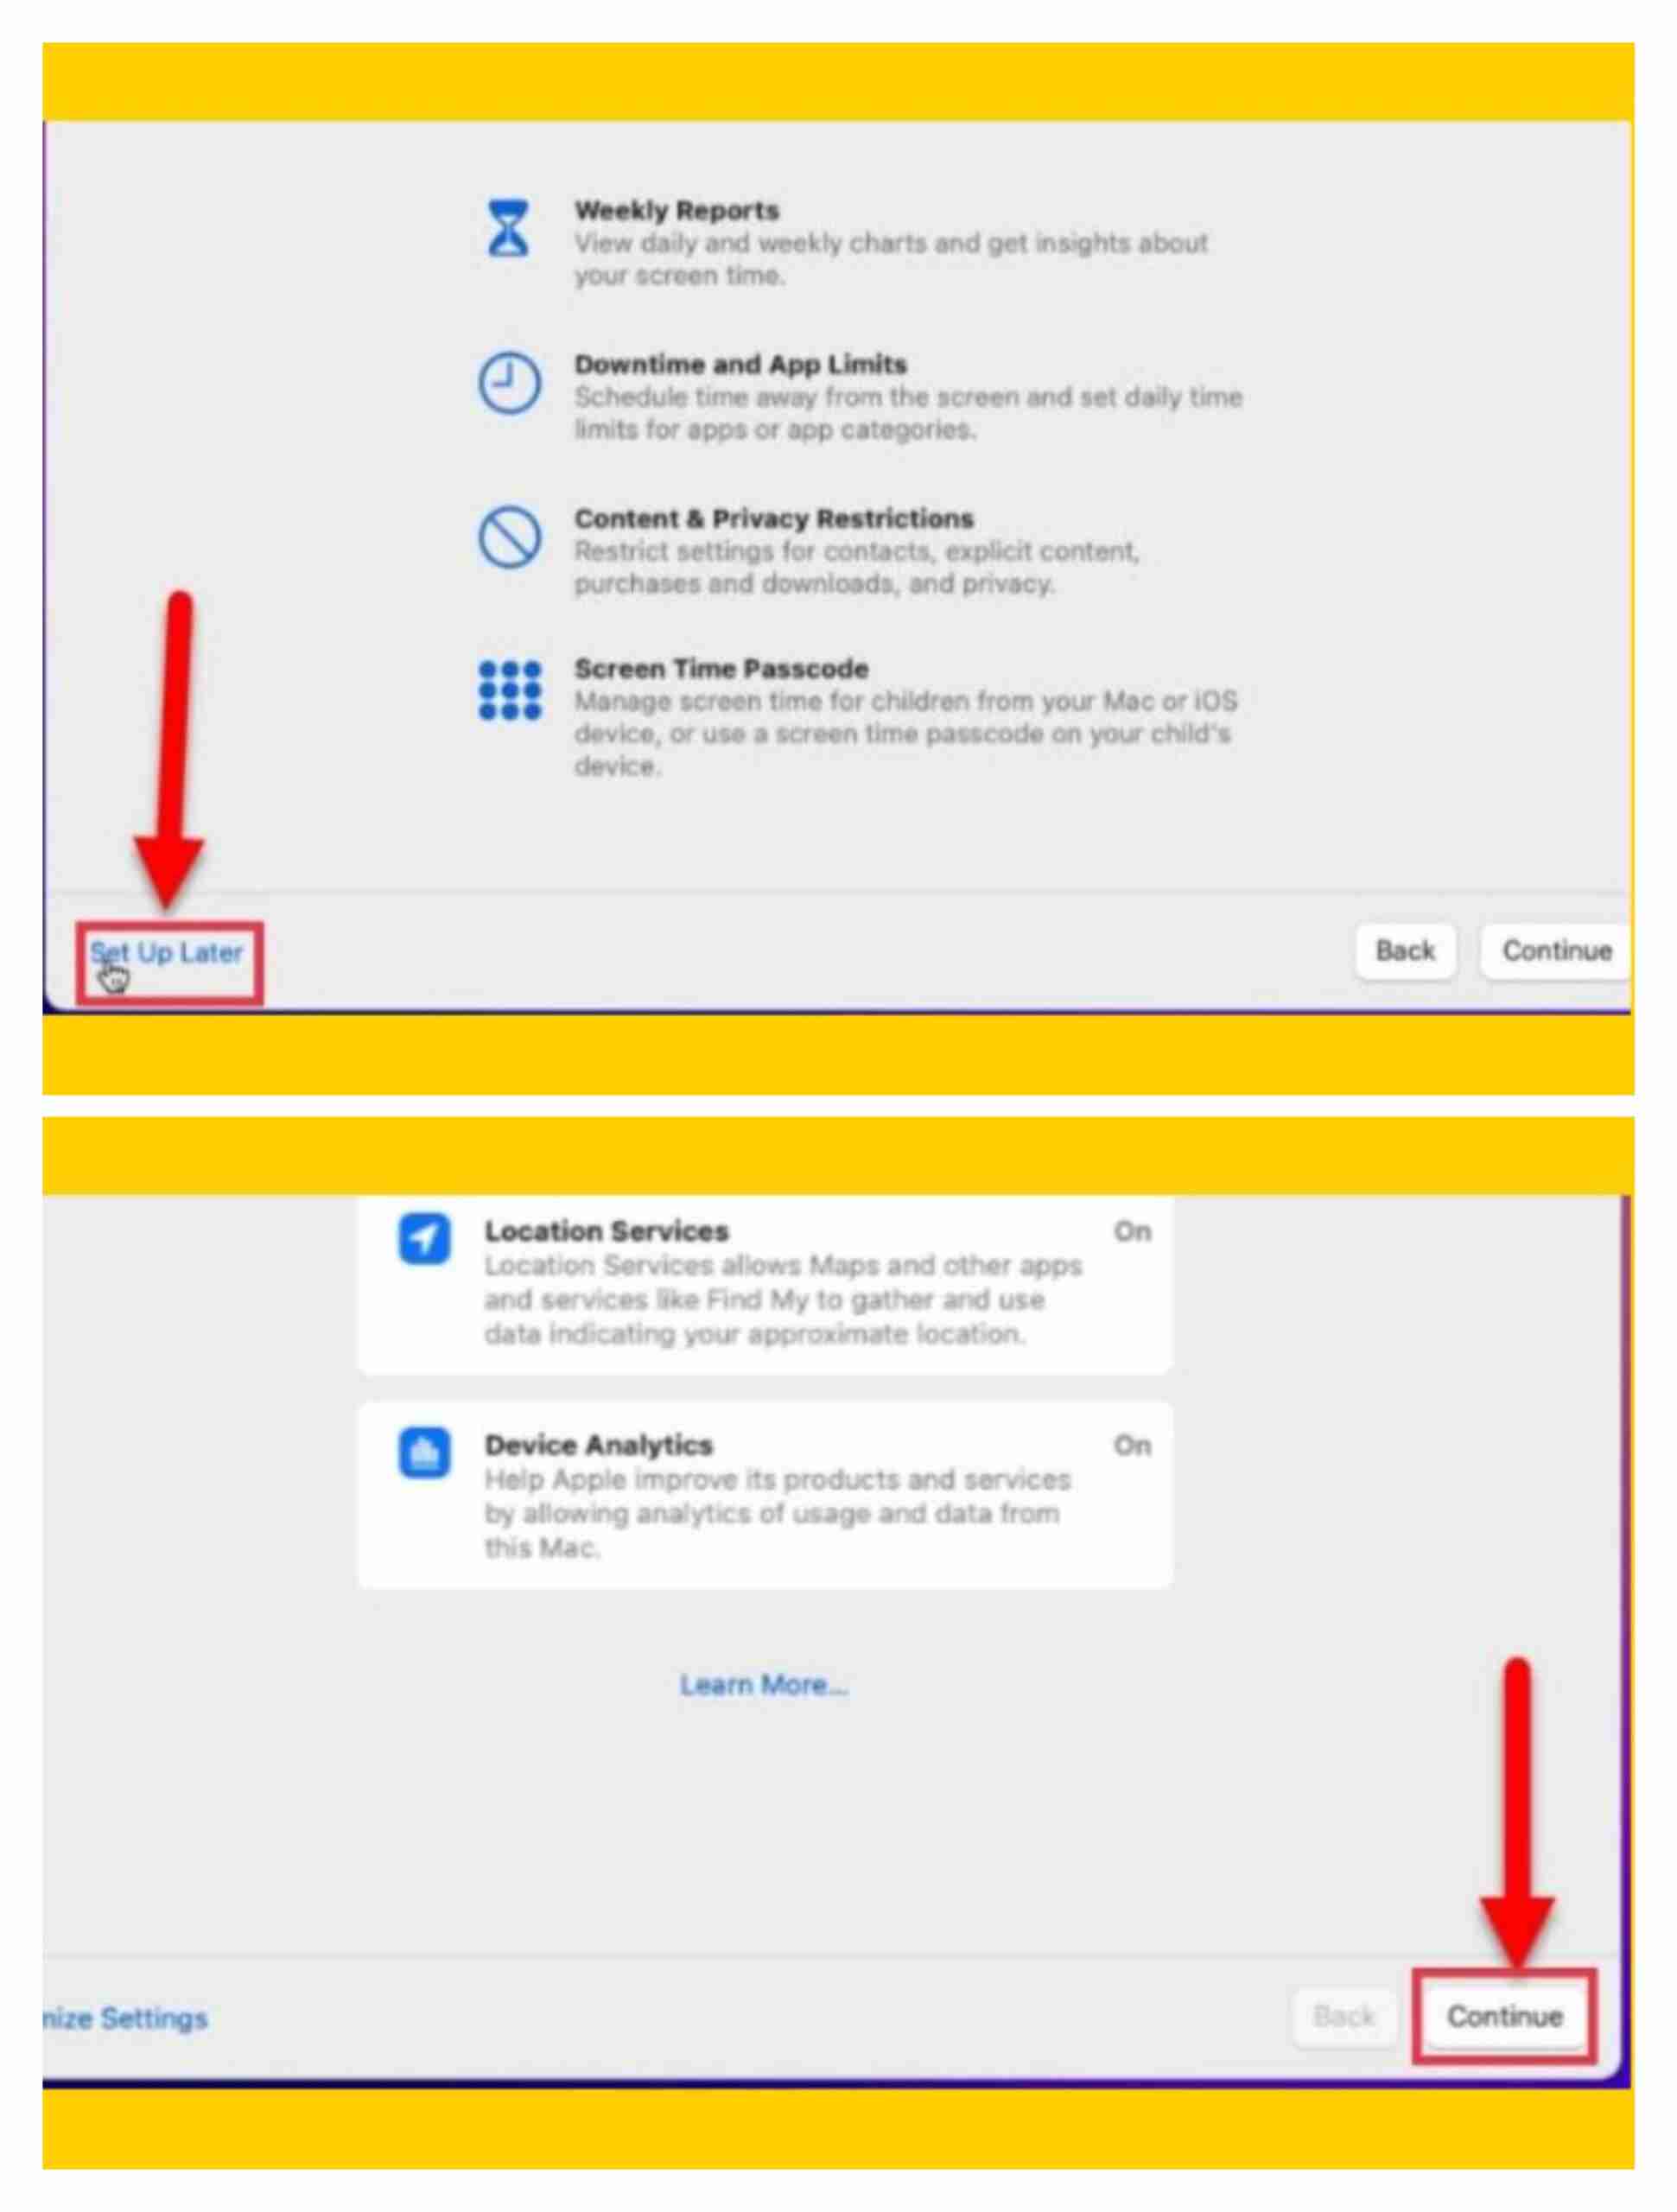
- Now, tap on Continue if you want to use Siri on your mac; if not, uncheck the box next to Siri.
- Finally, select your preferred theme for your macOS Monterey or macOS 12.

Pro tip: if you want your macOS Monterey to work smoothly and quickly on VMware on your PC, we recommend installing VMware Tools.
Final Words
That’s how you can Install macOS Monterey on VMware on Windows 10 PC and laptop with ease and with a step-by-step guide. If you have any kind of questions or encounter any kind of problem, please let me know in the comment section. Good Luck!
Read also:
The operation on file “C:\Users\terry\OneDrive\Documents\Virtual Machines\macOS 12\macOS 12.vmdk” failed.
If the file resides on a remote file system, make sure that the network connection and the server where this disk resides are functioning properly. If the file resides on removable media, reattach the media.
Select Retry to attempt the operation again.
Select Cancel to power off the virtual machine.
Select Continue to forward the error to the guest operating system.
It happened to me the first time because My One Drive was backing up the virtual machine folder, so I had to redo everything selecting a local different folder.
Great Article. Thanks.
Network won’t work following these steps. 🙁
Hey Fernando, the steps in this article will help you solve the network connection problem on macOS Monterey too. fixchumz.com/network-connection-error-on-macos-ventura/