Microsoft has officially released Windows 11 on June 24, it has lots of new features and comes into the market with a new look. It has been a long time since the release of Windows 10. We’ve been using the same Operating system for a long time now, but now we have Windows 11 on our hands. So, if you want to test and use it on your MI Mac and MacBook then you are in the right place. In this guide, you’re going to learn how to install Windows 11 on M1 Macs using a Virtual Machine. You can follow the same installation for both macOS Monterey and Big Sur.
Table of Contents
Windows 11
The new start menu and user interface in Windows 11 are very similar to those in Windows 10X. Before abandoning the project to support Windows 11, Microsoft has been working to make Windows easier to use for dual-screen computers. The most obvious visual modification can be noticed on the taskbar. The program icon has been centered, the tray area has been organized, and a new start button and menu have been added.
This new start menu is a simpler version of Windows 10, but it does not have live tiles. This includes options to pin the files recently used by the application and quickly shut down or restart the Windows 11 device. It is much simpler than what is currently available in Windows 10.
If you don’t want the program icon and start menu to be centered, you can drag them all to the left. When combined with dark mode, Windows 11 started to look like a more refined version of Windows 10, rather than something brand new.
Windows 11 New Features:
- The new Start Menu, Taskbar, and search
- Rounded corners
- Refreshed Action Center
- New icons
- New ways to manage virtual desktops
- Widgets
- New animations
- A new way to multitask with windows
- Improved touch controls
- Fresh new sounds
- Dark mode
Steps to Install Windows 11 On a Virtual Machine in M1 Macs (macOS Monterey & Big Sur)
It is easy to install Windows 11 on Windows, Linux, and Intel MacBook using VirtualBox. However, if you are using Apple’s latest Mac or MacBook M1, you are also lucky. This article will tell you about a free application called UTM for installing Windows 11 on Mac M1.
Follow the below steps to install Windows 11 on your macOS Monterey and macOS Big Sur Computer.
Step 1. Install UTM on your Mac
- Go to the official UTM for Macs website and tap on the Download button to download the .dmg file.
- Now, double click on the downloaded dmg file and you will see a Finder window. You will see two things on it: the icon of the application you are about to install and an application folder.
- Next, you need to drag the app icon and drop it in the Applications folder. UTM is now installed on your Mac/Macbook.
Step 2. Create a Virtual Machine on Mac for installing Windows 11
- Now, open the app menu and open the UTM app.
- Now, tap on Create a New Virtual Machine option.
- Next, enter a name for the VM and click on save.
- In the System tab, select the x86_64 Architecture.
- Assign at least 4GB of RAM. Then, click on Show Advanced Settings and allocate 4 CPU Cores, as shown in the image below.
- Next, without touching the settings in the QEMU tab.
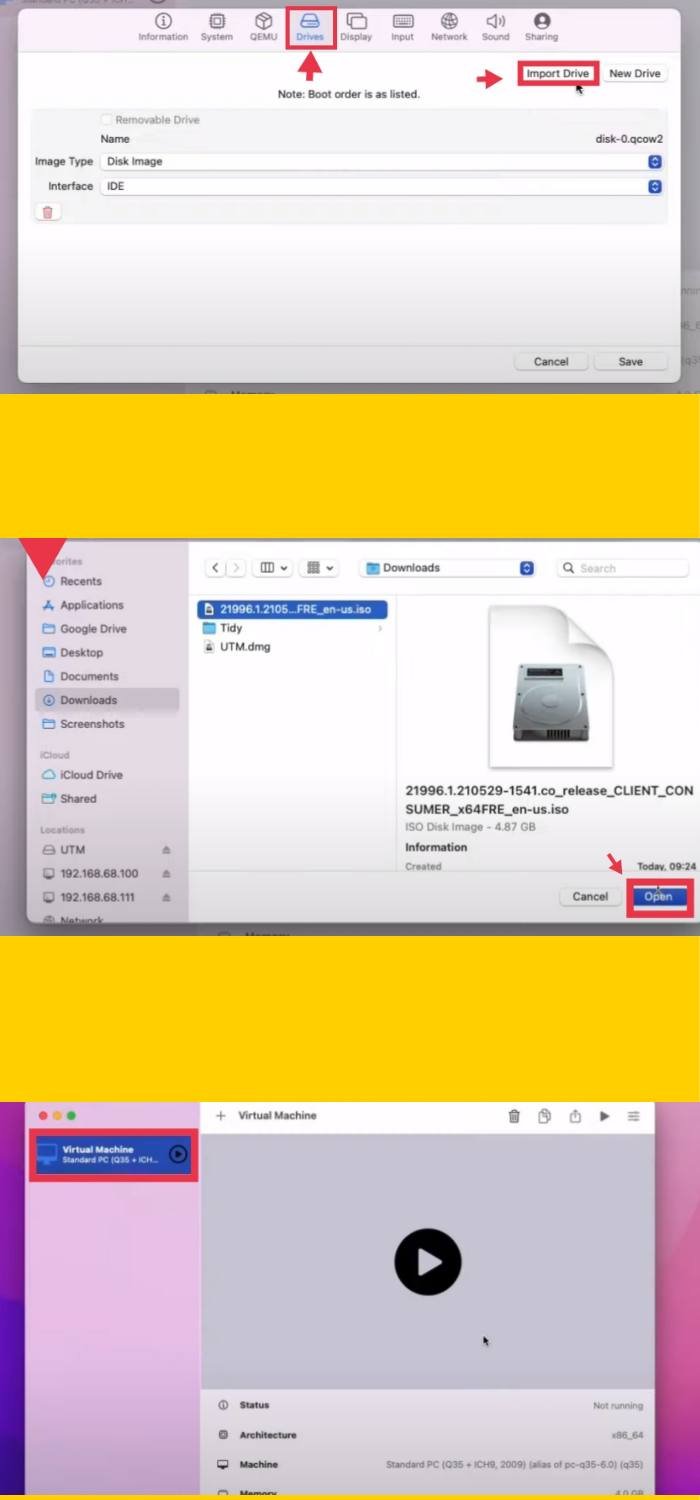
- In the Drives tab, click on the New Drive button.
- Next, select the interface as IDE and allocate 40GB of size.

Step 3. Install Windows 11 on M1 Macs Using a Virtual Machine
- Tap on Import Drive, select the Windows 11 ISO you downloaded, and tap on Save.
- After saving everything, from the main menu, start the Virtual Machine we just created.
- Finally, go through the Windows 11 installation setup, and voila! That’s how to install Windows 11 on M1 Macs.
Summary
The steps to install Windows 11 on M1 Macs using a virtual machine was as below:
- Install UTM on your Mac.
- Create a Virtual Machine on Mac for installing Windows 11.
- Install Windows 11 on a virtual machine in M1 Macs.
Note: The installation process may take longer because the x86 operating system emulation is very slow. Therefore, the overall experience will also be long and slow. In addition, UTM does not support GPU emulation and virtualization, so it lacks 3D acceleration.
Read also:
don’t waste your time… on mac m1, it’s so slow that installation take around 3 hours (if everything goes well) and it’s too slow to use it correctly. is ok only for a quick preview…
You are right! Users may experience low performance. I believe I put a small ‘Note’ at the end of the post! But remember it differs what system you want to install it on!