If you are excited about the new macOS operating system, macOS Sonoma or macOS 14, and want to know if you can install these cutting-edge systems on your Windows 10 or 11 computer, then These instructions in this article will help you install macOS Sonoma on VMware on a desktop computer or laptop running Windows 10 or 11.
MacOS Sonoma offers Windows users a user-friendly interface, improved privacy settings, and seamless integration with Apple devices. VMware allows users to explore recent macOS improvements without requiring a specific Apple device.
Table of Contents
MacOS Sonoma Updated Features
- Widget Improvements: An interactive, customizable widget allows users to easily access and control their favourite apps and information from their desktop.
- New Screensavers: MacOS Sonoma unveils elegant screensavers featuring stunning landscapes and animations.
- Screen Sharing: It introduces a screen-sharing feature for remote collaboration, improving productivity and simplifying remote work by allowing seamless access to others’ screens.
- Safari and Passwords: Safari is now enhanced with improved performance and enhanced privacy features.
- PDFs and Notes: MacOS Sonoma additionally enables users to manage and annotate PDFs with ease, making it more practical for organizing and reviewing documents.
MacOS Sonoma-compatible Macs
- iMac: 2019 and later
- iMac Pro: 2017 and later
- Mac mini: 2018 and later
- MacBook Air: 2018 and later
- MacBook Pro: 2018 and later
- Mac Pro: 2019 and later
Install macOS Sonoma on VMware on Windows 10/11
- Download and install the Required files.
- Enable Visualization on Windows 10 and 11.
- Download and Install VMware Workstation Pro 7.
- Unlock VMware to install macOS Sonoma on Windows.
- Create and customize the macOS Sonoma Virtual machine.
- Edit the macOS Sonoma VMX file.
Step 1: Download the Required Files
To install macOS Sonoma on VMware, you will need to download some prerequisites, and below is the link to do so.
Step 2. Enable Visualization on Windows PC
Windows Visualization is a technology that allows multiple virtual operating systems to run on the same physical computer. It enables software isolation and testing, as well as creating secure sandboxes for applications and optimising resource usage. This virtualization allows users to explore different environments within the confines of a single machine, increasing flexibility and efficiency.
Click on the link below to enable virtualization on your Windows.
Enable Virtualization on your Windows 10/11
Step 3. Download and Install VMware Workstation on your PC
To install OS X Sonoma on Windows, you must download and install VMware Workstation Pro or Player on your Windows PC or laptop. Once you have successfully installed VMware Workstation, you can create a virtual machine and allocate the necessary resources to run macOS Sonoma. Click on the link provided below.
Download and Install VMware Workstation Pro/Player on your Windows PC
If you already have VMware Workstation, you don’t need to download it again.
Step 4. Unlock VMware to install macOS Sonoma on Windows
Step 1. To begin, make sure VMware Workstation is closed. To do so, go to “File” and select Exit.”
Step 2. When finished downloading the VMware Unlocker, open it and “Extract All.”
Step 3. Then, right-click on “win-install. cmd” and select “Run as Administrator.”
Step 5. Create and maintain a VM for macOS Sonoma
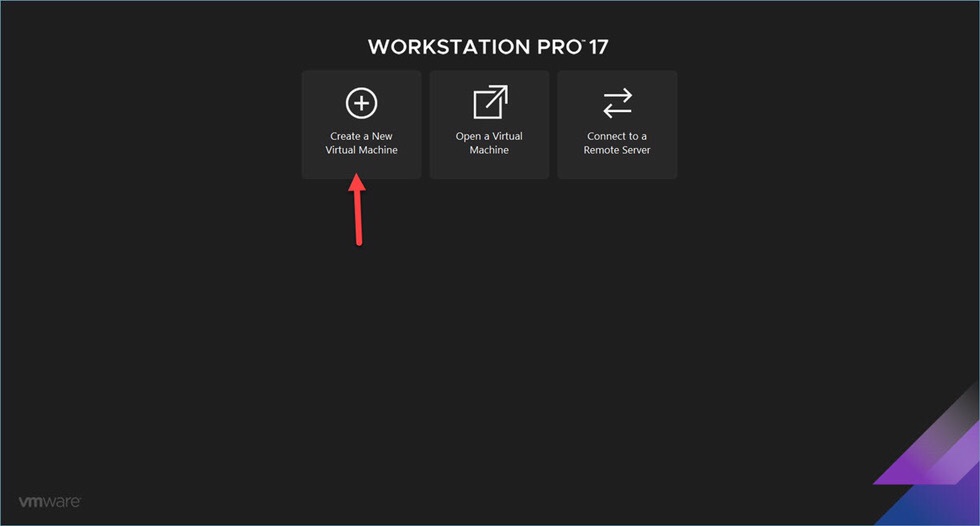
Step 1. Open the “VMware Workstation” and click on “Create a New Virtual Machine.”
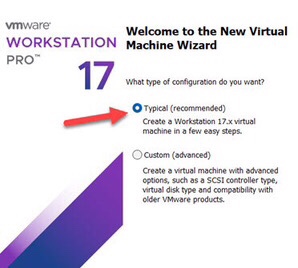
Step 2. Next, click on “Typical (Recommended)” and tap on “Next” to continue.
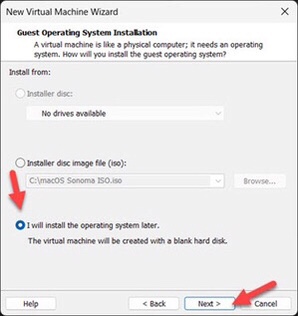
Step 3. Now check the “I will install the operating system later” option and tap “Next.”
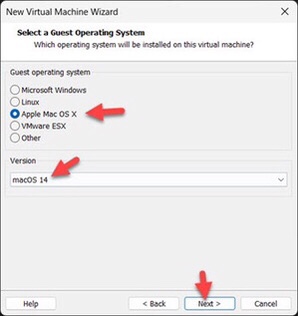
Step 4. Here, select “Apple Mac OX” and then “macOS 14” from the drop-down list and tap “Next.”
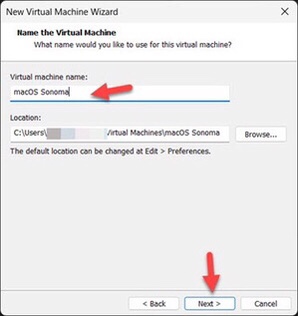
Step 5. Now give your “VM” a name like macOS Sonoma or macOS 14 and tap “Next.”
Step 6. Select the “Disk Size” mostly recommended as “80GB”. then check “Store virtual disk as a single file” and click “Next.”

Step 7. Next, tap on “Customize Hardware.”

Step 8: Increase the “Memory” to “4GB-8GB” for better performance.
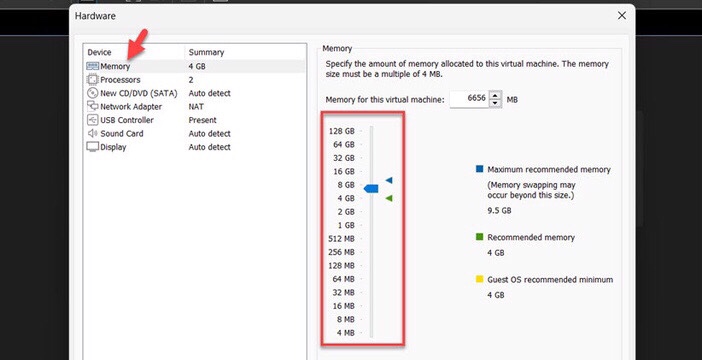
Step 9. Now increase the “CPU Processor” from the “Processors” menu.

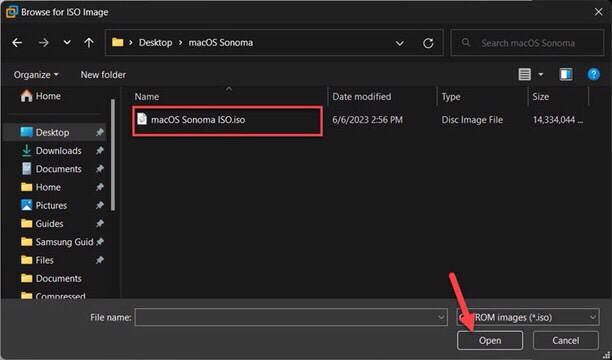
Step 10. Here select “New CD/DVD (SATA),” then check “Use ISO image file” and “Browse.”
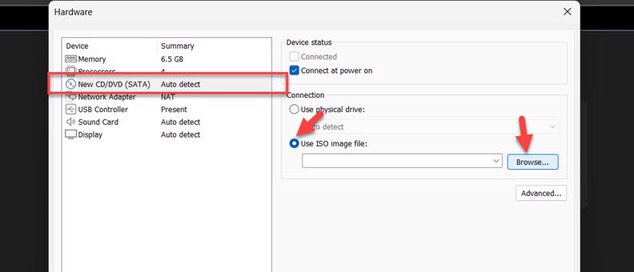
Step 11. Tap on the macOS Sonoma ISO File and tap “Open.”
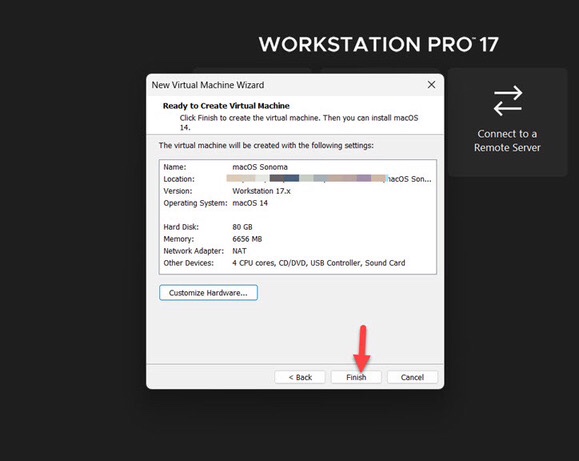
Step 12. Then tap on the “Close” option to save the changes.
Step 13. And finally, tap on “Finish.”
Step 6. Edit the macOS Sonoma VMX File
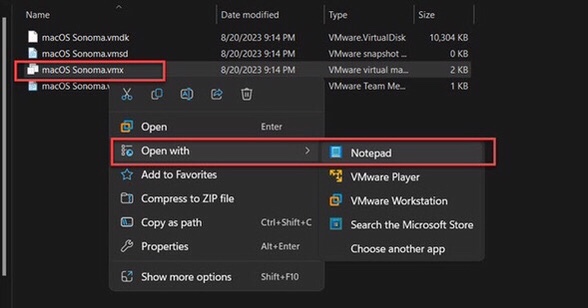
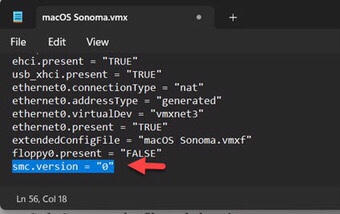
Step 1. To begin, right-click on “macOS Sonoma.vmx” and select “Notepad.”
Step 2.
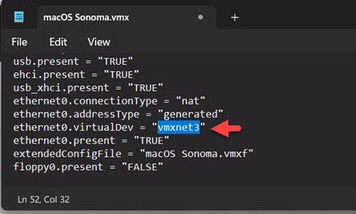
Step 3. Now add this code (smc.version = “0”) at the bottom of the text.
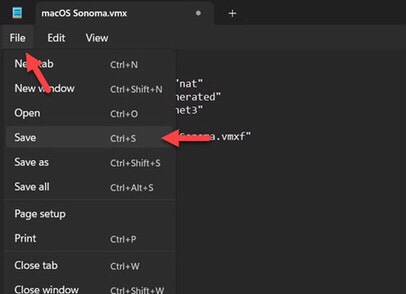
Step 3. And finally, navigate to “File” and select “Save” or “Ctrl+S” to save the changes.
Step 7. Install macOS Sonoma on VMware on Windows 10/11
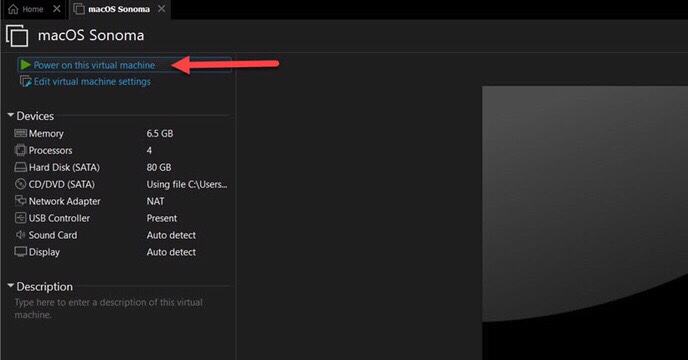
Step 1. Open VMware, then select “Power on this Virtual Machine.”
Step 2. Now choose your preferred “language.”
Step 3. Then tap on “Disk Utility” and tap “Continue.”
Step 4. Choose “VMware Virtual SATA Hard Drive Media” and tap the “Erase” button.
Step 5. Now select the following and click “Erase” after selecting.
- Name: macOS Sonoma
- Format: mac OS Extended (Journaled)
- Scheme: GUID Partition Map
Step 6. Next, click “Done.”
Step 7. Tap on “Quit Disk Utility” from the “Disk Utility” menu.
Step 8. Then tap on “Install macOS 14 Beta” and tap “Continue” twice.
Step 9. Now, to agree with all the “Terms and Conditions,” tap on the “Agree” button twice.
Step 10. Its downloading will take up to 40 to 60 minutes. but it will be finished after 2-3 restarts.
Final Words
Once the download is complete, you can sit back and relax as the installation process takes place. Just make sure to follow any prompts or instructions that may appear on your screen. Once everything is finished, you’ll be ready to explore all the new features and improvements of macOS Sonoma. Finally, if you have any questions, feel free to share them with us in the comments section below.
Read also: